Develop centralized APIs using Azure API Management and YugabyteDB
Azure API Management (APIM) can be used to design, manage, and protect your APIs. This service acts as a centralized hub for your APIs, providing API gateway functionality, security measures, rate limiting, analytics, and monitoring, among other features.
In this tutorial, we'll walk through the steps required to develop and deploy an API using Azure API Management with Node.js and YugabyteDB Aeon. It covers the deployment of a geo-partitioned YugabyteDB cluster, the development of Azure Functions for database queries, and the creation of an API using Azure API Management.
In the following sections, you will:
- Deploy and configure a geo-partitioned YugabyteDB cluster.
- Develop and provision an Azure Function to connect to and query our database in a specific region.
- Create an Azure API Management instance to design an API with an Azure Function backend.
Prerequisites
- A YugabyteDB Aeon account. Sign up for a free trial.
- An Azure Cloud account with permission to create services.
Create a YugabyteDB cluster
Begin by deploying a multi-region, geo-partitioned cluster in YugabyteDB. This will partition data by region, reducing latencies by fetching data from the closest cluster nodes.
-
A VPC is required for each region when deploying YugabyteDB on Azure. Create separate VPCs in the eastus, westus2, and westus3 regions.
-
Deploy a 3-node partition by region cluster running on Azure, with nodes in the eastus, westus2, and westus3 regions. Under Data Distribution, select Partition by region.
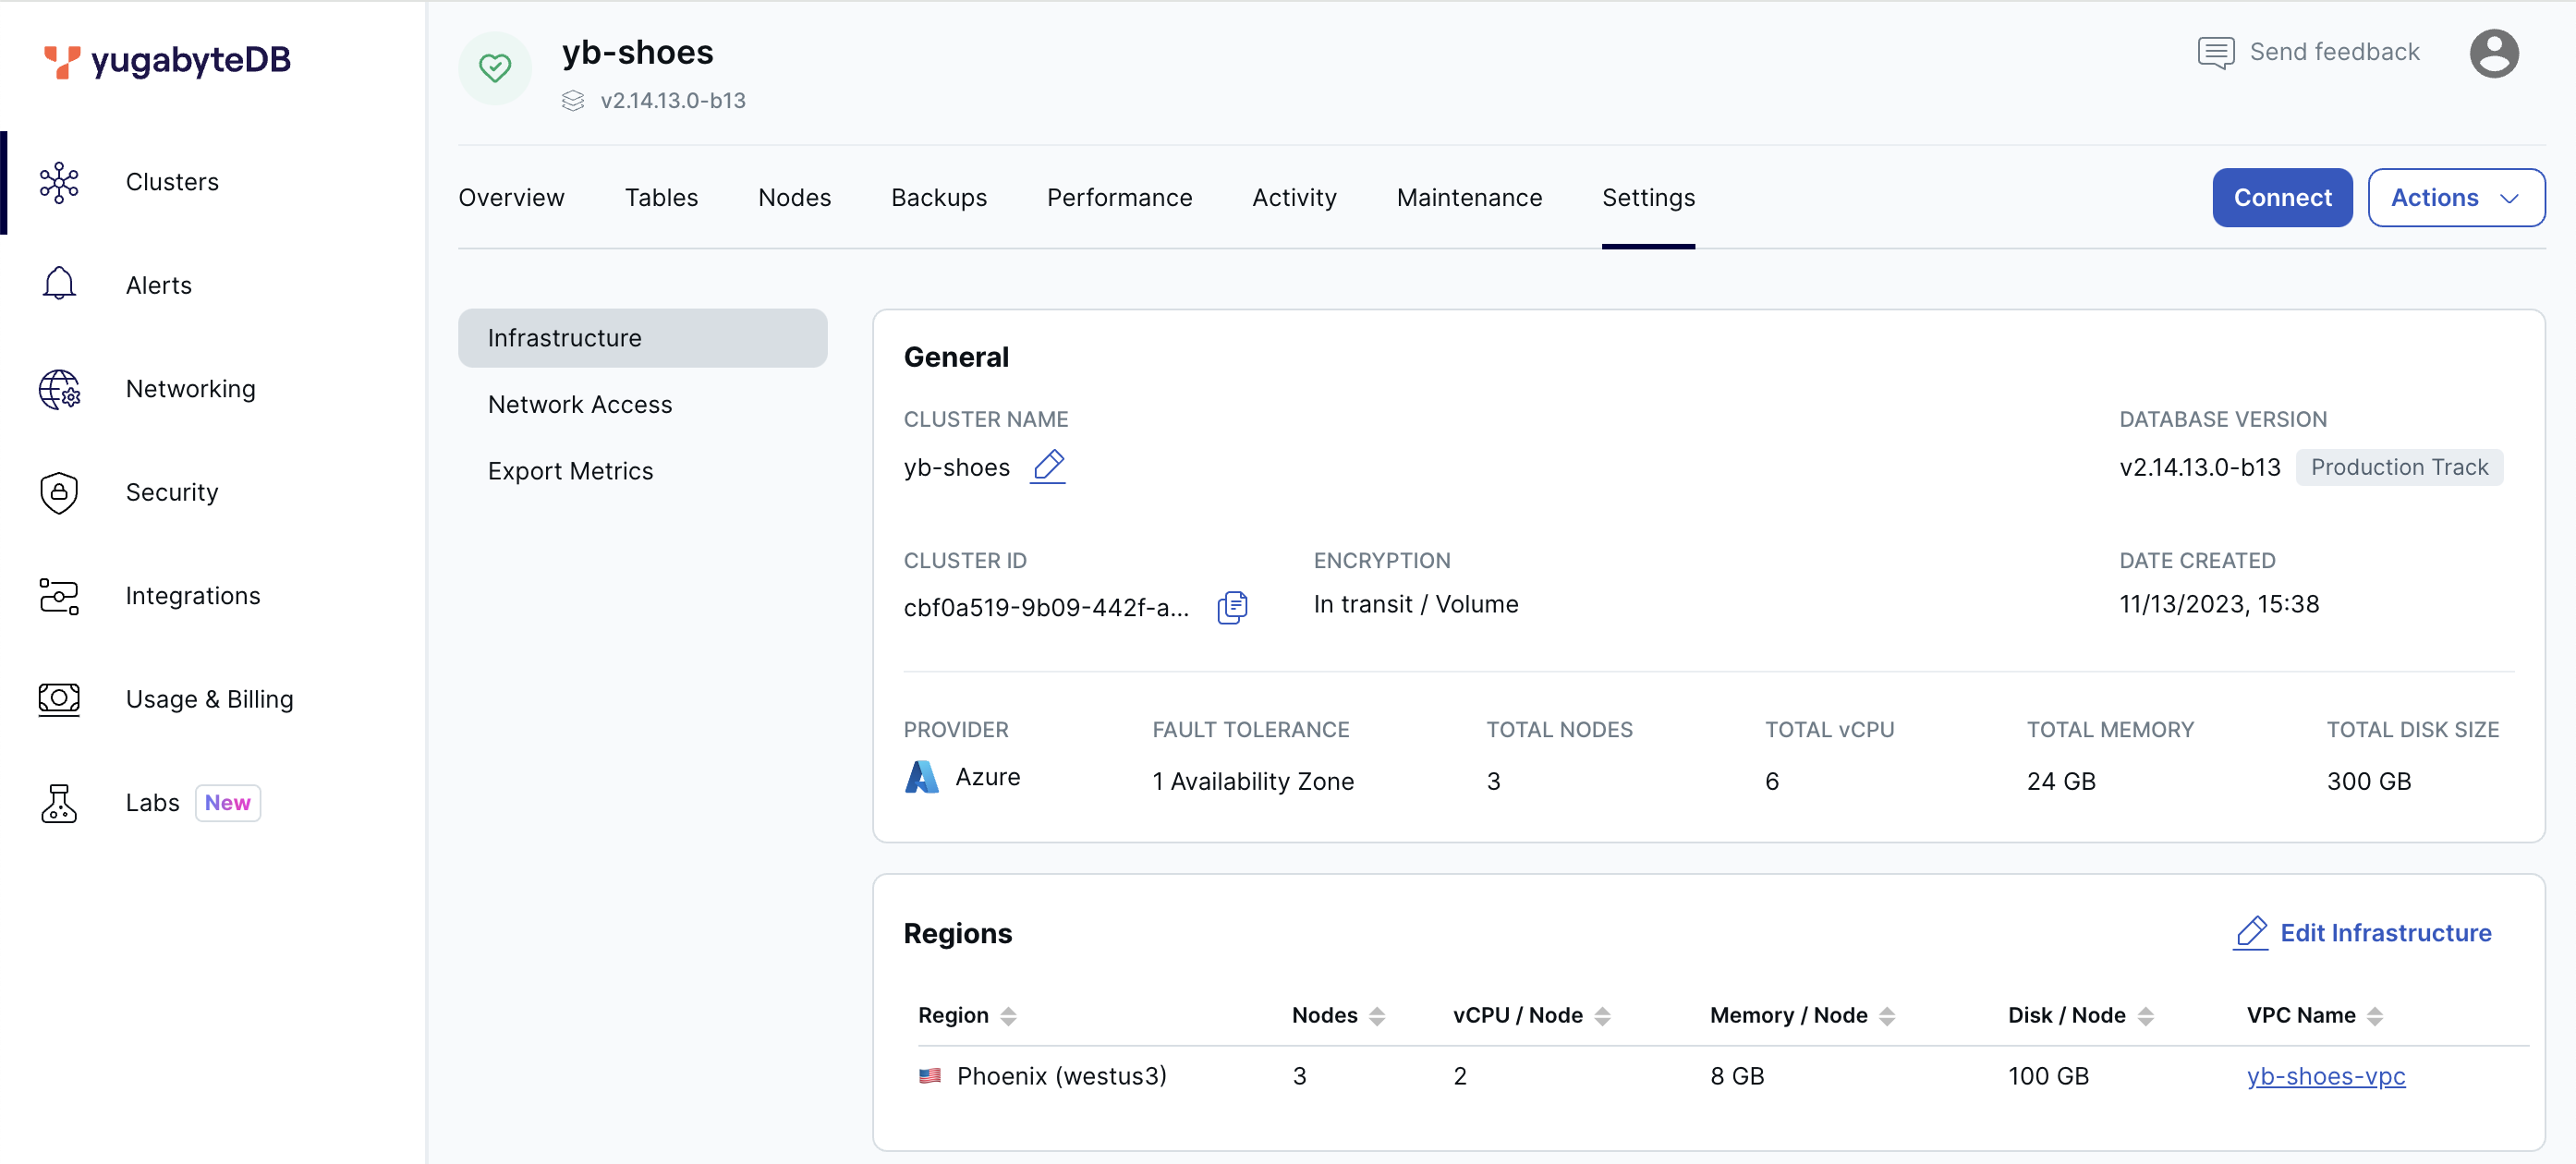
-
Enable public access on the cluster and add 0.0.0.0/0 to the cluster IP Allow List. This setup allows connections to the cluster from all IP addresses.
Note
In a production application, Azure Private Link can be used with private service endpoints to create a secure connection between your application and database VPCs. -
Upon creation, save the credentials and download the CA certificate once everything is up and running. This is essential for secure connections using the Node.js Smart Client.
Create tables and insert records
Connect to your YugabyteDB cluster running on Azure via the Cloud Shell and execute the following commands:
- Create the orders table and partition it by region.
- Create partition tables using the automatically created regional tablespaces.
- Seed the database with some orders. These records will be stored in the appropriate cluster node according to the supplied region.
Develop an Azure function
Follow the instructions in Develop Azure Functions with YugabyteDB to develop and deploy an Azure Function.
Update the function and its corresponding configuration by doing the following:
- Deploy the function to the uswest3 region.
- Use the YugabyteDB host provided for the westus3 region.
- Update the contents of the function to GET orders using a connection pool.
This function uses the supplied region route parameter to determine which database node it should connect to. It then queries the database for orders partitioned in this region.
Create an Azure API Management service
Create the service as follows:
-
Configure an Azure API Management (APIM) service instance in the westus3 region.
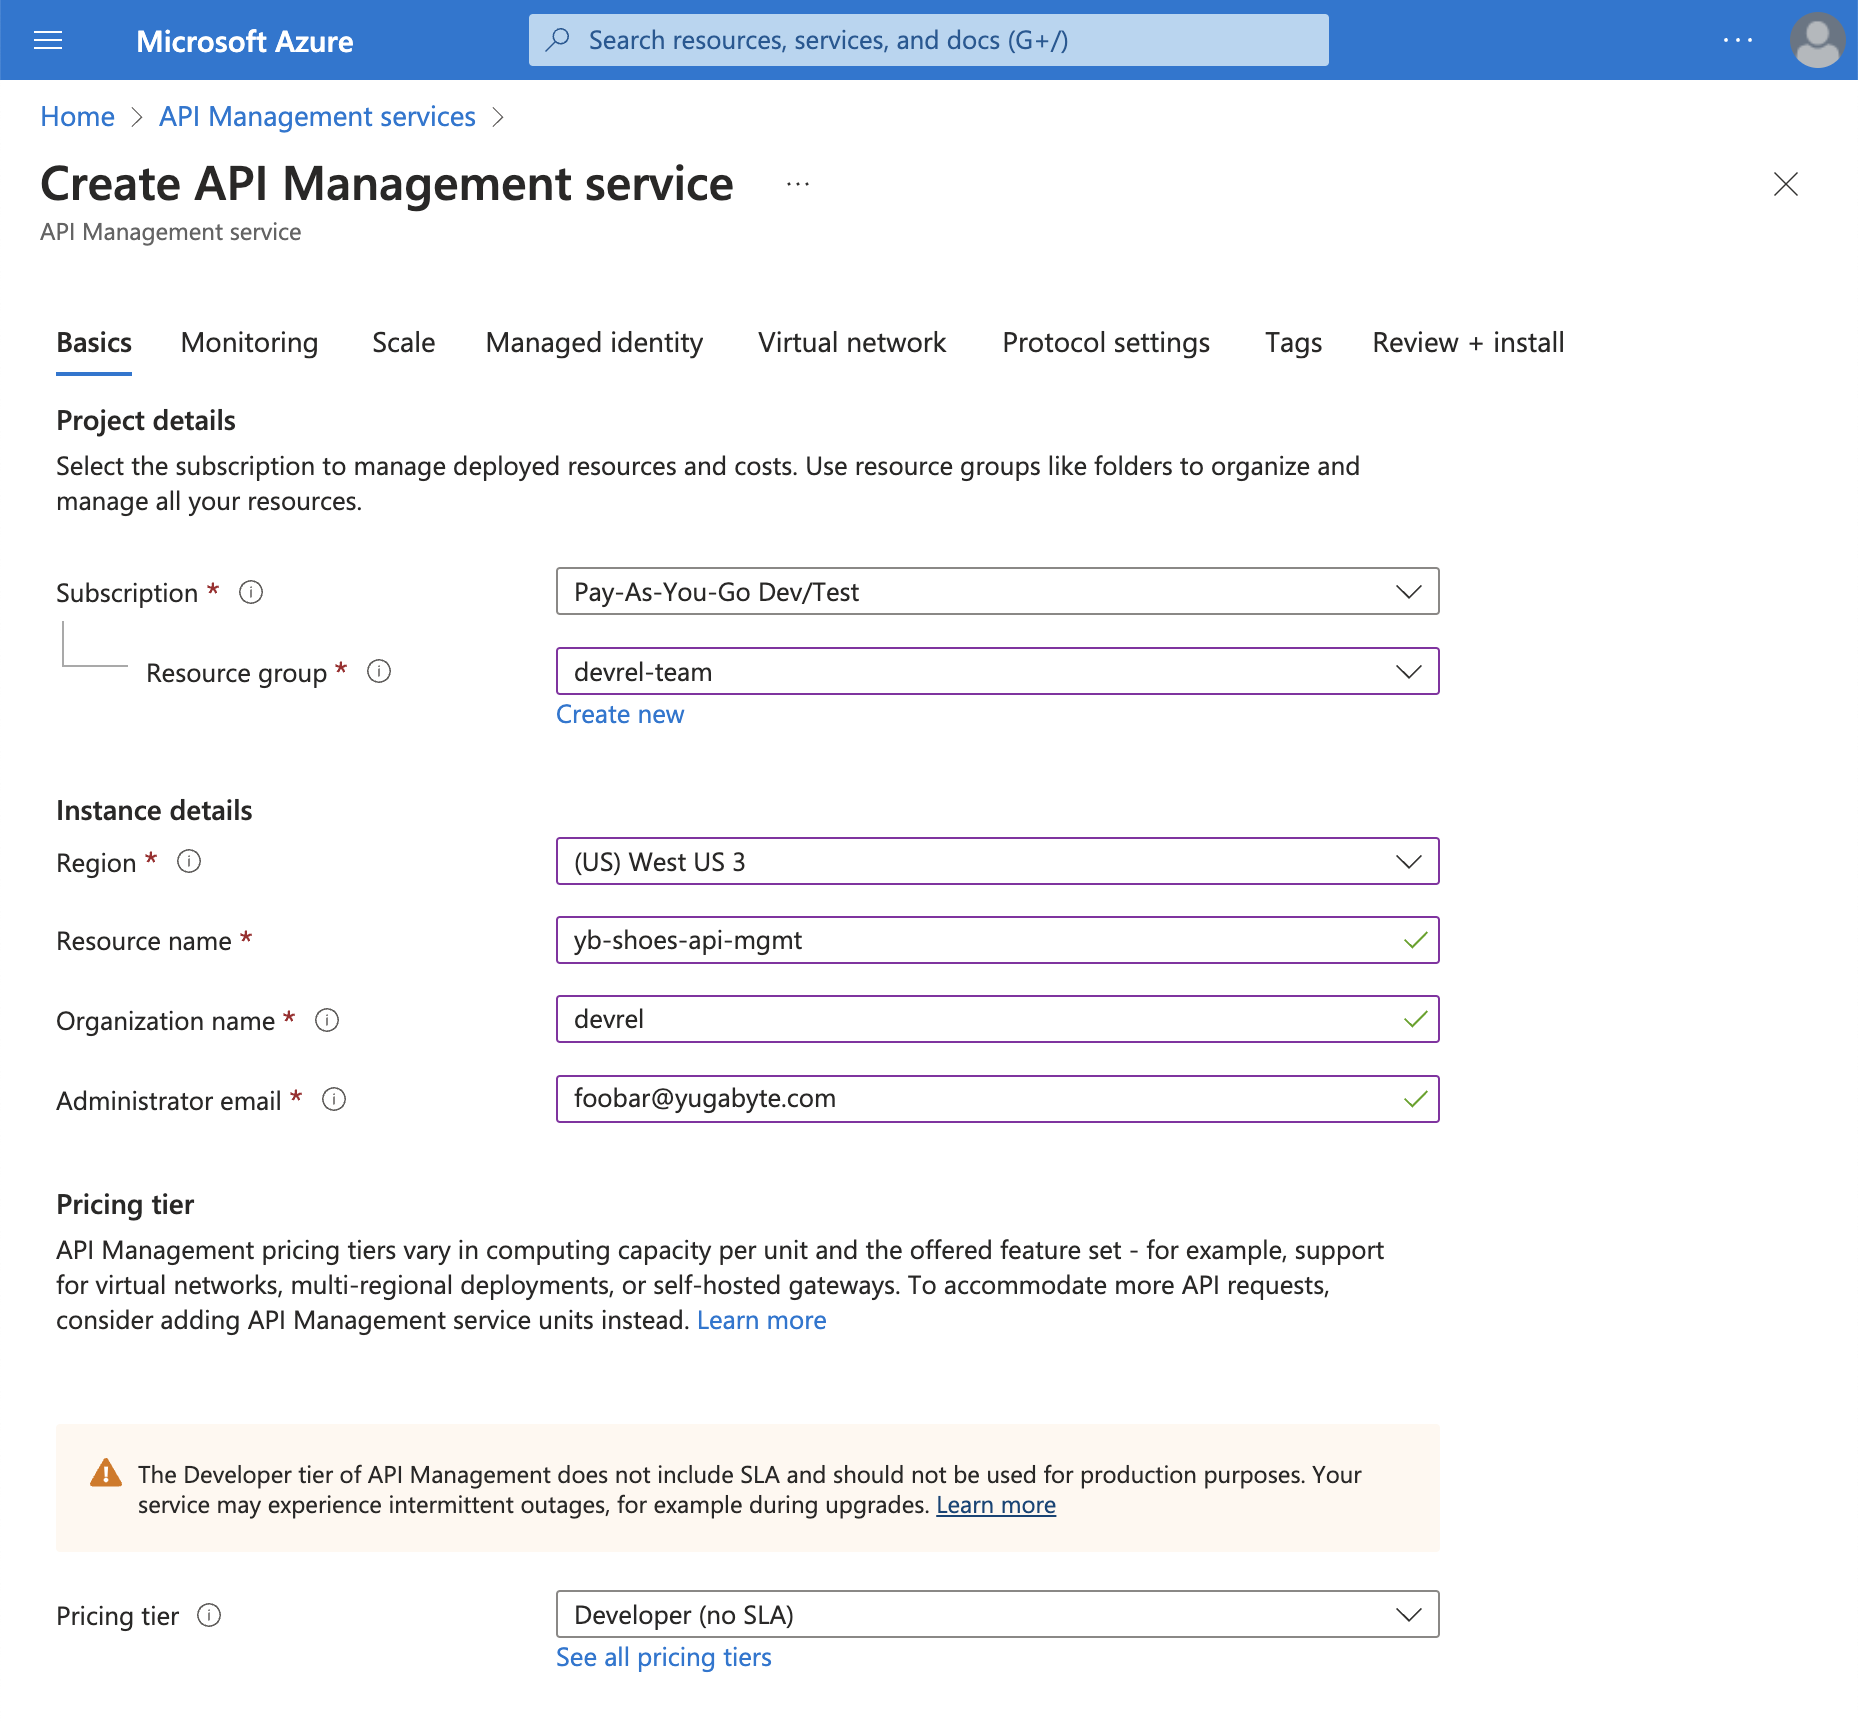
-
Add HTTP/2 as a client-side protocol so that you can communicate with the API Management service using HTTP.
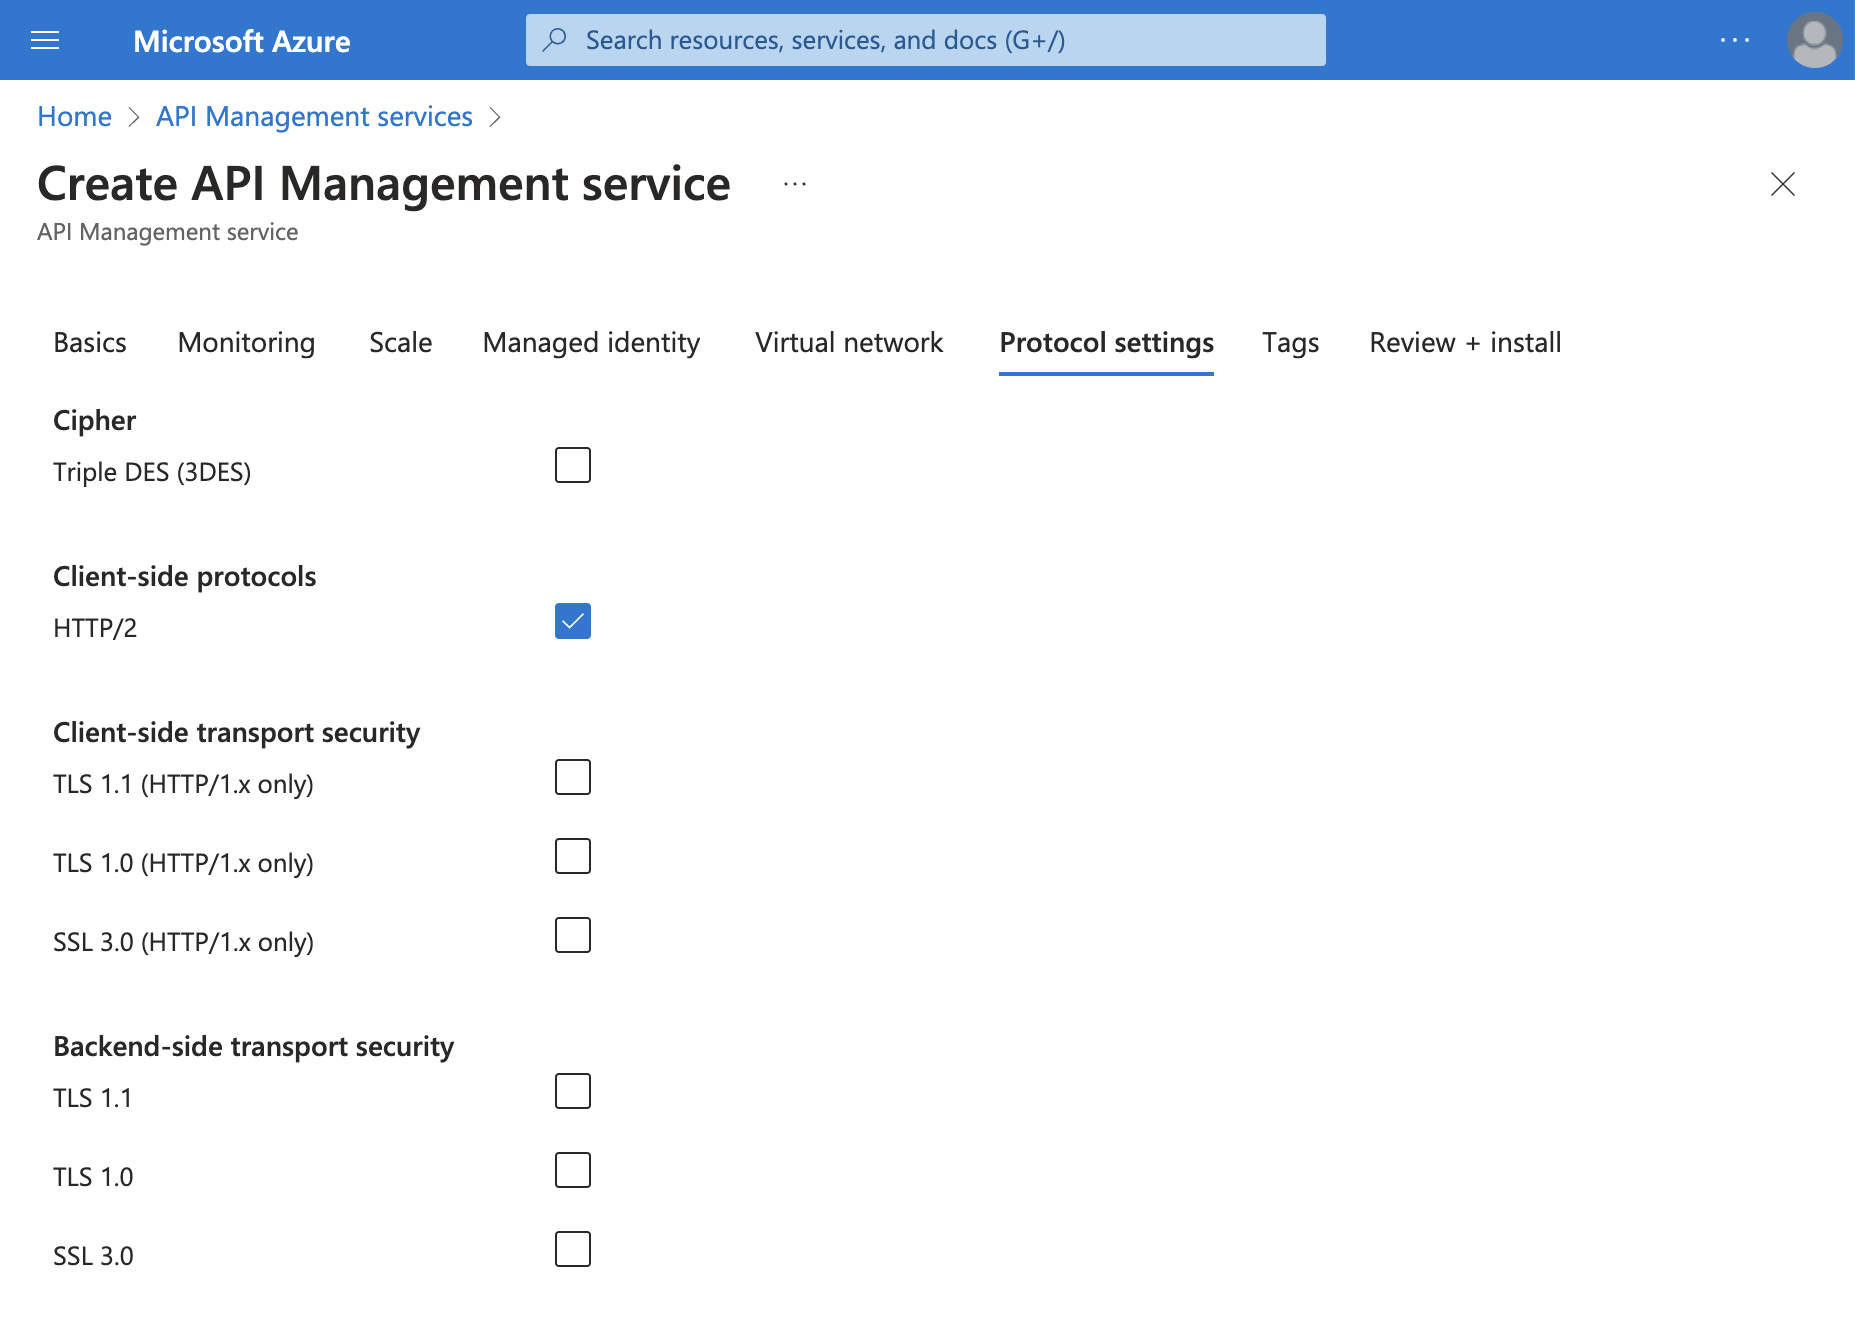
-
Review and install your APIM instance.
This can take around 15-30 minutes depending on Azure's resources.
Design a REST API in Azure
Azure's API Management service provides multiple options for API design. You can create an API from scratch, create or import an API definition, or create an API from an existing Azure resource.
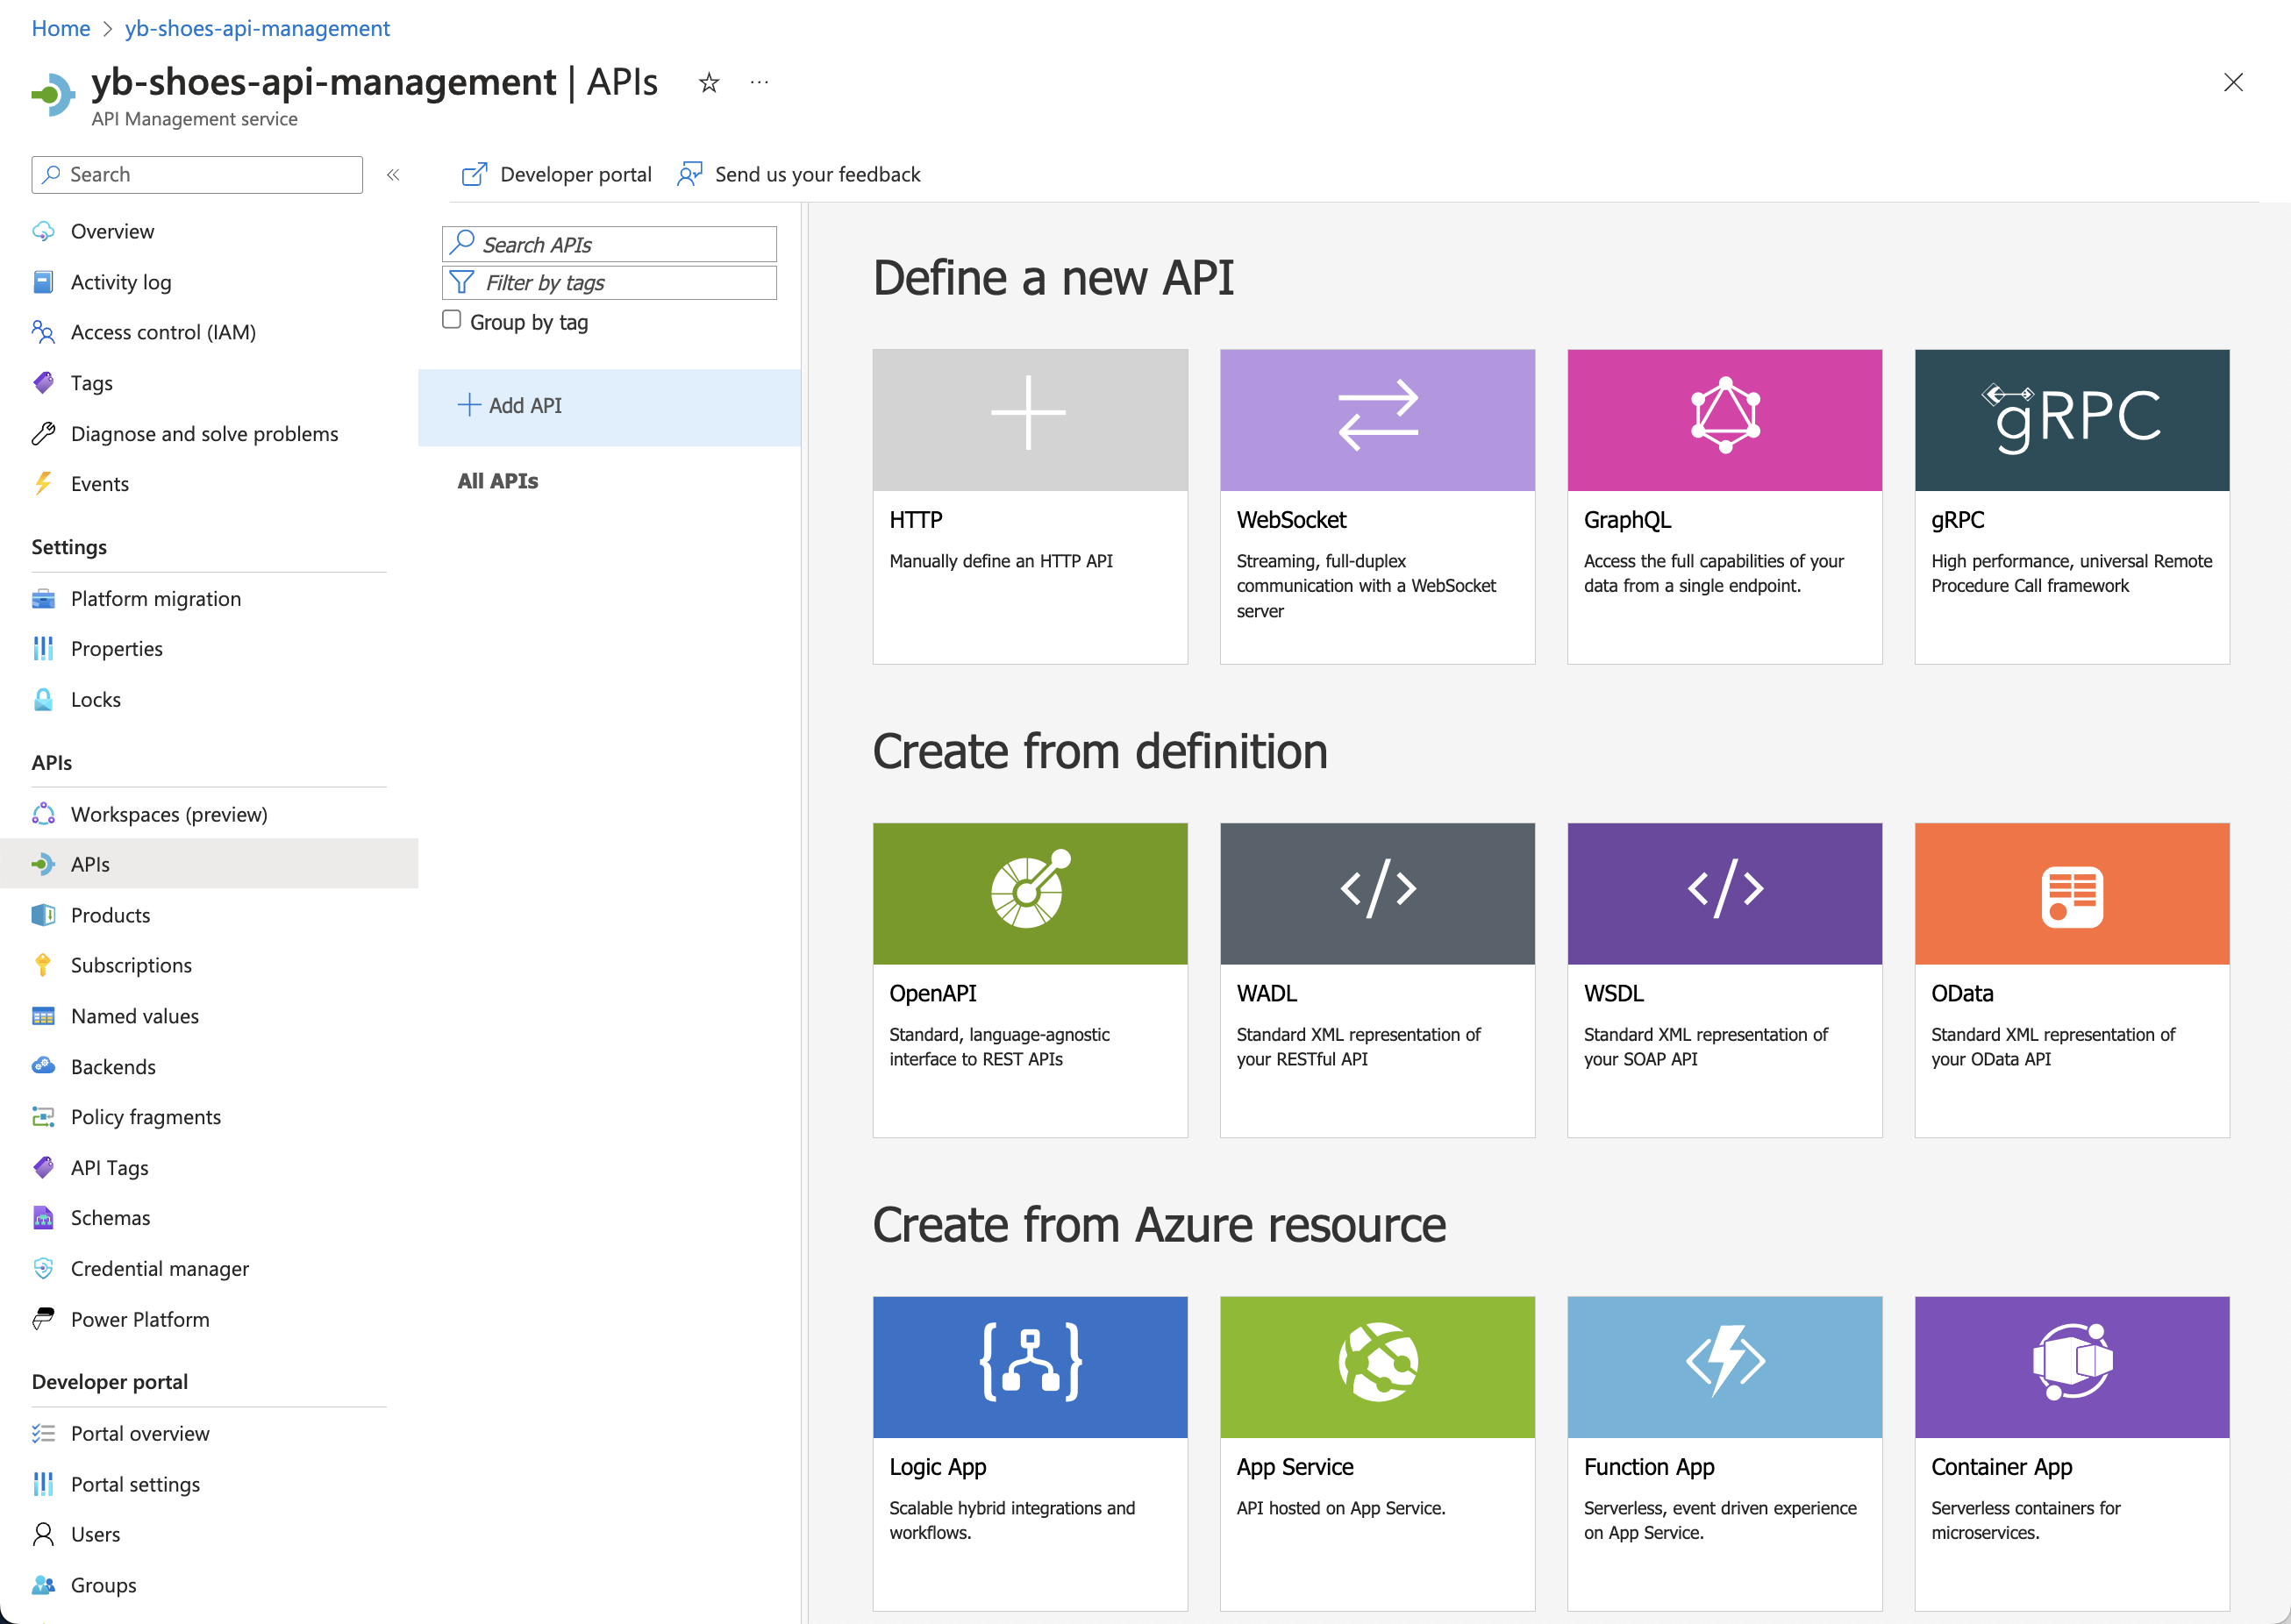
-
Select the Function App option in the Create from Azure resource section.
-
Browse for your Azure Function App and create the API in APIM.
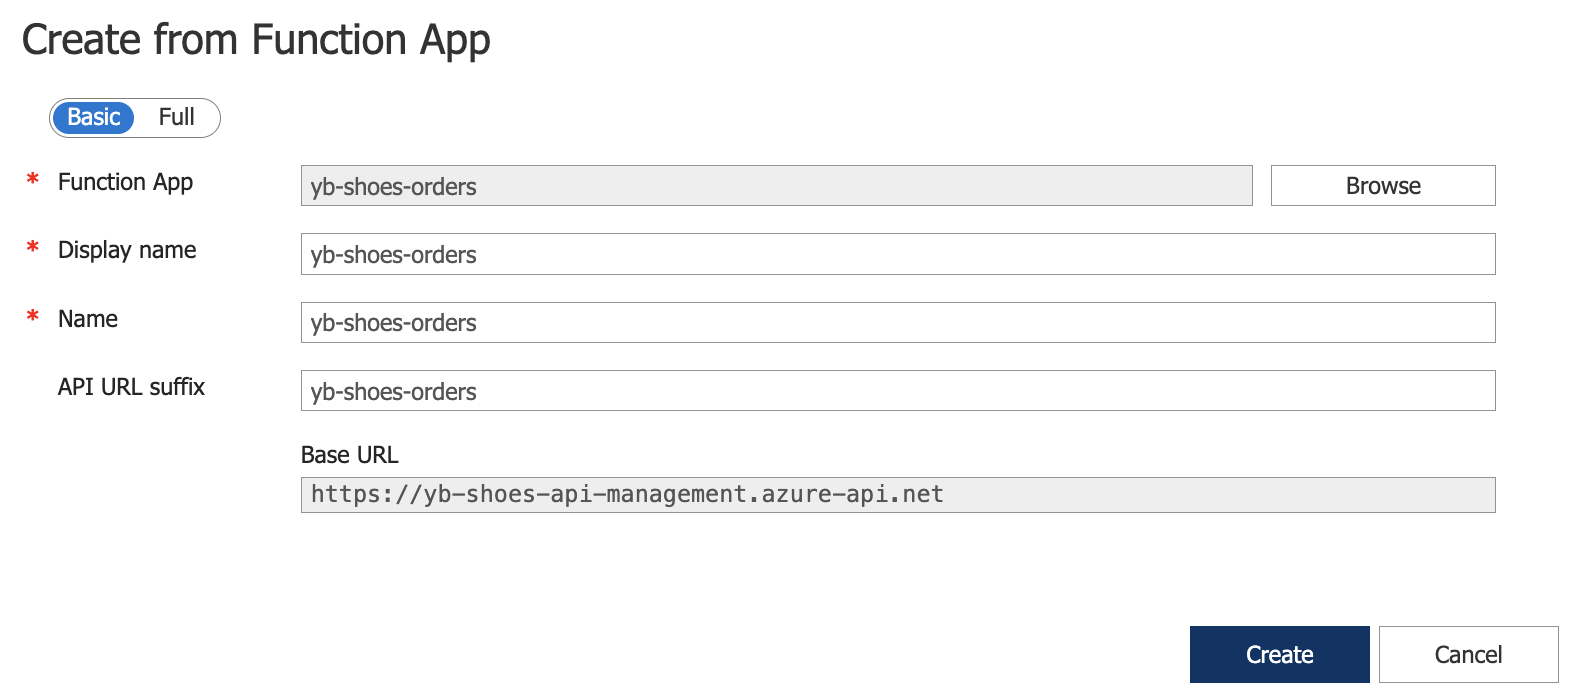
-
Review your API configuration.
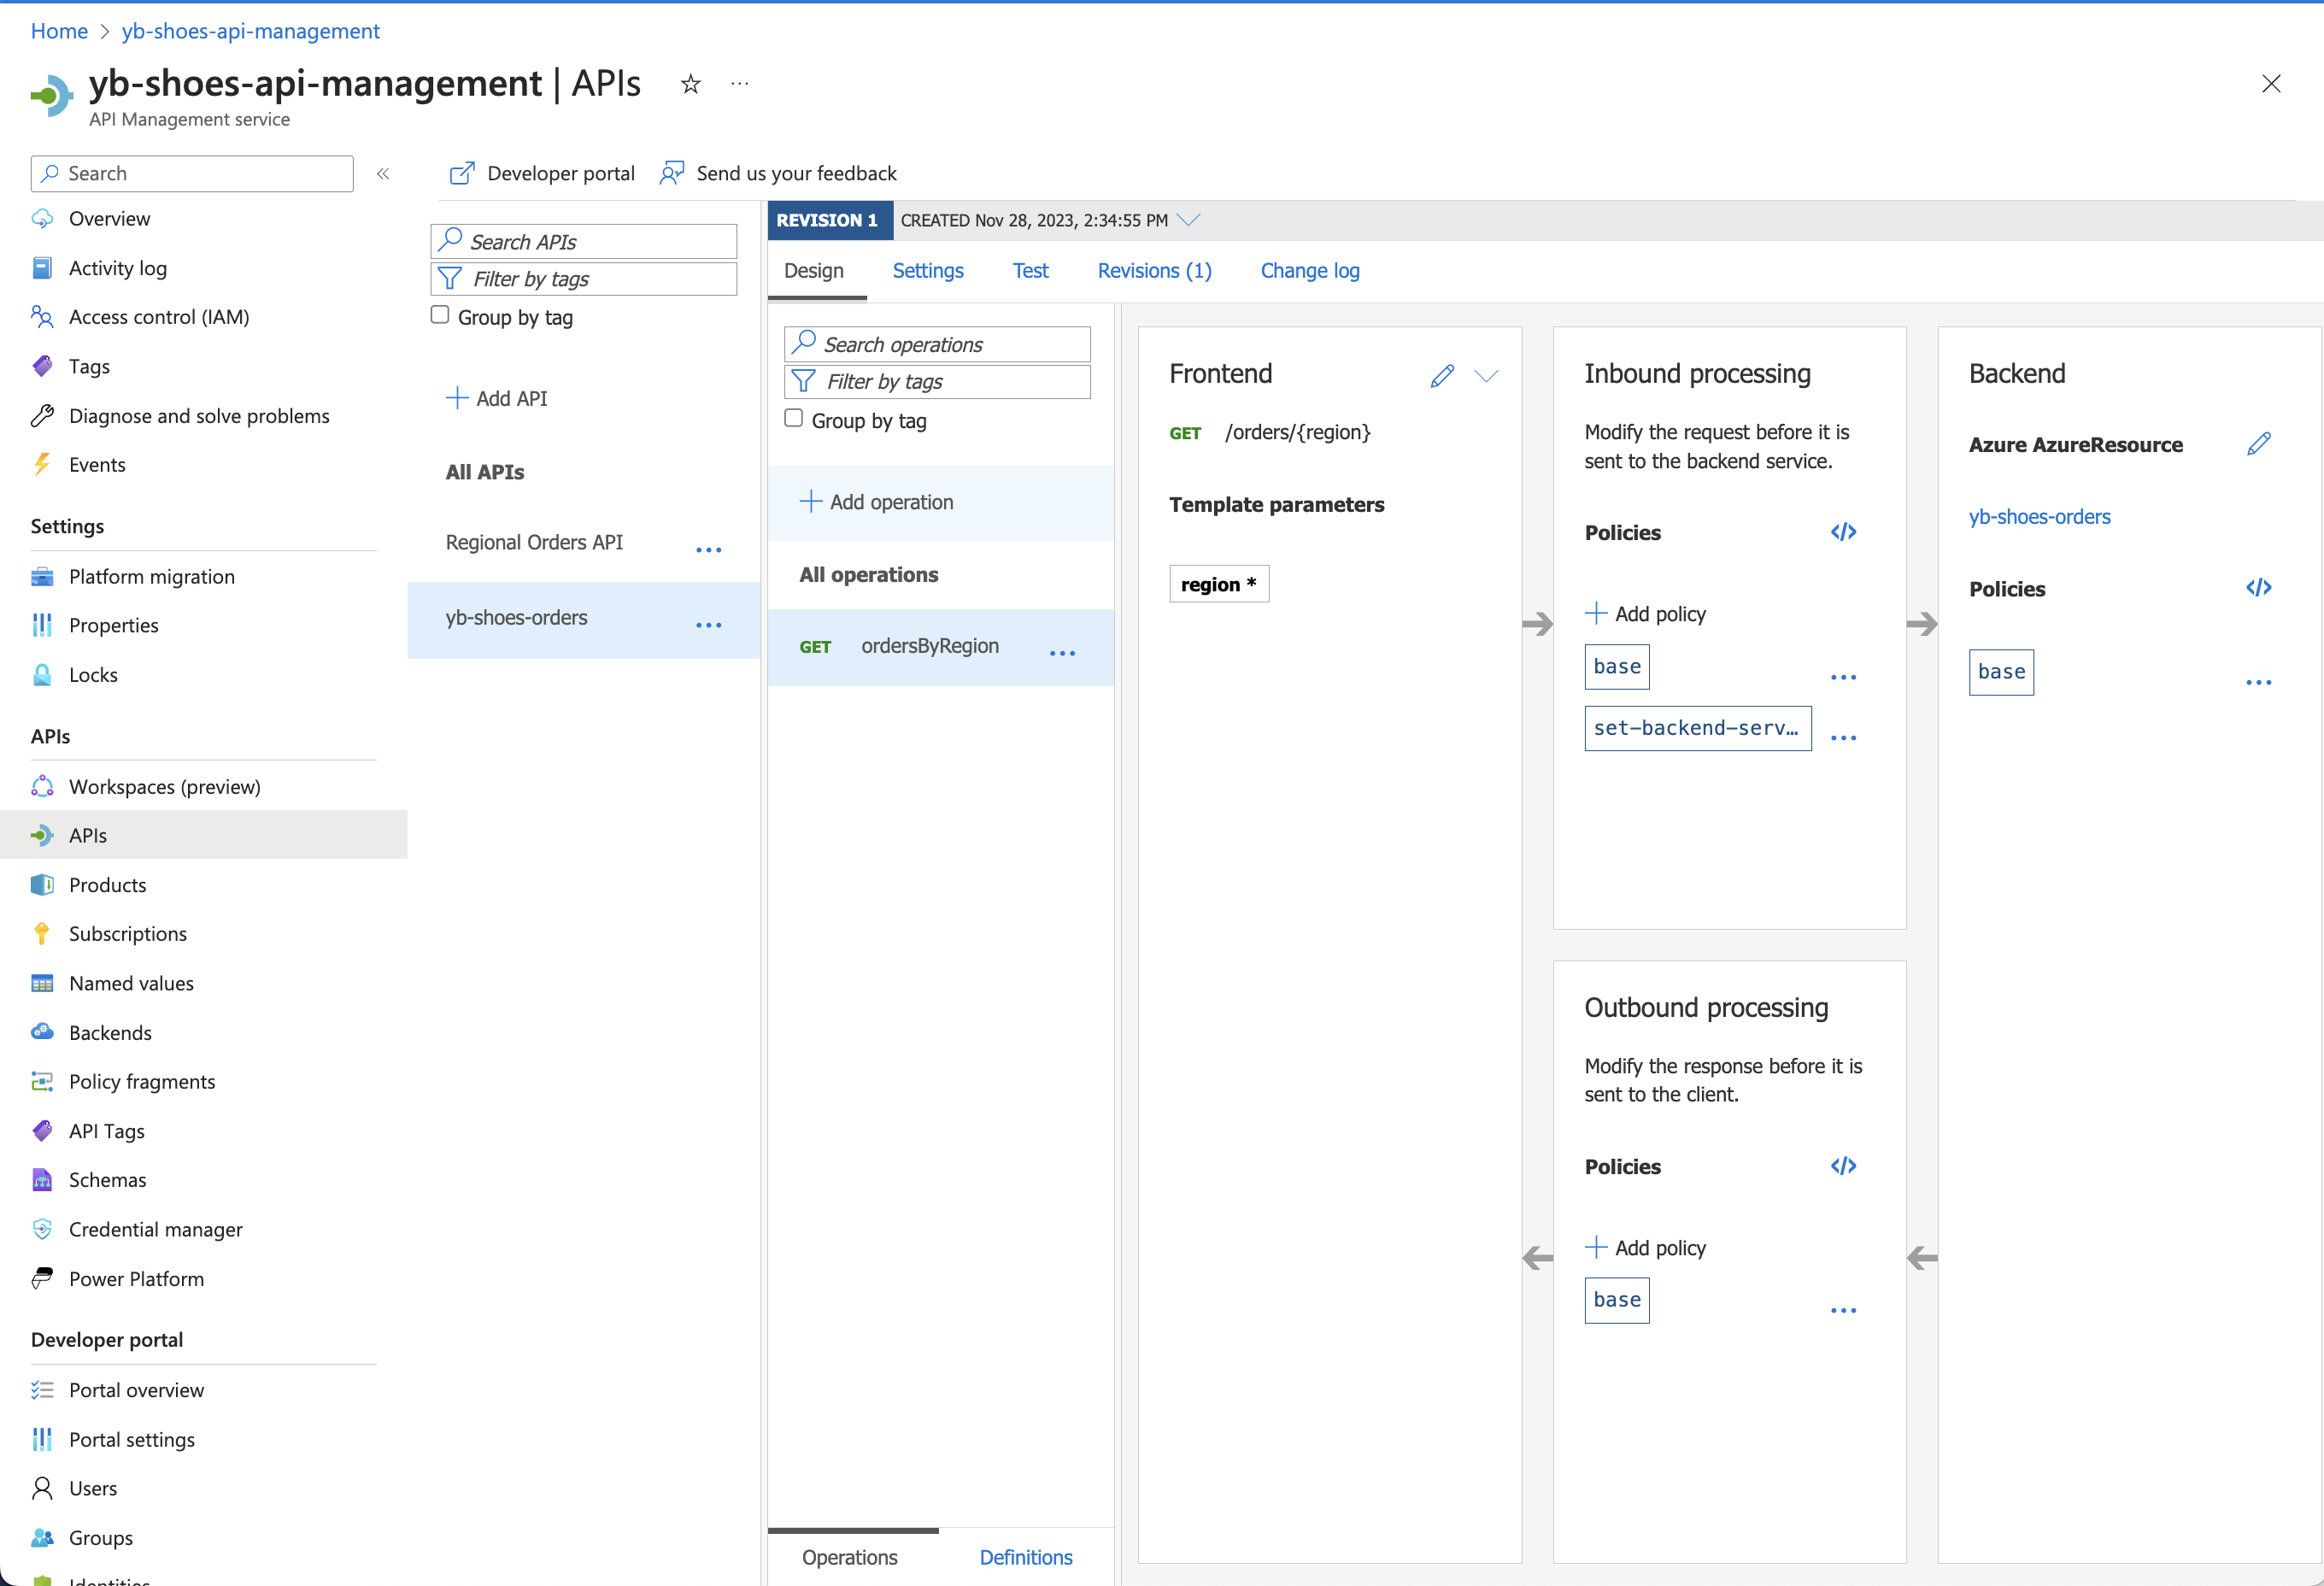
The inbound processing block defines policies to modify a request before it is sent to a backend service. This is where you can set permissions, rate-limiting, and a number of other security features. By default, a subscription key is required to access your APIM API.
Test the API
Azure's API Management Service provides a console for testing your APIs. Supply a value for the region parameters and send a request to verify that the endpoint returns successfully.
westus3
In the following case, the endpoint successfully returns order data from the database nodes in the westus3 region.
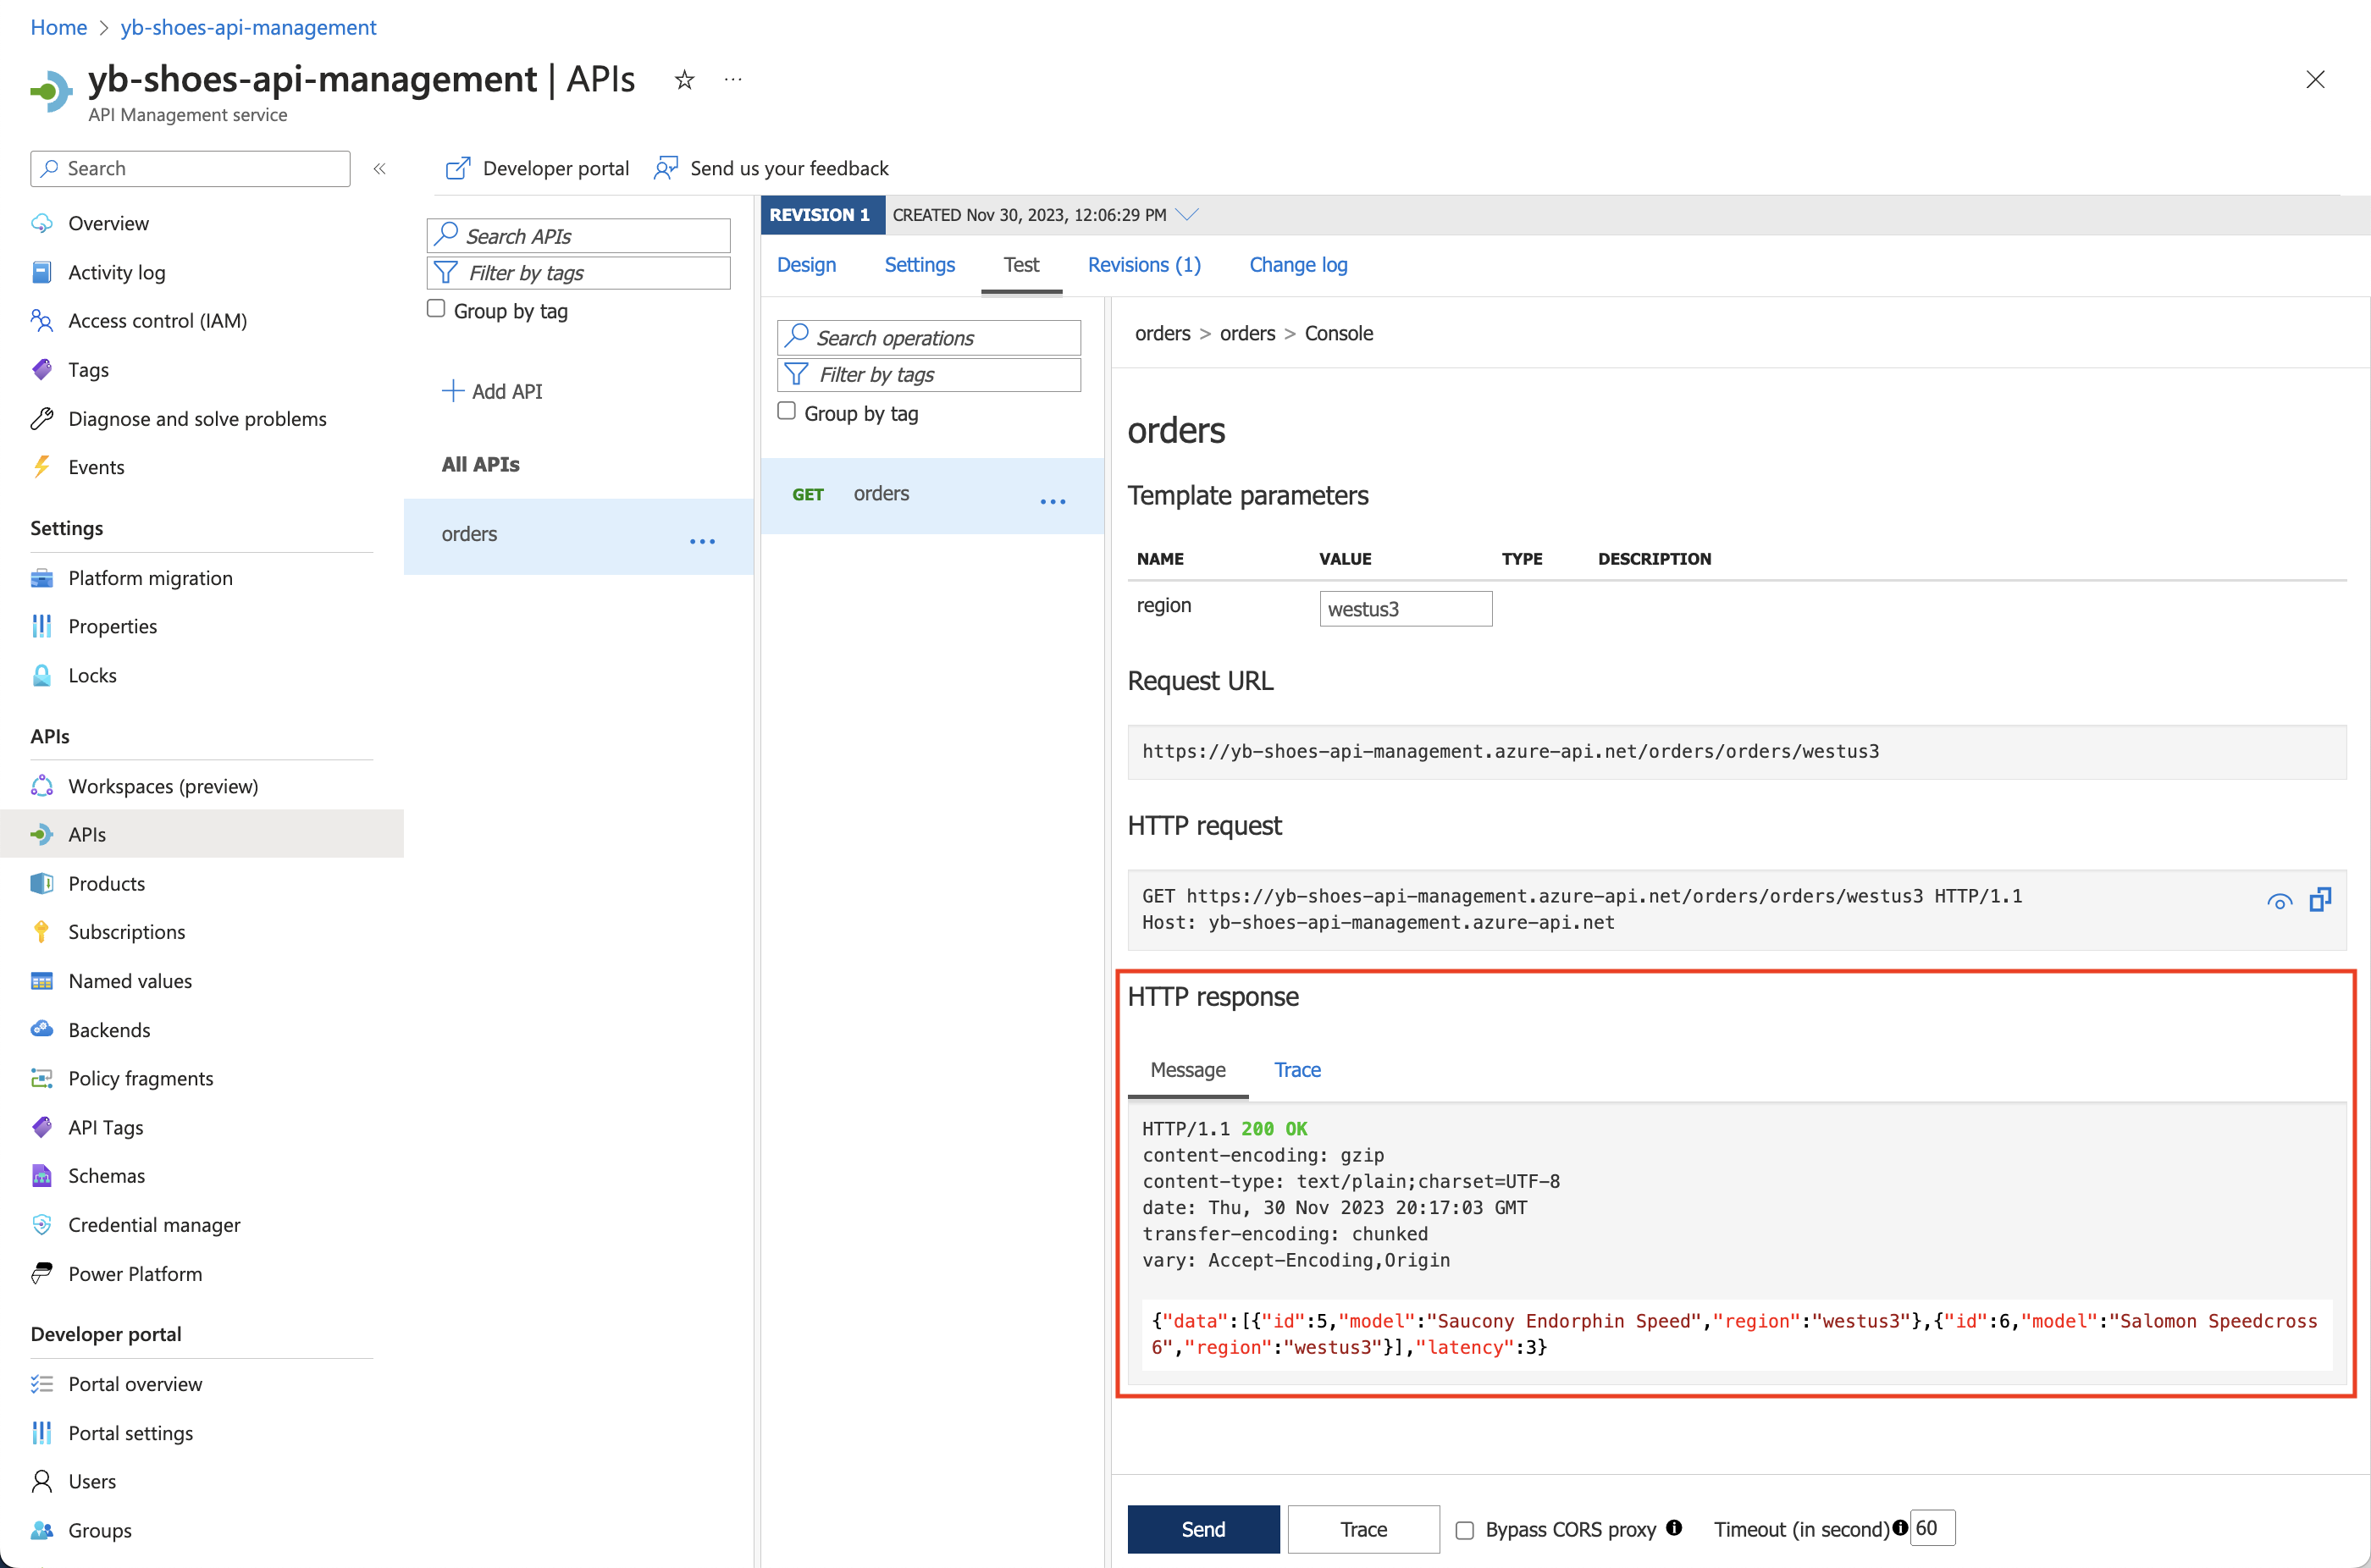
This endpoint returned in only 3 milliseconds (see the latency field in the response) because our Azure API Management instance, Azure Function App, and the YugabyteDB cluster node used for this connection all reside in the westus3 region.
Under the hood, this web console executes the following request, using your subscription key for authentication.
eastus
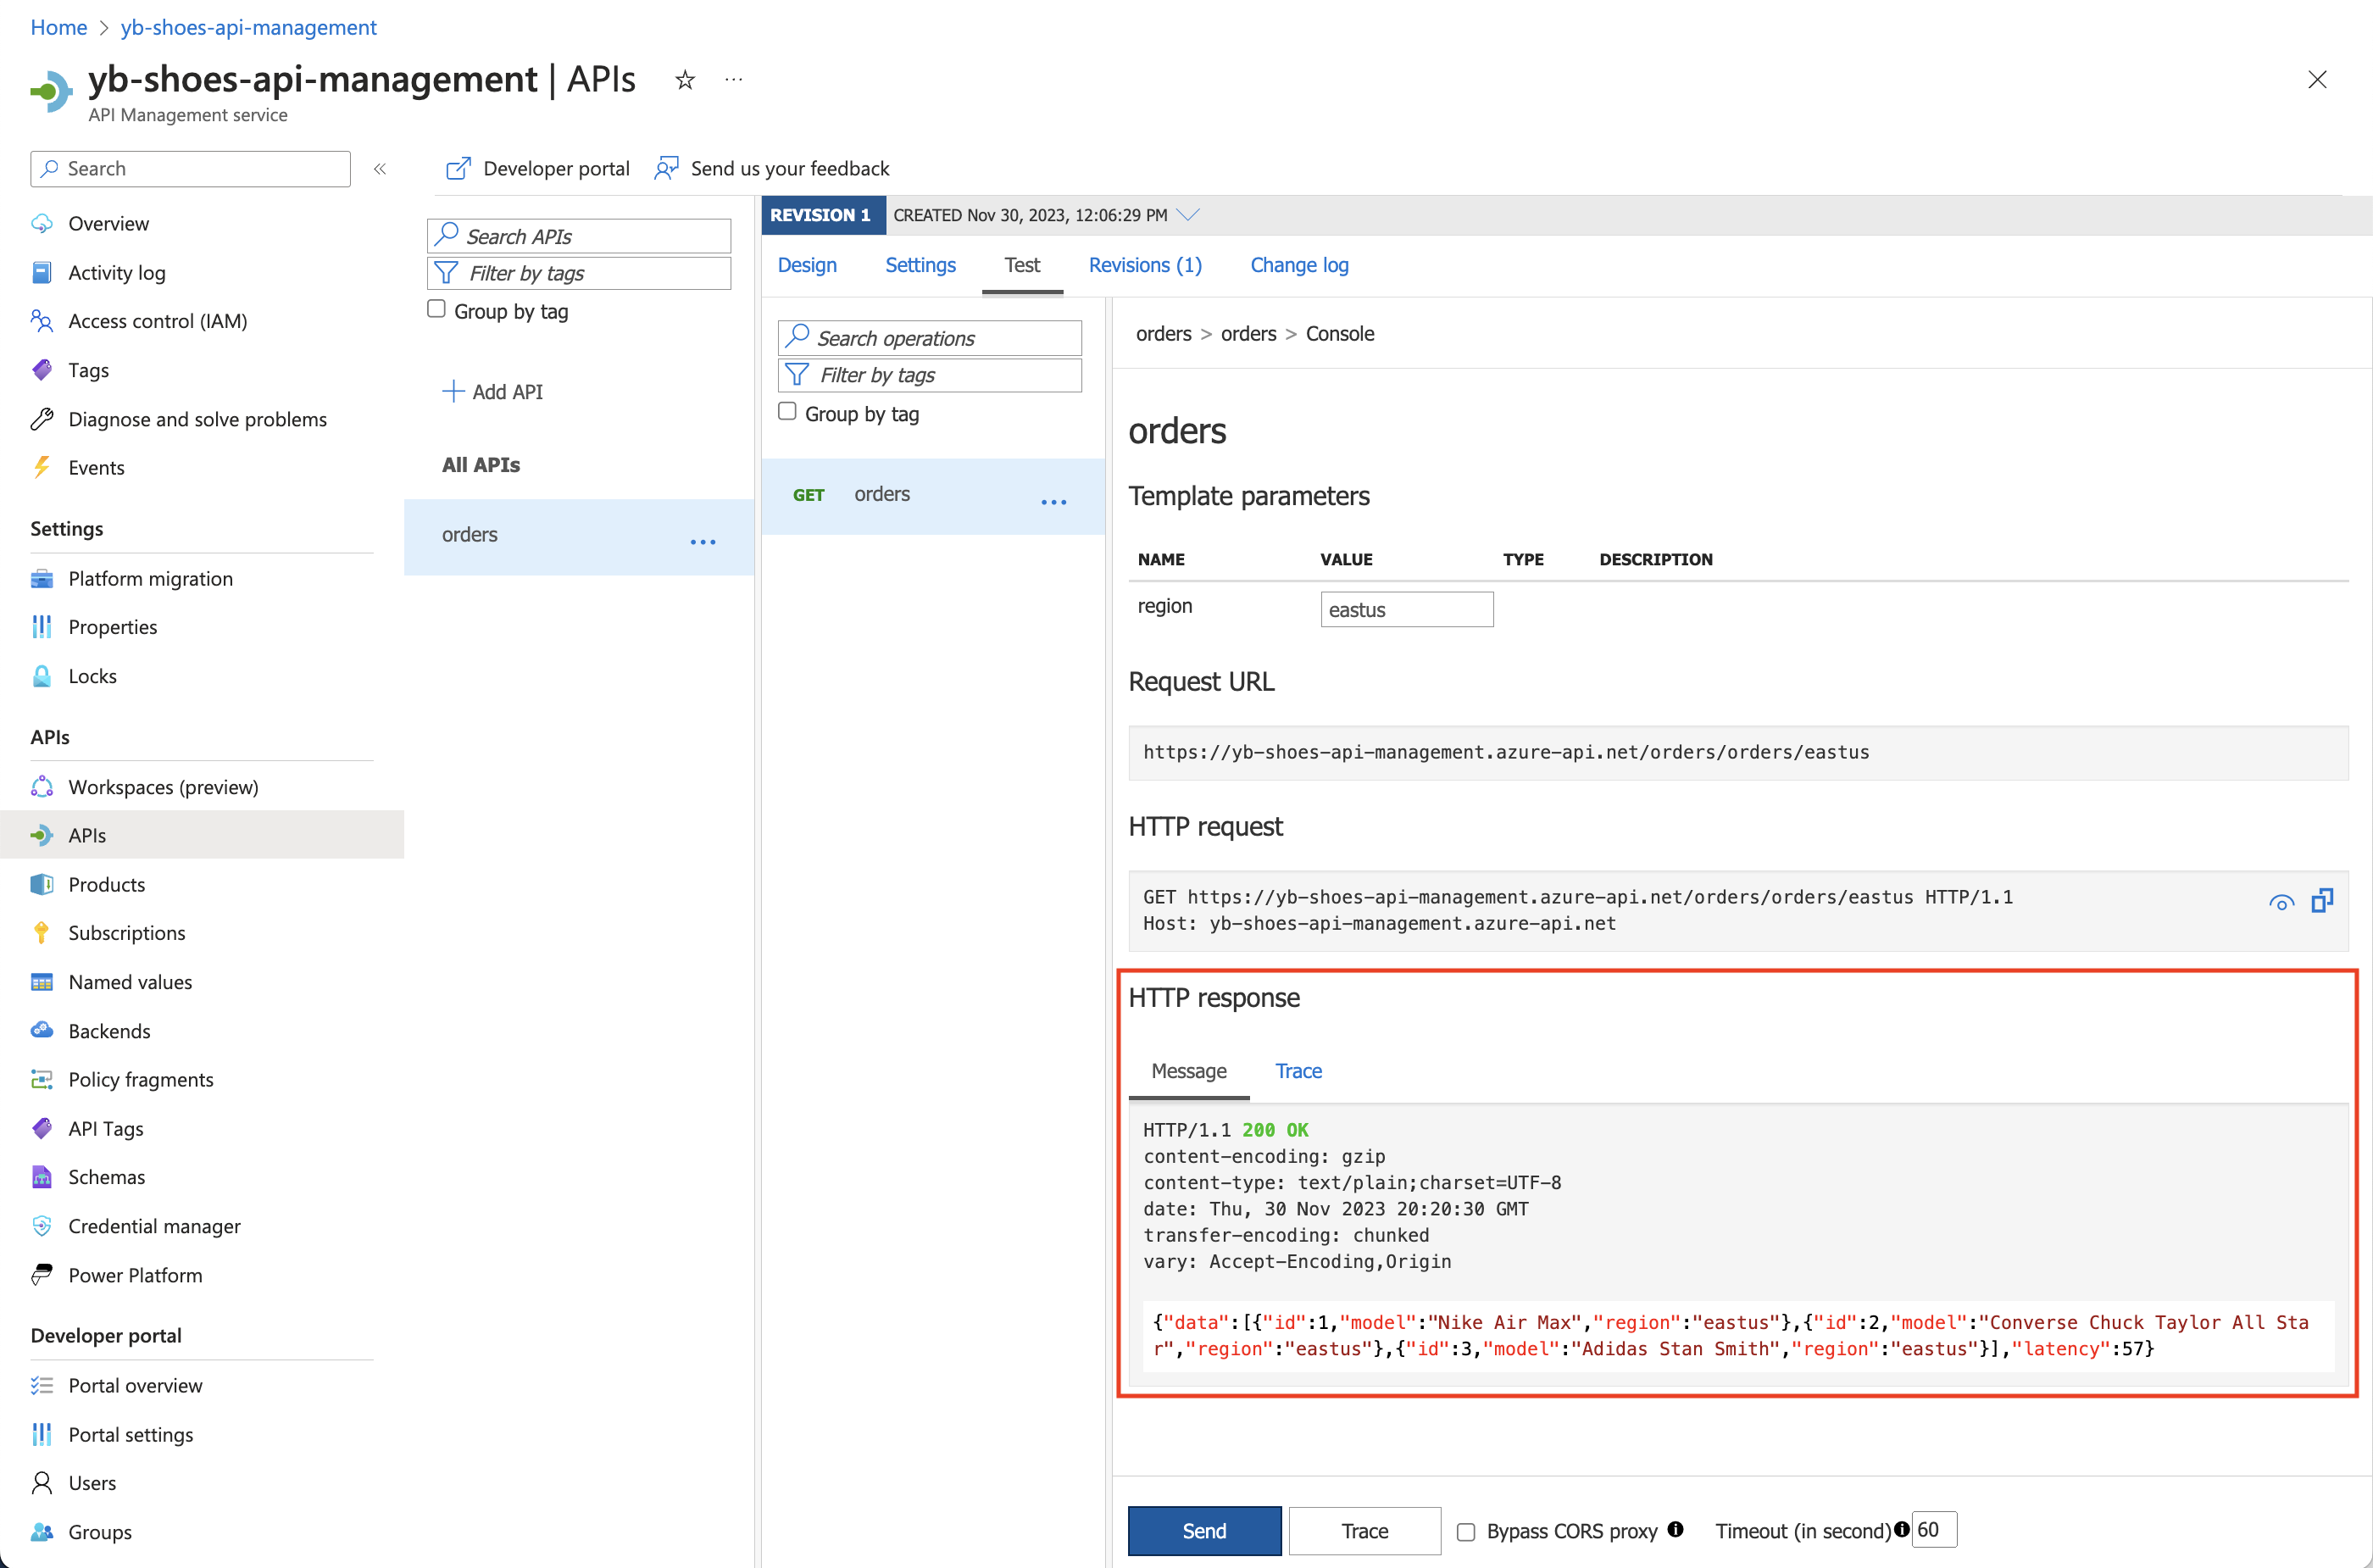
Let's try again, this time testing the eastus database nodes. The latency is higher because the API and function instances are fetching data that is stored on database nodes in the east region. However, if you deploy additional API and function instances in the east and request through them, the latency will be as low as you observed previously in the west.
Wrap-up
By developing a system with Azure API Management service and function instances in the same region as a geo-partitioned YugabyteDB cluster node, we achieved the lowest latency possible. Furthermore, centralizing your APIs with Azure API Management makes it easy for teams to develop, organize, and secure their endpoints.
To learn how to create a secure connection between Azure and YugabyteDB using Azure Private Link, see Develop secure applications with Azure Private Link.
If you would like to explore the different deployment options of YugabyteDB (including self-managed, co-managed, fully managed, and open source), see our database comparison page.