Real-time data streaming with YugabyteDB CDC and Azure Event Hubs
The Azure Event Hubs data streaming service is Apache Kafka compatible, enabling existing workloads to easily be moved to Azure. Using the YugabyteDB Debezium connector, we can stream changes from a YugabyteDB cluster to a Kafka topic using Kafka Connect.
In this tutorial, we'll examine how YugabyteDB CDC can be used with Azure Event Hubs to stream real-time data for downstream processing.
In the following sections, you will:
- Deploy and configure a single-node YugabyteDB cluster.
- Configure Azure Event Hubs with an access policy.
- Set up Kafka Connect to connect the YugabyteDB CDC to the Event Hubs.
- Create an application to insert orders in our database and view the changes downstream.
What you'll build
Find the full project on GitHub. The project uses an eCommerce application and DB schema along with YugabyteDB CDC functionality to send data to Azure Event Hubs via Kafka Connect.
This application runs a Node.js process to insert order records to a YugabyteDB cluster at a regular, configurable interval. The records are then automatically captured and sent to Azure Event Hubs.
Prerequisites
- An Azure Cloud account with permissions to create services
- Download Apache Kafka version 2.12-3.2.0
- Download YugabyteDB version 2.16.8.0
- Download YugabyteDB Debezium connector version 1.9.5.y.15
- Node.js version 18
Get started with YugabyteDB
With YugabyteDB downloaded on your machine, create a cluster and seed it with data:
-
Start a single-node cluster using yugabyted.
./path/to/bin/yugabyted start -
Connect to the cluster using ysqlsh.
./path/to/bin/ysqlsh -U yugabyte -
Prepare the database schema.
CREATE EXTENSION IF NOT EXISTS "uuid-ossp"; CREATE TABLE users ( id UUID PRIMARY KEY DEFAULT uuid_generate_v4(), first_name VARCHAR(255), last_name VARCHAR(255) ); CREATE TABLE products ( id UUID PRIMARY KEY DEFAULT uuid_generate_v4(), brand VARCHAR(255), model VARCHAR(255) ); CREATE TABLE orders ( id UUID PRIMARY KEY DEFAULT uuid_generate_v4(), user_id UUID REFERENCES users(id), product_id UUID REFERENCES products(id), order_date TIMESTAMP WITH TIME ZONE DEFAULT CURRENT_TIMESTAMP, quantity INT NOT NULL, status VARCHAR(50) ); -
Add users and products to the database.
INSERT INTO
users (first_name, last_name)
VALUES
('Gracia', 'Degli Antoni'),
('Javier', 'Hiom'),
('Minnaminnie', 'Este'),
('Hartley', 'Arrow'),
('Abbi', 'Gallear'),
('Lucila', 'Corden'),
('Henrietta', 'Fritschel'),
('Greta', 'Gething'),
('Raymond', 'Lowin'),
('Rufus', 'Gronowe');

INSERT INTO
products(brand, model)
VALUES
('hoka one one', 'speedgoat 5'),
('hoka one one', 'torrent 2'),
('nike', 'vaporfly 3'),
('adidas', 'adizero adios pro 3');
Get started on Azure Event Hubs
-
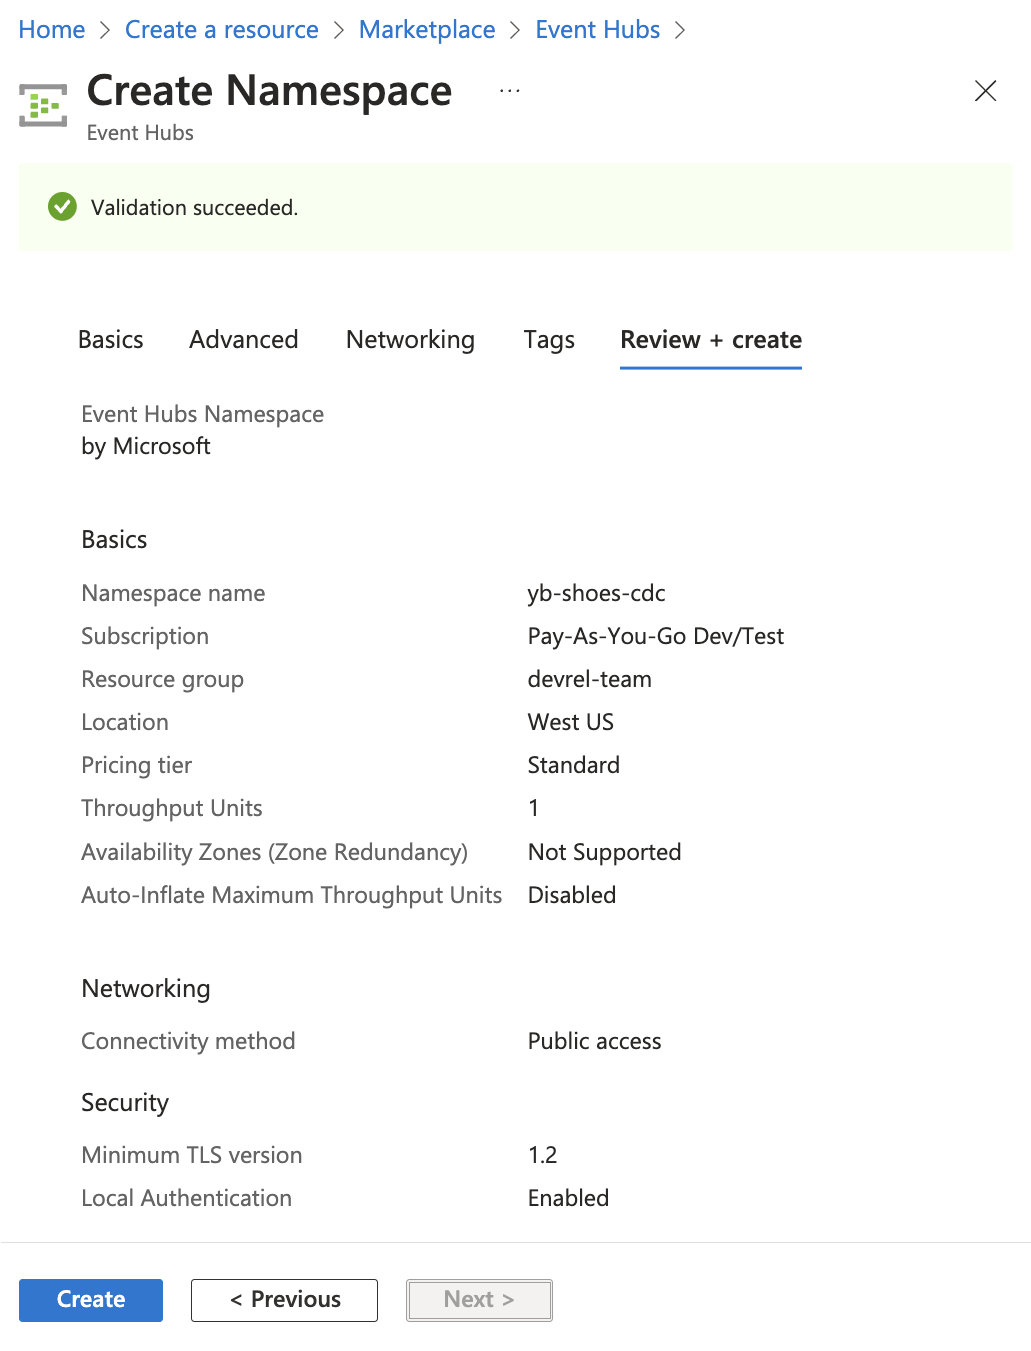
Create an Azure Event Hubs Namespace in the Azure Web Portal.

Note
The Standard pricing tier is required for Kafka compatibility.Note
An Event Hubs instance will be created automatically by Debezium when Kafka Connect is configured. Event Hubs instances can be configured to automatically capture streaming data and store it in Azure Blob storage or Azure Data Lake Store, if desired. -
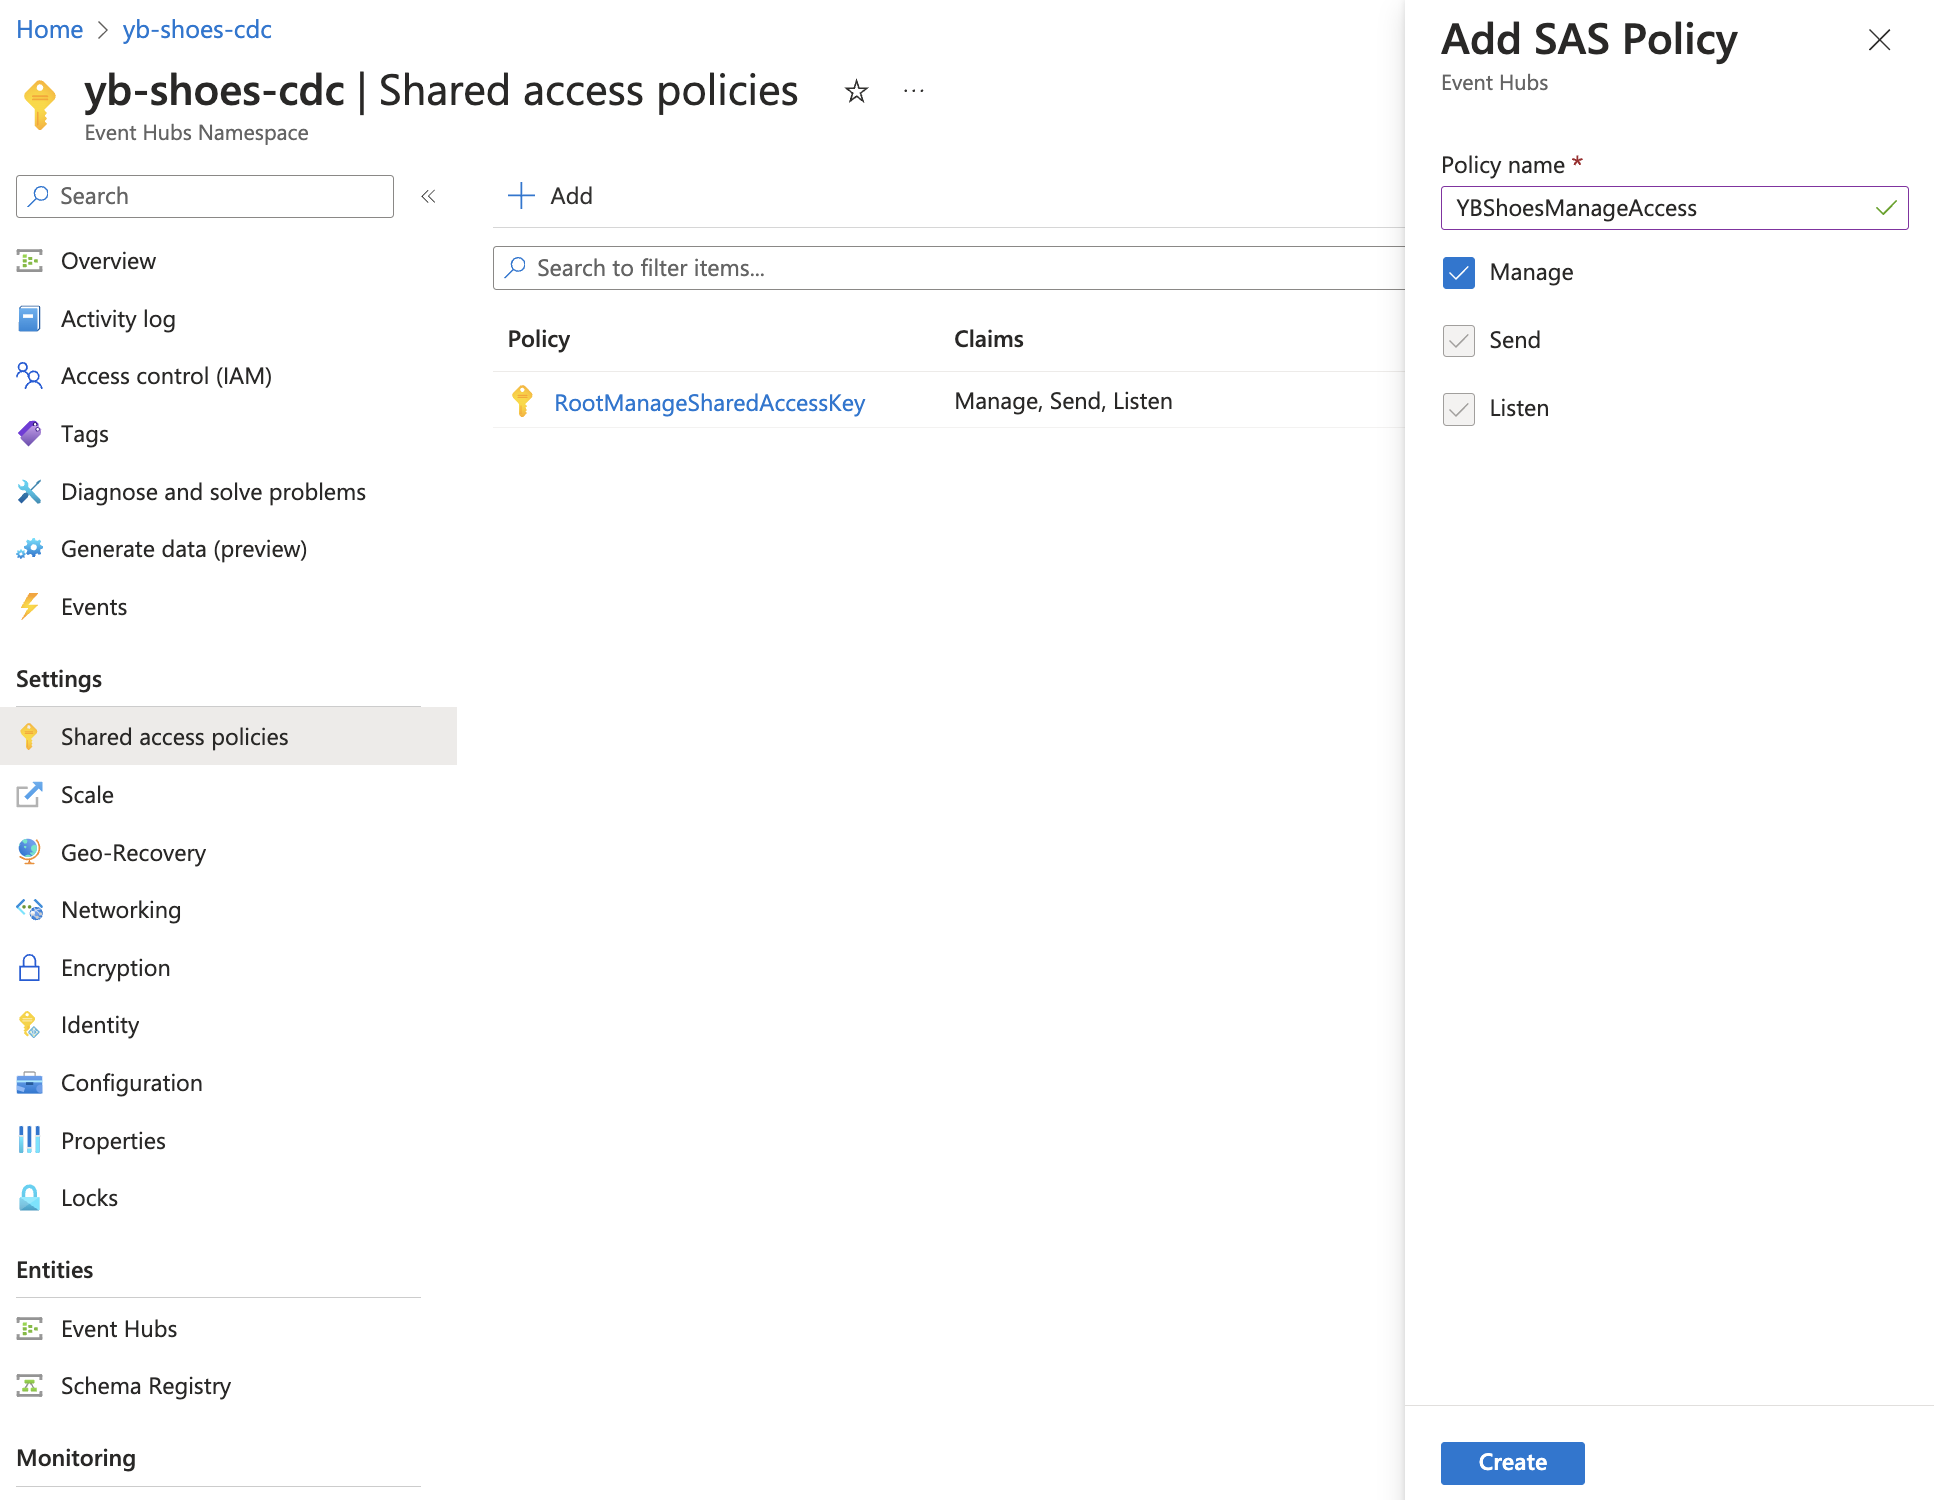
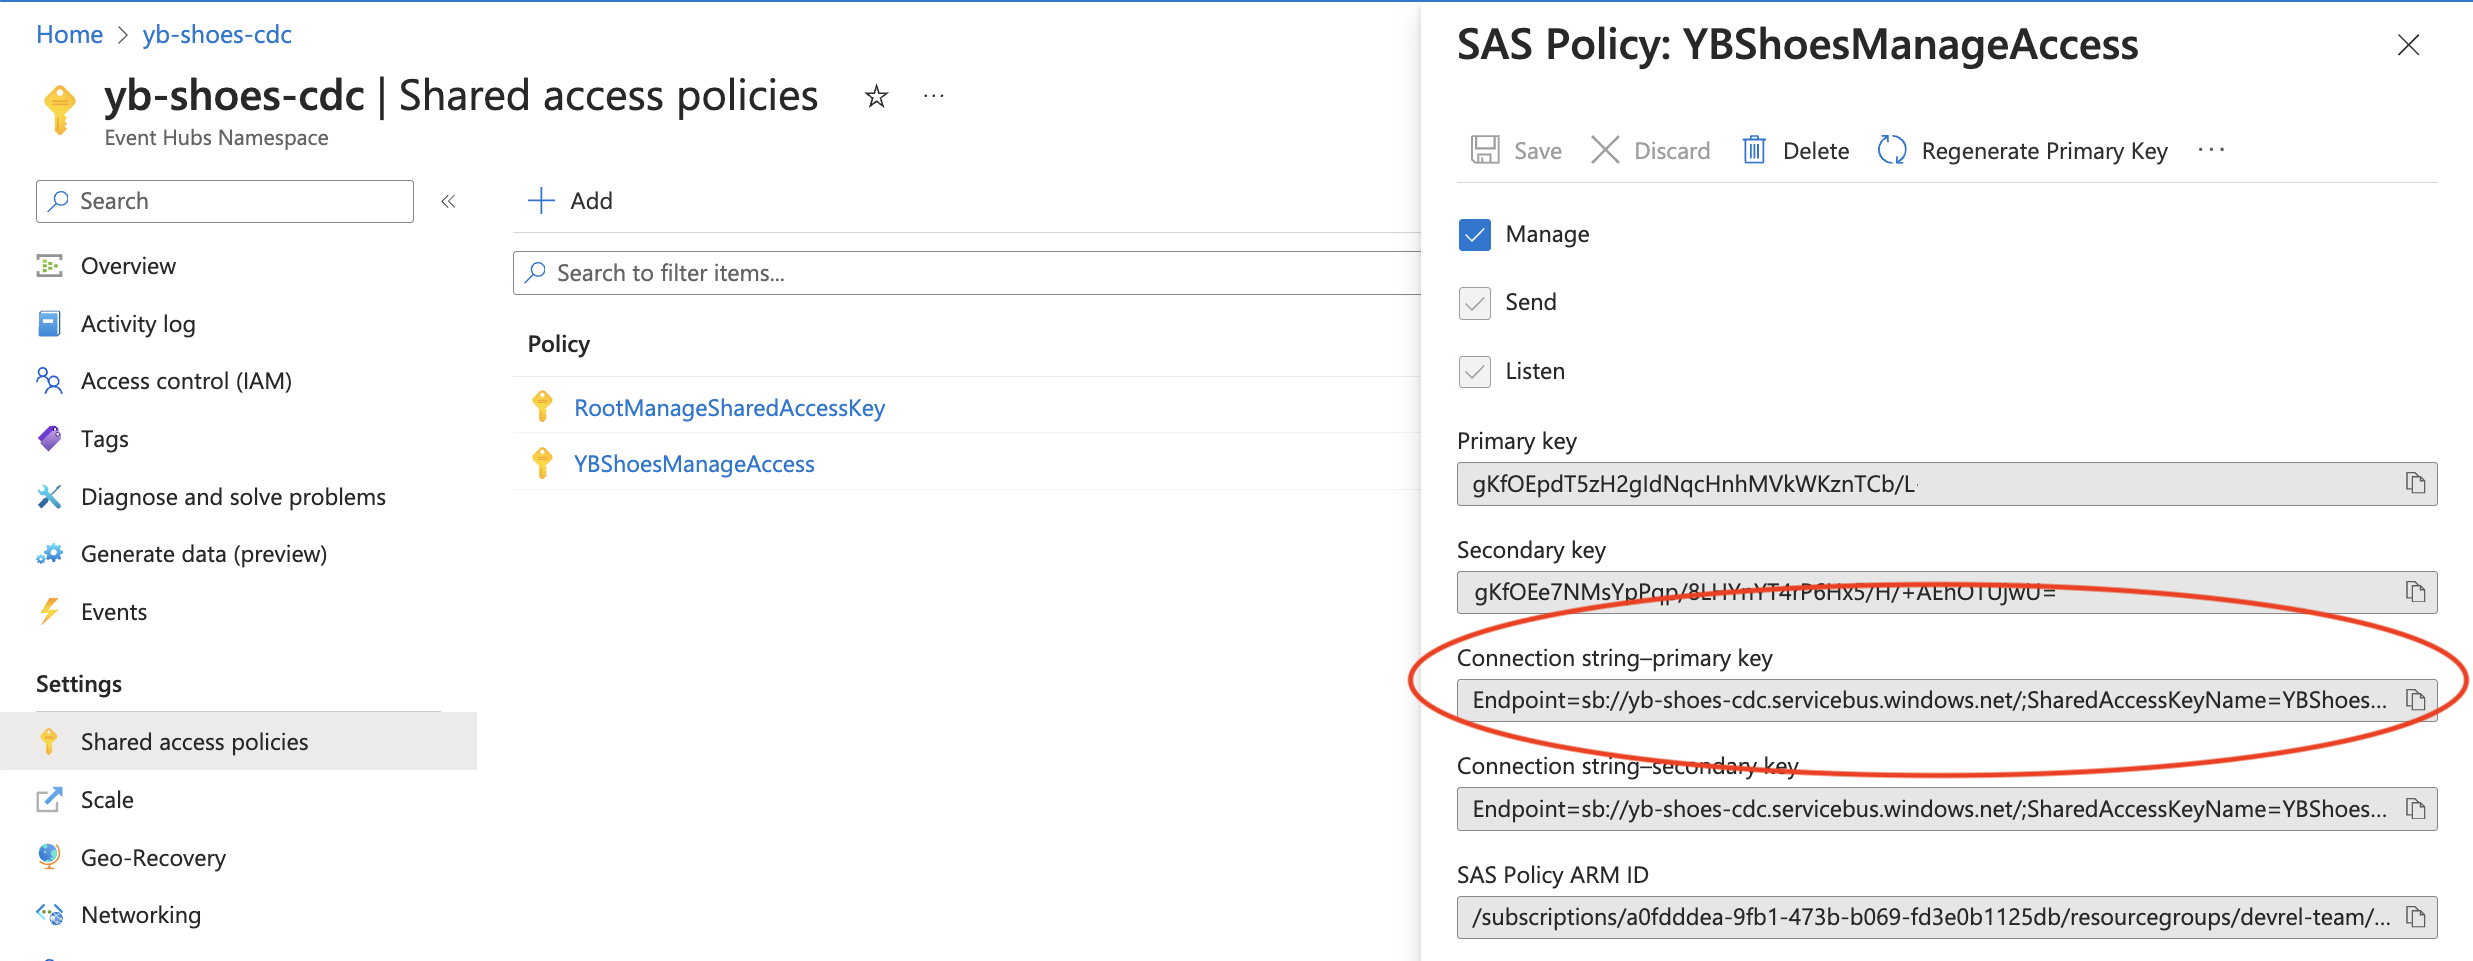
Create a new Shared Access Policy in the Event Hubs Namespace with Manage access. This is a best practice, as opposed to using the root access key for the namespace to securely send and receive events.

Configure Kafka Connect
While Kafka's core broker functionality is being replaced by Event Hubs, Kafka Connect can still be used to connect the YugabyteDB CDC to the Event Hubs we just created. The connect-distributed.sh script is used to start Kafka Connect in a distributed mode. This script can be found in the bin directory of the downloaded Kafka distribution.
A Kafka Connect configuration file is required to provide information about the bootstrap servers (in this case, the Event Hubs host), cluster coordination, and data conversion settings, just to name a few. Refer to the official documentation for a sample Kafka Connect configuration for Event Hubs.
-
Create a Kafka Connect configuration file named event-hubs.config.
bootstrap.servers={YOUR.EVENTHUBS.FQDN}:9093 group.id=$Default # Event Hubs requires secure communication key.converter=org.apache.kafka.connect.json.JsonConverter value.converter=org.apache.kafka.connect.json.JsonConverter internal.key.converter=org.apache.kafka.connect.json.JsonConverter internal.value.converter=org.apache.kafka.connect.json.JsonConverter internal.key.converter.schemas.enable=false internal.value.converter.schemas.enable=false config.storage.topic=connect-cluster-configs offset.storage.topic=connect-cluster-offsets status.storage.topic=connect-cluster-status # required EH Kafka security settings security.protocol=SASL_SSL sasl.mechanism=PLAIN sasl.jaas.config=org.apache.kafka.common.security.plain.PlainLoginModule required username="$ConnectionString" password="{YOUR.EVENTHUBS.CONNECTION.STRING}"; producer.security.protocol=SASL_SSL producer.sasl.mechanism=PLAIN producer.sasl.jaas.config=org.apache.kafka.common.security.plain.PlainLoginModule required username="$ConnectionString" password="{YOUR.EVENTHUBS.CONNECTION.STRING}"; consumer.security.protocol=SASL_SSL consumer.sasl.mechanism=PLAIN consumer.sasl.jaas.config=org.apache.kafka.common.security.plain.PlainLoginModule required username="$ConnectionString" password="{YOUR.EVENTHUBS.CONNECTION.STRING}"; -
Replace {YOUR.EVENTHUBS.FQDN} with the Event Hubs Namespace host name.

-
Replace {YOUR.EVENTHUBS.CONNECTION.STRING} with an Event Hubs connection string to your namespace.

-
Copy your configuration file to the Kafka bin directory.
cp /path/to/event-hubs.config /path/to/kafka_2.12-3.2.0/bin -
Copy the YugabyteDB Debezium connector to the Kafka libs directory.
cp /path/to/debezium-connector-yugabytedb-1.9.5.y.15.jar /path/to/kafka_2.12-3.2.0/libs -
Run Kafka Connect via the connect-distributed.sh script from the Kafka root directory.
./bin/connect-distributed.sh ./bin/event-hubs.config -
Create a CDC stream ID to connect to Kafka Connect.
./bin/yb-admin --master_addresses 127.0.0.1:7100 create_change_data_stream ysql.yugabyteCDC Stream ID: efb6cd0ed21346e5b0ed4bb69497dfc3 -
POST a connector for YugabyteDB with the generated CDC stream ID value.
curl -i -X POST -H "Accept:application/json" -H "Content-Type:application/json" \
localhost:8083/connectors/ \
-d '{
"name": "ybconnector",
"config": {
    "connector.class": "io.debezium.connector.yugabytedb.YugabyteDBgRPCConnector",
    "database.hostname":"127.0.0.1",
    "database.port":"5433",
    "database.master.addresses": "127.0.0.1:7100",
    "database.user": "yugabyte",
    "database.password": "yugabyte",
    "database.dbname" : "yugabyte",
    "database.server.name": "dbserver1",
    "table.include.list":"public.orders",
    "database.streamid":"{YOUR_YUGABYTEDB_CDC_STREAM_ID}",
    "snapshot.mode":"never"
}
}'
Now writes to the orders table in the YugabyteDB cluster will be streamed to Azure Event Hubs via Kafka Connect.
Note
Debezium will auto-create a topic for each table included and several metadata topics. A Kafka topic corresponds to an Event Hubs instance. For more information, check out the Kafka and Event Hubs conceptual mapping.Test the application
We can test this real-time functionality by running a sample application to insert orders into our YugabyteDB instance. With a Kafka Connect configured properly to an Event Hubs namespace, we can see messages being sent to an Event Hubs instance.
-
Clone the repository.
git clone git@github.com:YugabyteDB-Samples/yugabytedb-azure-event-hubs-demo-nodejs.git cd yugabytedb-azure-event-hubs-demo-nodejs -
Install Node.js application dependencies.
npm install -
Review the Node.js sample application.
const { Pool } = require("@yugabytedb/pg");

const pool = new Pool({
    user: "yugabyte",
    host: "127.0.0.1",
    database: "yugabyte",
    password: "yugabyte",
    port: 5433,
    max: 10,
    idleTimeoutMillis: 0,
});
async function start() {
    const usersResponse = await pool.query("SELECT * from users;");
    const users = usersResponse?.rows;
    const productsResponse = await pool.query("SELECT * from products;");
    const products = productsResponse?.rows;

    setInterval(async () => {
        try {
            const randomUser = users[Math.floor(Math.random() * users.length)];
            const randomProduct =
            products[Math.floor(Math.random() * products.length)];
            const insertResponse = await pool.query(
            "INSERT INTO orders(user_id, product_id, quantity, status) VALUES ($1, $2, $3, $4) RETURNING *",
            [randomUser?.id, randomProduct?.id, 1, "processing"]
            );

            console.log("Insert Response: ", insertResponse?.rows?.[0]);
        } catch (e) {
            console.log(`Error while inserting order: ${e}`);

        }
    }, process.env.INSERT_FREQUENCY_MS || 50);
}

start();
This application initializes a connection pool to connect to the YugabyteDB cluster using the YugabyteDB node-postgres smart driver. It then randomly inserts records into the orders table at a regular interval.
-
Run the application.
node index.jsThe terminal window will begin outputting the response from YugabyteDB, indicating that the records are being inserted into the database.
# Example output
Insert Response:  {
    id: '6b0dffe9-eea4-4997-a8bd-3e84e58dc4e5',
    user_id: '17246d85-a403-4aec-be83-1dd2c5d57dbb',
    product_id: 'a326aaa4-a343-45f6-b99a-d16f6ac7ad14',
    order_date: 2023-12-06T19:54:25.313Z,
    quantity: 1,
    status: 'processing'
}
Insert Response:  {
    id: '29ae786e-cc4d-4bf3-b64c-37825ee5b5a7',
    user_id: '7170de37-1a9f-40de-9275-38924ddec05d',
    product_id: '7354f2c3-341b-4851-a01a-e0b3b4f3c172',
    order_date: 2023-12-06T19:54:25.364Z,
    quantity: 1,
    status: 'processing'
}
...
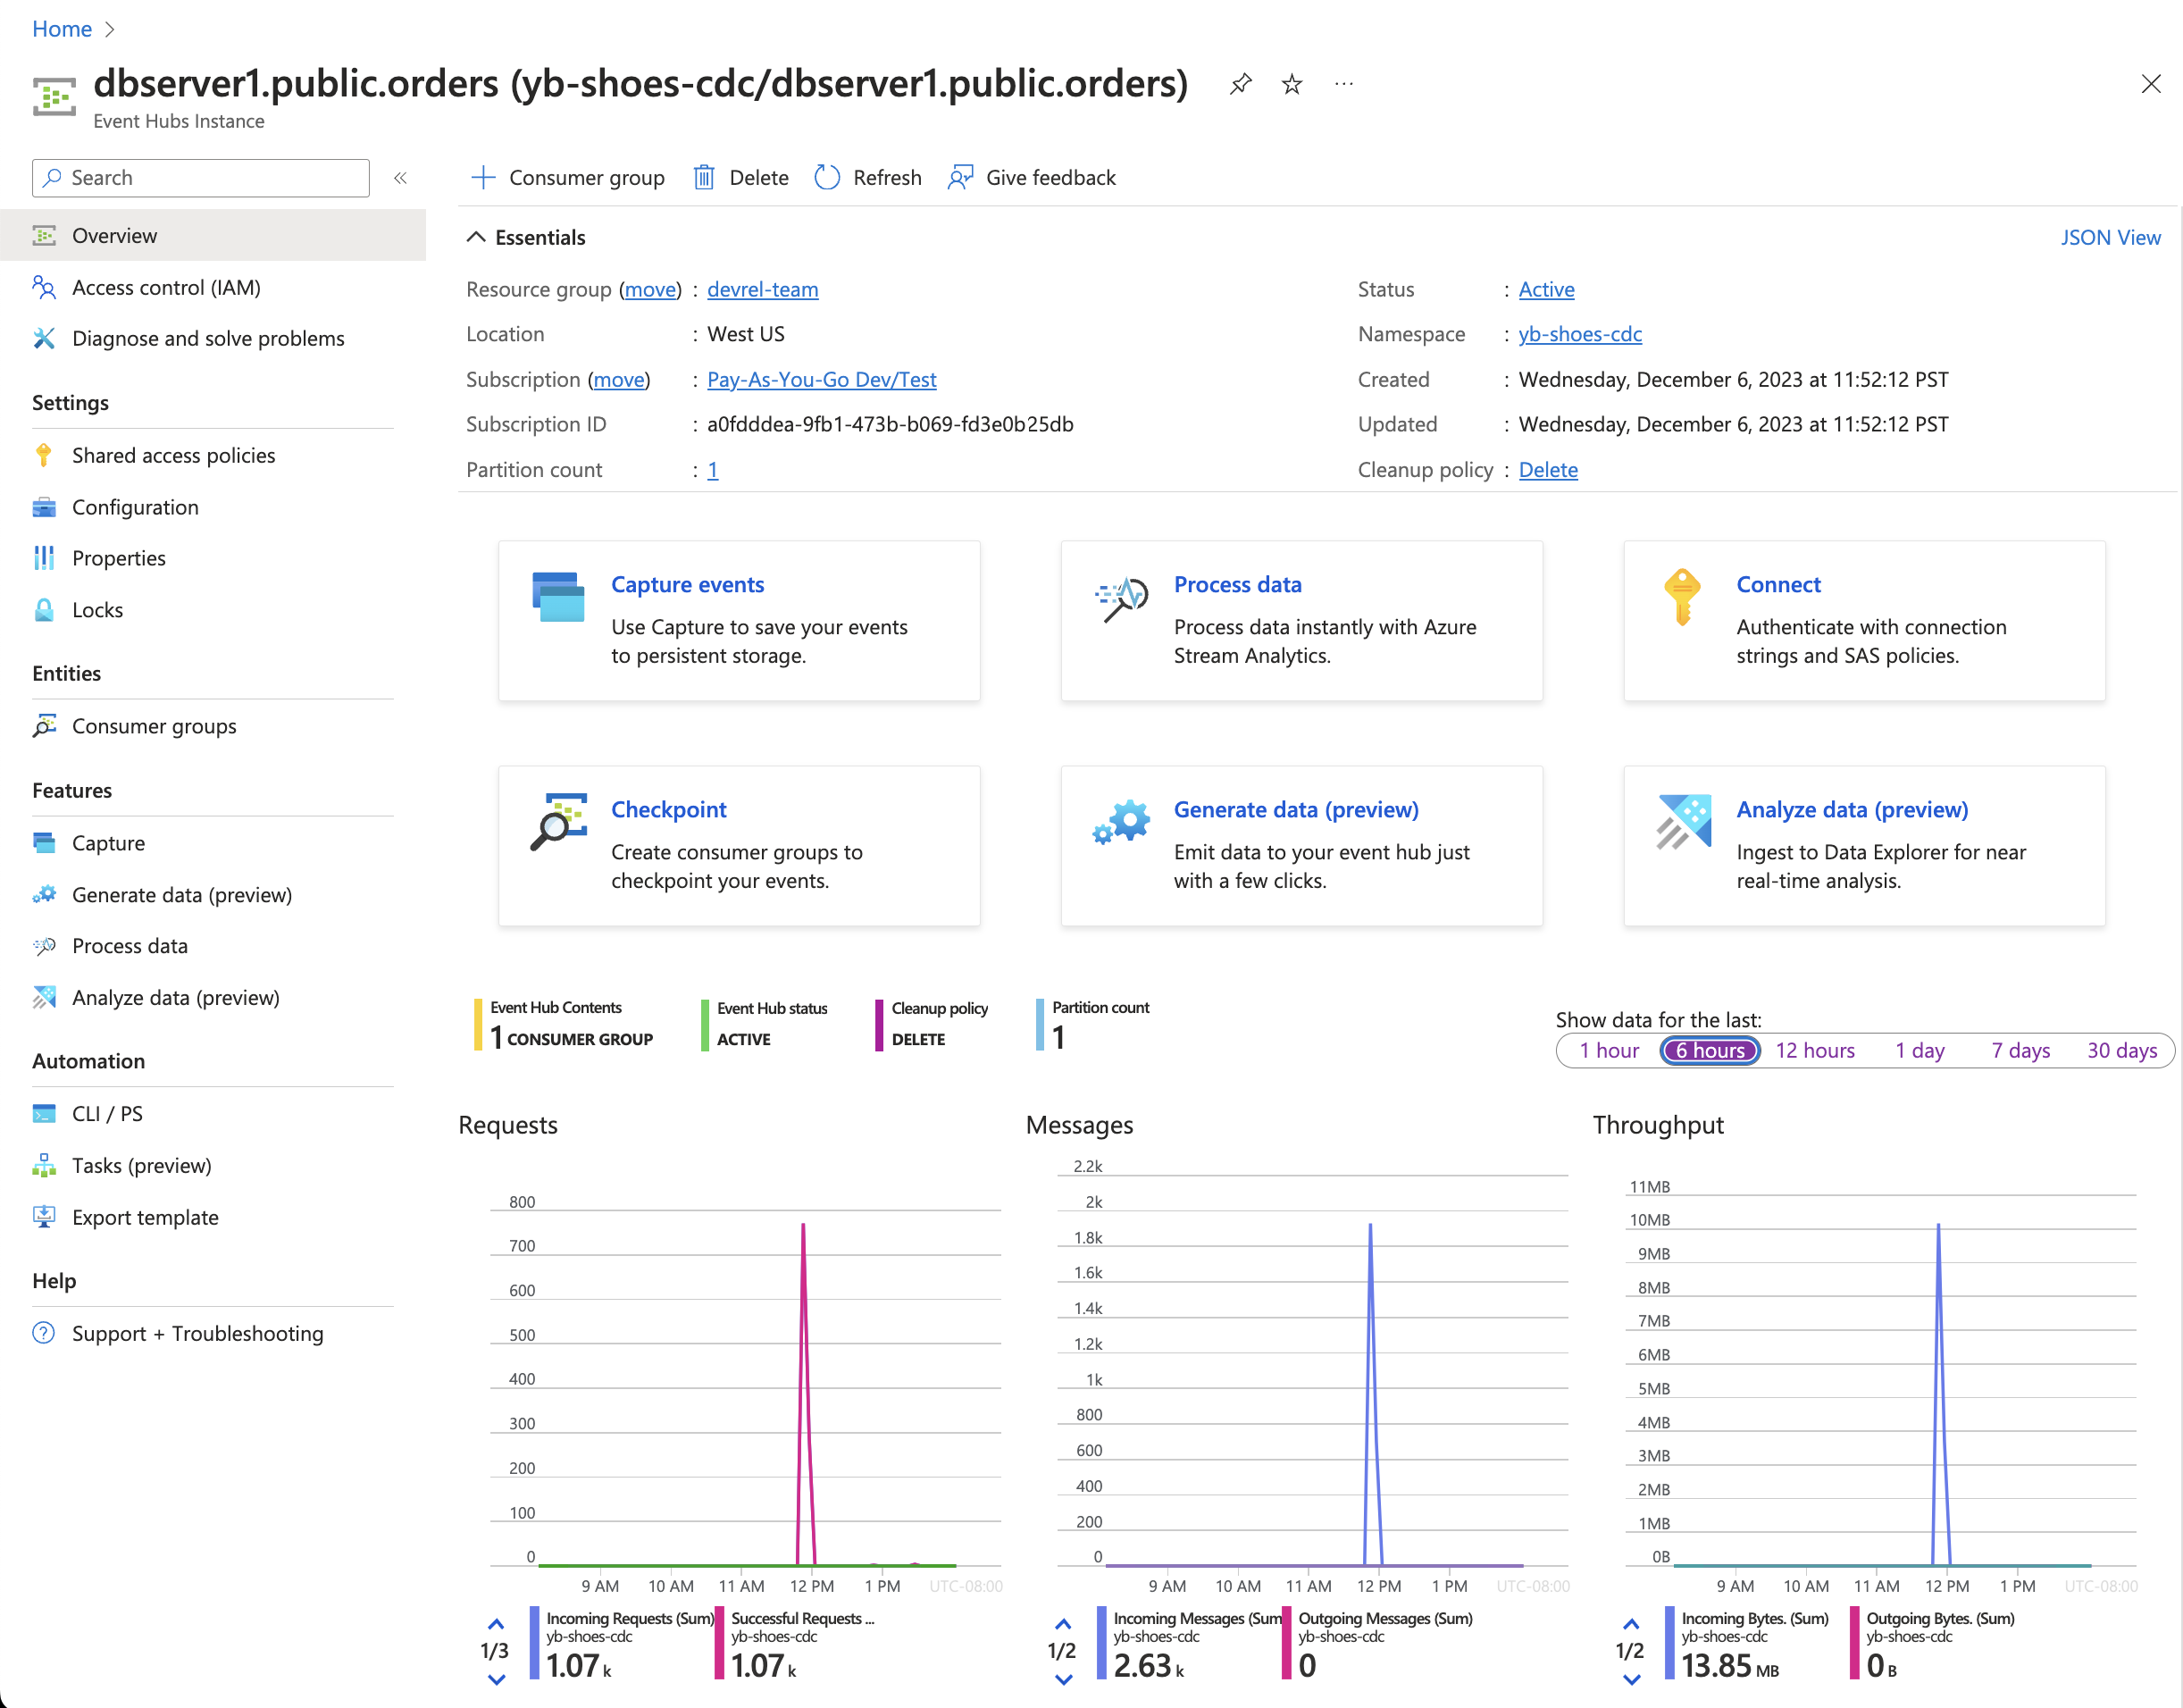
Heading over to the Azure Event Hubs instance database1.public.orders, we can see that the messages are reaching Azure and can be consumed by downstream applications and services.

Wrap-up
YugabyteDB CDC combined with Azure Event Hubs enables real-time application development using a familiar Kafka interface.
If you're interested in real-time data processing on Azure, check out Azure Synapse Analytics integration using Azure Event Hubs.