Scale universes
YugabyteDB Anywhere supports both horizontal and vertical scaling of your universe. If your workloads have increased, you can add nodes or change to more powerful instance types to improve latency, throughput, and memory. Likewise, if your cluster is over-scaled, you can reduce nodes or use smaller instances to reduce costs.
YugabyteDB automatically ensures that new nodes start hosting the tablet leaders for a set of tablets in such a way that the tablet leader count remains evenly balanced across all the available nodes.
To scale a universe, change its placement (nodes, availability zones, and regions) or its hardware (instance type and storage). For sizing and topology guidance, refer to Plan your universe.
You can also change user tags, configuration flags, and Kubernetes overrides. To place YB-Master processes on dedicated nodes, refer to Dedicated YB-Masters.
Horizontal scaling
Horizontal scaling adds or removes nodes (or pods, for Kubernetes) and can include changing availability zones or regions.
In on-premises universes, ensure your provider has enough free nodes to accommodate any increase in size of your cluster.
To change the number of nodes of universes created with an on-premises provider and secured with third-party certificates obtained from external certification authorities, you must first add the certificates to the nodes you will add to the universe. Refer to Add certificates. Ensure that the certificates are signed by the same external CA and have the same root certificate. In addition, ensure that you copy the certificates to the same locations that you originally used when creating the universe.
New UI To scale a universe horizontally:
Navigate to the universe, select Settings > Placement, and on the Primary Cluster card, click Edit and choose one of the following:
- Edit Regions to add or remove regions, or to change resilience or replication factor. After you update regions, continue to the nodes and availability zones step.
- Edit AZ and Node Placement (or Edit AZ and Pod Placement for Kubernetes) to add or remove nodes and availability zones.
Either option displays the Edit Placement wizard.
Using the wizard, you can specify placement using Guided or Expert mode. For the differences between modes and topology limits, refer to Placement. When editing an existing universe, you can increase replication factor (Expert) or resilience (Guided) but you cannot decrease it. Refer to Changing placement.
In Guided mode, you set the following:
- Resilience. You can only increase the resilience. Increasing resilience requires more nodes or availability zones.
- Regions. Select the regions where you want to locate the primary cluster.
- Availability Zones and Nodes. Select the zones, specify the number of nodes (the same in every zone), and optionally rank preferred availability zones.
In Expert mode, you set the following:
- Regions. Select the regions where you want to locate the primary cluster.
- EA Replication Factor. You can only increase the replication factor. This change may also require more nodes or availability zones. Contact Yugabyte Support for help with capacity planning.
- Availability Zones and Nodes. Select the zones (you can add extra zones depending on the number of regions and RF), specify the number of nodes per zone, and optionally rank preferred availability zones.
When you are done, click Review Changes, confirm the summary, then click Confirm and Apply.
Classic UI To scale a universe horizontally:
-
Navigate to your universe and choose Actions > Edit Universe.
-
Under Cloud Configuration, update the following as needed:
- Regions - Select any region configured in the provider used to deploy the universe.
- Master Placement.
- Total Nodes and Availability Zones - As you add nodes, they are automatically distributed among the availability zones; you can also add, configure, and remove availability zones.
- EA Replication Factor - Currently, you can only increase the replication factor. Note that this change may also require you to increase the number of nodes or availability zones. Contact Yugabyte Support before modifying this field, for assistance on capacity planning and sizing appropriately.
-
Click Save.
Vertical scaling
Vertical scaling changes the instance type or storage used by universe nodes. In some cases, these operations are available as a smart resize.
New UI To scale a universe vertically:
-
Navigate to the universe, then open Settings > Hardware.
-
On the Cluster Instance card, click Edit.
If the universe uses dedicated master nodes, edit the T-Server Instance and Master Server Instance cards separately.
-
Update the instance configuration as needed:
-
Instance Type and volume size - Change instance type and storage volume size as configured in the provider.
-
Storage type and volume count - For cloud providers, you can also change the storage volume count and type. On AWS, you can additionally change throughput and IOPS.
For Kubernetes universes on YugabyteDB v2026.1.0.0 or later, you can change storage class and volume count using full move.
-
For Kubernetes, you can also change cores and memory.
-
-
Click Review Changes.
-
Confirm the summary of current and new values. If more than one update option is available, choose how to apply the change:
- Rolling restart the current nodes - Resizes the existing nodes (smart resize). No data migration is required. This option is faster and recommended when available.
- Migrate to a new set of nodes - Moves data to new nodes with new IP addresses. The universe remains online.
For details on when each option is available, refer to Smart resize.
-
Click Confirm and Apply.
Classic UI To scale a universe vertically:
-
Navigate to your universe and choose Actions > Edit Universe.
-
Under Instance Configuration, update the following as needed:
-
Instance Type and Volume Info Size - Change instance type and storage volume size as configured in the provider. In some cases, these operations are available as a smart resize.
-
Storage Type and Volume Info Count - For cloud providers, you can also change the storage volume count and type. On AWS, you can additionally change throughput and IOPS.
For Kubernetes universes on YugabyteDB v2026.1.0.0 or later, you can change storage class and volume count using full move.
-
-
Click Save.
When smart resize is available, YugabyteDB Anywhere prompts you to either migrate the universe and its data to new nodes, or do a smart resize. Refer to Smart resize.
Smart resize
Normally when resizing a universe, YugabyteDB moves the data from the old nodes to the new nodes. However, if the universe is deployed on AWS, GCP, or Azure using a cloud provider configuration, you can perform some resizing operations without migrating the data. This is referred to as smart resize, and can be significantly faster than a full copy of the data.
Smart resize is available for the following operations:
-
Change the Instance type.
Note that smart resize is not available when changing the instance type from an AWS EBS-backed instance type (like c5.xlarge) to a local storage-backed instance type (like i3.xlarge), or vice-versa.
-
Increase the Volume disk size.
Note that smart resize is not available with Azure ultra disks, or when decreasing the volume size.
-
Both together.
In addition, smart resize isn't available if you change other universe settings in the same operation, such as node count, regions, or storage type, in addition to the instance type and volume size.
When smart resize is available, YugabyteDB Anywhere gives you the option to either migrate the universe and its data to new nodes, or do a smart resize.
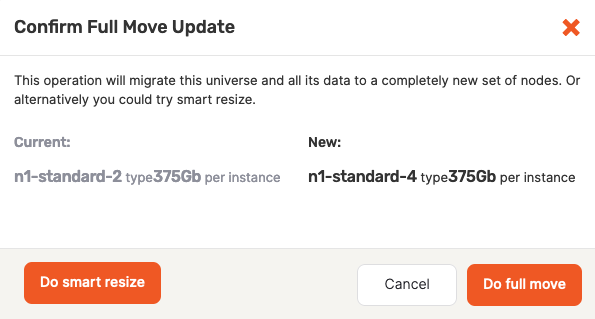
If you change only the volume size, YugabyteDB Anywhere automatically performs a smart resize.