Create universes
New UI YugabyteDB Anywhere allows you to create a universe across multiple availability zones in a single geographic region, or spanning multiple regions (for example, Oregon, South Carolina, and Tokyo), using a provider configuration. This includes universes deployed on VMs (cloud provider, on-premises) and on Kubernetes.
For specific scenarios such as creating large numbers of tables, high rates of DDL change, and so on, consider creating a universe with dedicated nodes for YB-Master processes.
For planning considerations, including placement (Guided and Expert mode), hardware, and security, refer to Plan your universe.
For information on modifying or scaling an existing universe, refer to Modify universe.
Prerequisites
Before you start creating a universe, ensure that you have created a provider configuration as described in Create provider configurations. For Kubernetes universes, see Create Kubernetes provider configuration.
Create a universe
To create a universe:
-
Navigate to Dashboard or Universes, and click Create Universe.
-
Follow the instructions in the Create Cluster wizard.
The Create Cluster wizard has the following pages:
Settings
General Settings
Set the following options:
- Universe Name: Enter a name for the universe.
- Provider: Choose a cloud provider.
- Provider Configuration: Choose the provider configuration to use to create the universe.
- Database Version: Choose the version of YugabyteDB to install on the nodes. If the version you want is not listed, import it into YugabyteDB Anywhere. Refer to YugabyteDB version and Manage YugabyteDB releases.
Placement
Specify the placement of nodes for your universe.
-
For development or testing, select Single-Node Cluster, choose a region, and choose an availability zone.
-
For production universes, select Regular Cluster, then Guided or Expert mode.
For which mode to use, resilience options, and topology limits, refer to Placement.
In Guided mode, you set the following:
- Resilience. Choose the outage domain (region, availability zone, node, or none) and how many of those outages to tolerate. Refer to Guided mode.
- Regions. Select the regions where you want to locate the primary cluster. You can only select regions that have been added to the provider configuration.
- Availability Zones and Nodes. Select the zones, specify the number of nodes (the same in every zone), and optionally rank preferred availability zones.
In Expert mode, you set the following:
- Regions. Select the regions where you want to locate the primary cluster. You can only select regions that have been added to the provider configuration.
- Replication factor. Select the replication factor. Refer to Expert mode.
- Availability Zones and Nodes. Select the zones (you can add extra zones depending on the number of regions and RF), specify the number of nodes per zone, and optionally rank preferred availability zones.
Advanced Configurations
Select Allocate dedicated nodes to master servers to place master servers on dedicated nodes. Refer to Dedicated YB-Masters.
Hardware
For sizing guidance, refer to Hardware.
Specify the instance to use for the universe nodes:
-
Choose the CPU Architecture, either x86 (Intel) or AArch64 (ARM).
-
Choose the Linux version to be provisioned on the nodes of the universe.
This option only applies if you have selected an AWS, GCP, Azure, or OCI provider configuration. The available Linux versions are specified in the provider.
If you are performing an airgapped installation, you cannot use YBA-Managed Linux versions; you must use a custom image. Do the following before creating your universe:
- Create a custom Linux version (AMI) that includes all of the software pre-requisites, including additional software for airgapped deployment.
- Add your custom Linux version to the universe provider configuration Linux Version Catalog.
Refer to Create cloud provider configuration.
-
Select the Instance Type to use for the nodes in the universe.
-
Specify the number and size of the storage volumes.
-
Select the Storage Type (GCP, Azure, or OCI only). Available options depend on the provider:
-
GCP: Persistent, Local Scratch, Hyperdisk Balanced, or Hyperdisk Extreme.
-
Azure: Standard, Premium, PremiumV2, or Ultra.
-
OCI: Balanced, Higher Performance, or Lower Cost. The default is Balanced.
NVMe (local disk) instance types are not supported. Choose a remote block-volume instance type.
-
Additional AWS fields
-
Choose the AWS EBS Type between IO1, IO2, GP2, and GP3.
-
Specify the Provisioned IOPS (IO1, IO2, and GP3 only) and Provisioned Throughput (GP3 only) for your disk in advance to ensure a consistent performance level.
-
EA Enable EBS Volume Encryption (AWS only) to create a universe with AWS EBS volume-level encryption, using a custom AWS Key Management Service (KMS) configuration.
Select the Key Management Service Config you created. See Create a KMS configuration.
While in Early Access, EBS Volume Encryption is not available in YugabyteDB Anywhere by default. To make it available, set the Allow Cloud Volume Encryption Global Runtime Configuration option (config key
yb.universe.allow_cloud_volume_encryption) to true. Refer to Manage runtime configuration settings. You must be a Super Admin to set global runtime configuration flags.You can use AWS EBS volume-level encryption and YugabyteDB Anywhere envelope Encryption at rest (EAR) at the same time. Configure each one with its own KMS config; you cannot use the same KMS config for both.
Currently, you cannot use EBS volume-level encryption for multi-region universe deployments, because an instance in one region cannot access the KMS key in another region.
Kubernetes
Complete the Instance Settings section for TServer and Master as follows:
-
Number of Cores - specify the total number of processing cores or CPUs assigned to the TServer and Master.
-
Memory(GiB) - specify the memory allocation of the TServer and Master.
-
Volume Info - specify the number of volumes multiplied by size for the TServer and Master. The default is 1 x 100GB.
After the universe is created, you can change storage class and volume count on universes running YugabyteDB v2026.1.0.0 or later. Refer to Full move for Kubernetes universes.
YugabyteDB supports ARM instances, which are specified using Helm overrides. Refer to Kubernetes overrides.
Database
Interface
Enable the YSQL and YCQL endpoints and database authentication.
Enter the password to use for the default database admin superuser (for YSQL the user is yugabyte, and for YCQL cassandra). Be sure to save your password; the password is not saved in YugabyteDB Anywhere. For more information, refer to Database authorization.
By default, the API endpoints use ports 5433 (YSQL) and 9042 (YCQL). You can customize these ports.
Features
- Enable Connection Pooling
- If database version is v2024.2 or later, you can enable Built-in connection pooling.
- After the universe is created, you can customize additional connection pooling YB-TServer flags using Edit configuration flags. For flag names and defaults, refer to YSQL Connection Manager configuration.
- Enhanced Postgres Compatibility
- If database version is v2024.2 or later, you can enable early access features for PostgreSQL compatibility. For more information, refer to Enhanced PostgreSQL Compatibility Mode.
- For new universes running v2025.2 or later, note that the following features are enabled by default when you deploy using YugabyteDB Anywhere:
Advanced Flags
Optionally, add configuration flags for your YB-Master and YB-TServer nodes. You can also set flags after universe creation. Refer to Edit configuration flags.
Security
For security planning, refer to Security.
Network Access
To enable IPv6 for the universe, select the Enable IPv6 option. (Kubernetes only.)
To enable public access to the universe, select the Assign Public IP option. (AWS, GCP, Azure, or OCI only.)
Encryption in Transit Settings
Enable encryption in transit to encrypt universe traffic. You can enable the following:
-
Node-to-Node Encryption to encrypt traffic between universe nodes.
-
Client-to-Node Encryption to encrypt traffic between universe nodes and external clients.
Note that if you want to enable Client-to-Node encryption, you first must enable Node-to-Node encryption.
Encryption requires a certificate. YugabyteDB Anywhere can generate a self-signed certificate automatically, or you can use your own certificate.
To use your own, you must first add it to YugabyteDB Anywhere; refer to Add certificates.
To have YugabyteDB Anywhere generate a certificate for the universe, set Certificate Type to Use system-generated (self-signed) certificate.
To use a certificate you added or a previously generated certificate, set Certificate Type to Use customer-managed certificate, then select the certificate from the Select Root Certificate menu.
For more information on using and managing certificates, refer to Encryption in transit.
Encryption at Rest Settings
To encrypt the universe data, select the Enable Encryption at Rest option and select the KMS configuration to use for encryption.
For more information, refer to Encryption at rest.
Advanced
Proxy Configuration
If you require a proxy for network access from nodes, enable the Enable Proxy Server option.
You can specify a Secure Web Proxy and a Web Proxy. Provide the proxy endpoints and ports to use as appropriate.
To allow specific IP addresses to bypass the proxy, enable the Bypass Proxy List option and enter a list of addresses with port numbers.
Node Access
- SSH Access Key
- The access key is the SSH key that is created in the provider. Usually, each provider has its own access key, but if you are reusing keys across providers, they are listed here.
- Instance Profile ARN
- For AWS providers, you can assign an ARN to the nodes in the universe; this allows them to be seamlessly backed up without explicit credentials.
User Tags
The instances created on a cloud provider can be assigned special metadata to help manage, bill, or audit the resources. You can define these tags when you create a new universe, as well as modify or delete tags of an existing universe. Refer to Create and edit instance tags. (AWS, GCP, Azure, or OCI only.)
Deployment Port Override
To customize the ports used for the universe, enter the custom port numbers for the services you want to change. Any value from 1024 to 65535 is valid, as long as it doesn't conflict with anything else running on nodes to be provisioned.
Kubernetes overrides
For Kubernetes universes, you can optionally set Helm chart overrides when creating the universe. Refer to Configure Kubernetes overrides.
Starting in YugabyteDB v2026.1.2, YugabyteDB Docker images are STIG-compliant and hardened, and run as a non-root user by default. To keep running as root on a non-OpenShift universe, set a Helm override. Refer to Run as root.
Examine the universe
After the universe is ready, its Overview tab should appear similar to the following illustration:
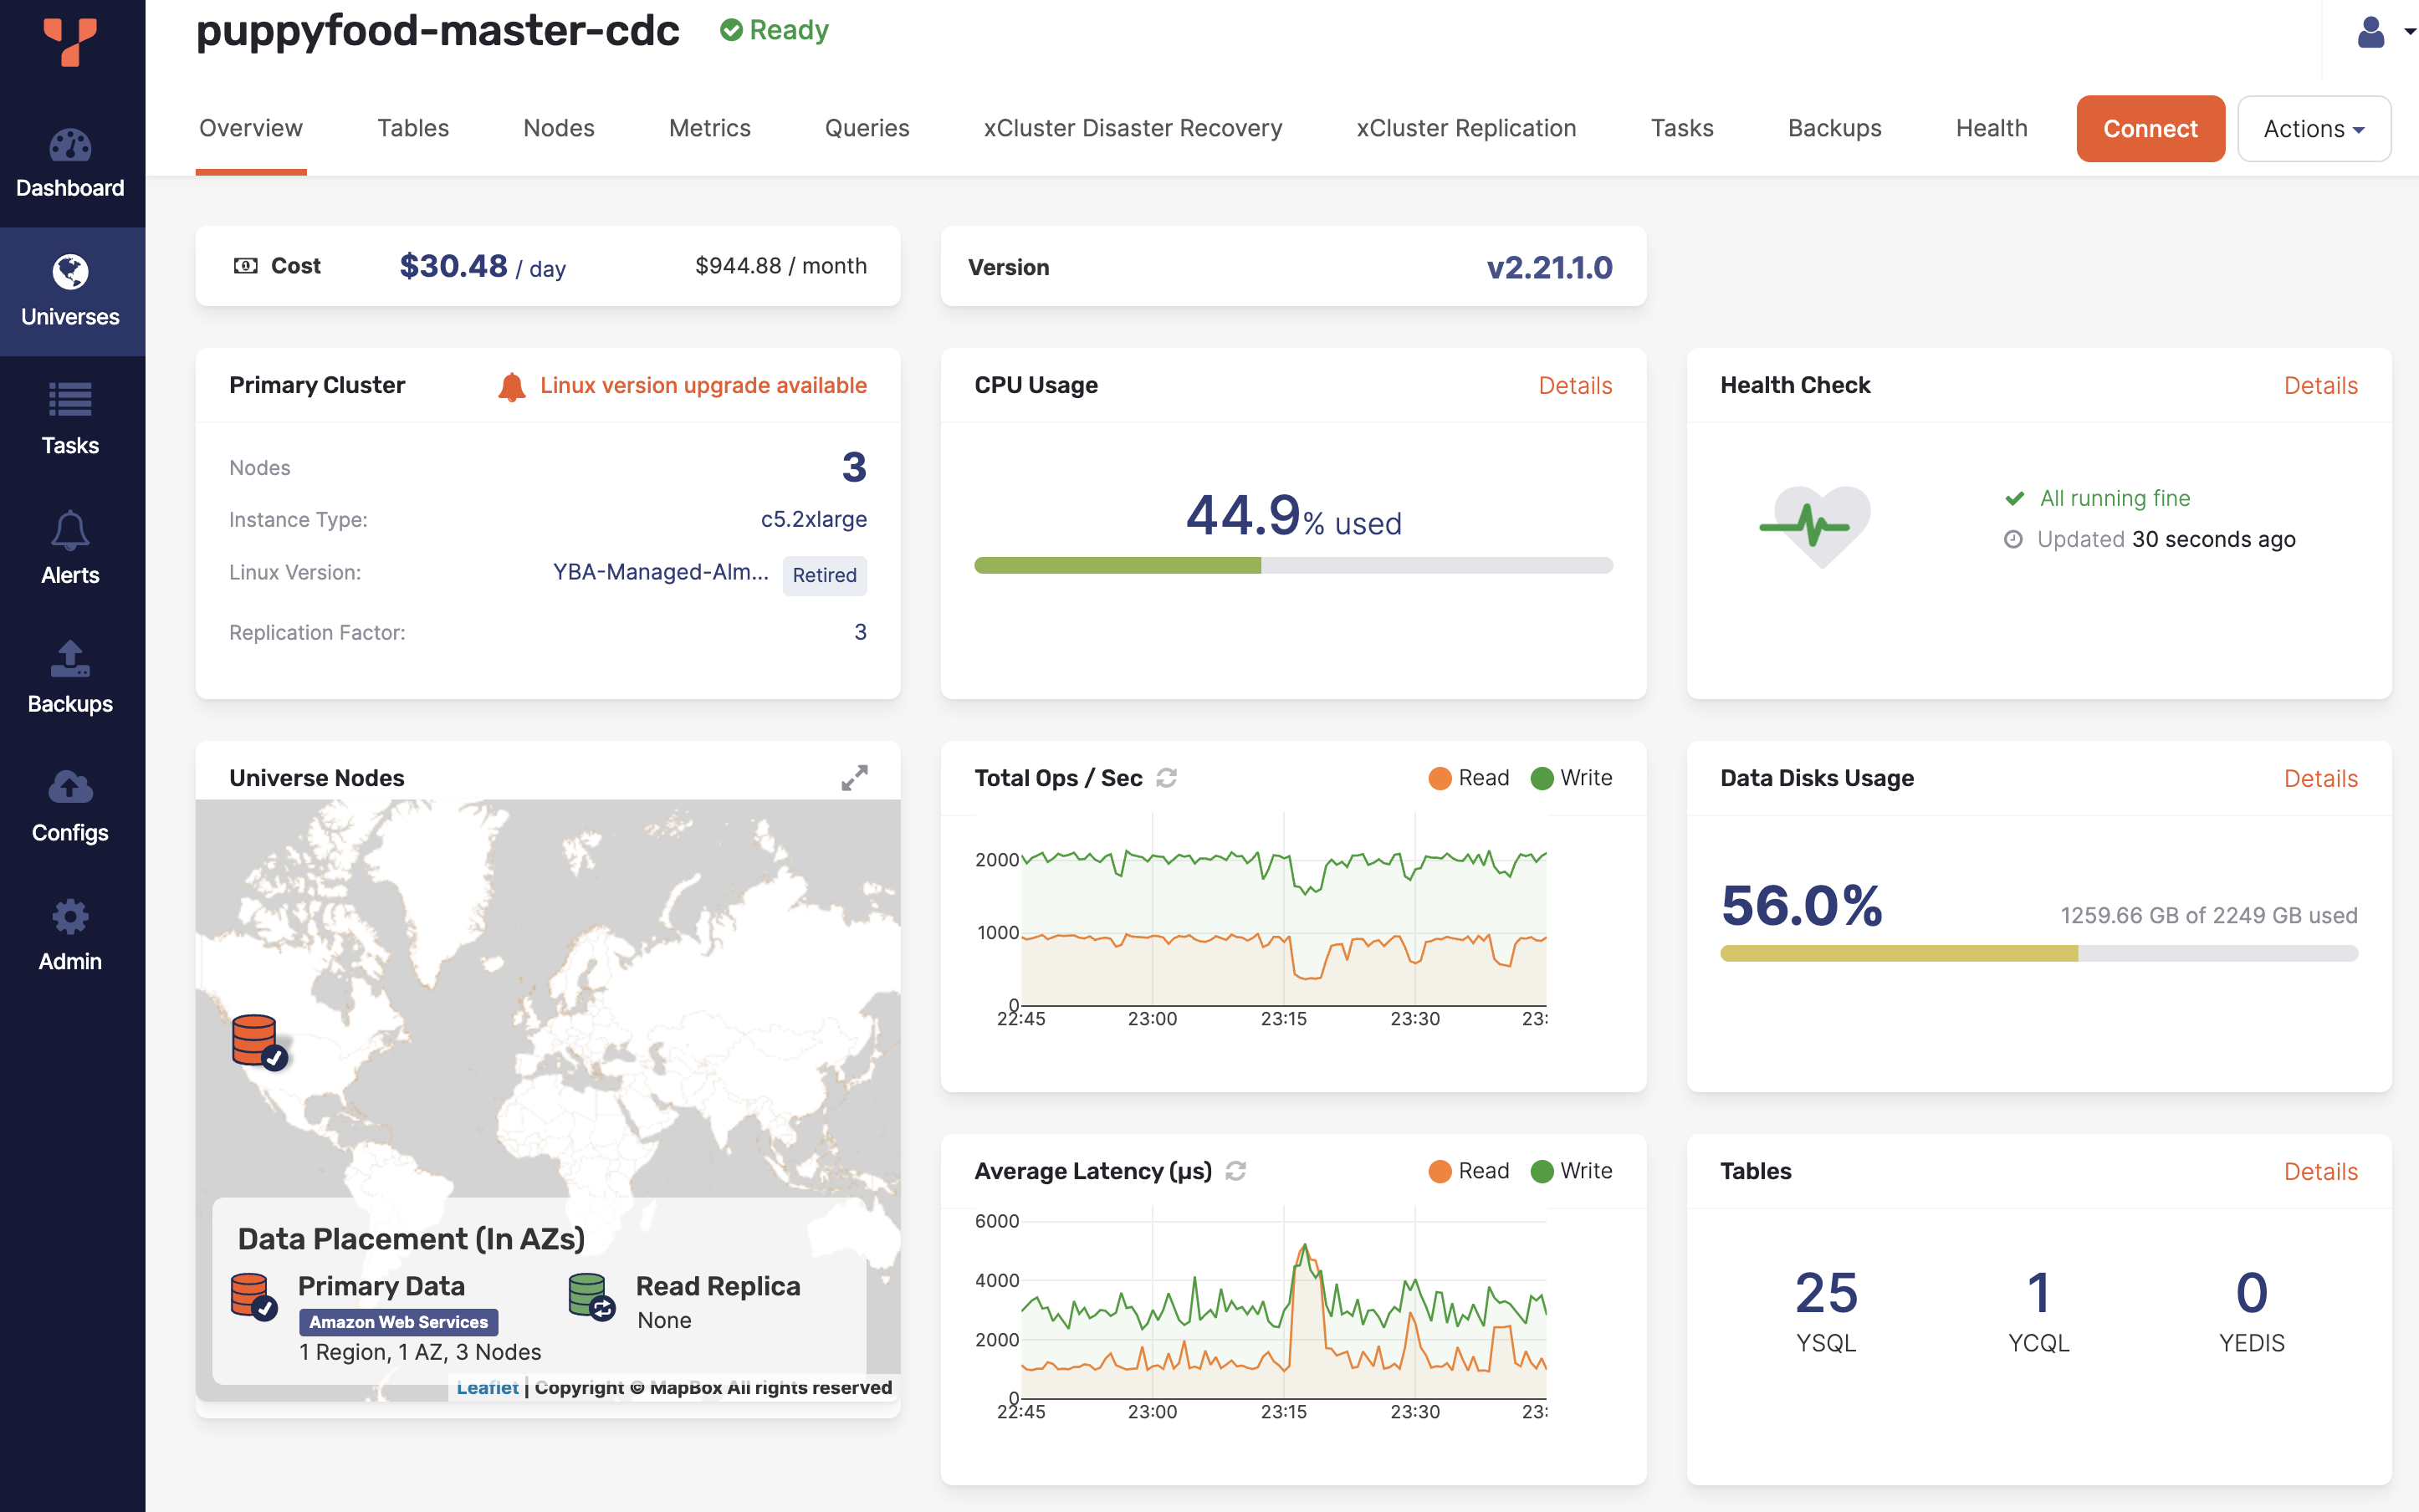
The universe page includes the following tabs:
- Overview — Cost, database version, primary cluster details (nodes, instance type, Linux version, and replication factor), CPU and disk usage, health check status, node geography and data placement, operations per second, average latency, and table counts.
- Tables — Details about YSQL and YCQL tables in the universe. Table sizes are calculated across all nodes in the cluster.
- Nodes (or Pods for Kubernetes) — Details on nodes or pods in the universe, and actions on a specific node (connect, stop, remove, display live and slow queries, download logs). You can also use Nodes to open the cloud provider's instances page. For example, in case of GCP, if you navigate to Compute Engine > VM Instances and search for instances that contain the name of your universe, you should see a list of instances.
- Metrics — Graphs representing operations, latency, and other parameters for each type of node and server.
- Queries — Live and slow queries that you can filter by column and text.
- xCluster Disaster Recovery — Information about any disaster recovery configured for the universe.
- xCluster Replication — Information about any asynchronous replication in the universe.
- Tasks — Details about the state of tasks running on the universe, as well as tasks that have run in the past against this universe.
- Performance — Performance Advisor recommendations for the universe (when enabled).
- Backups — Scheduled backups, if any, and options to create, restore, and delete backups.
- CDC — Replication slots for change data capture (when enabled).
- Health — Detailed health check status of the nodes and components involved in their operation. Health also allows you to pause health check alerts.
- Settings — Centralized universe configuration, including placement, hardware, and related settings.
For information on connecting to nodes and database endpoints, refer to Connect to a universe.