Create provider configuration

Configure an on-premises provider configuration

Before you can deploy universes using YugabyteDB Anywhere, you must create a provider configuration.

A provider configuration describes your cloud environment (such as its regions and availability zones, NTP server, certificates that may be used to SSH to VMs, whether YugabyteDB database software will be manually installed by the user or auto-provisioned by YugabyteDB Anywhere, and so on). The provider configuration is used as an input when deploying a universe, and can be reused for many universes.

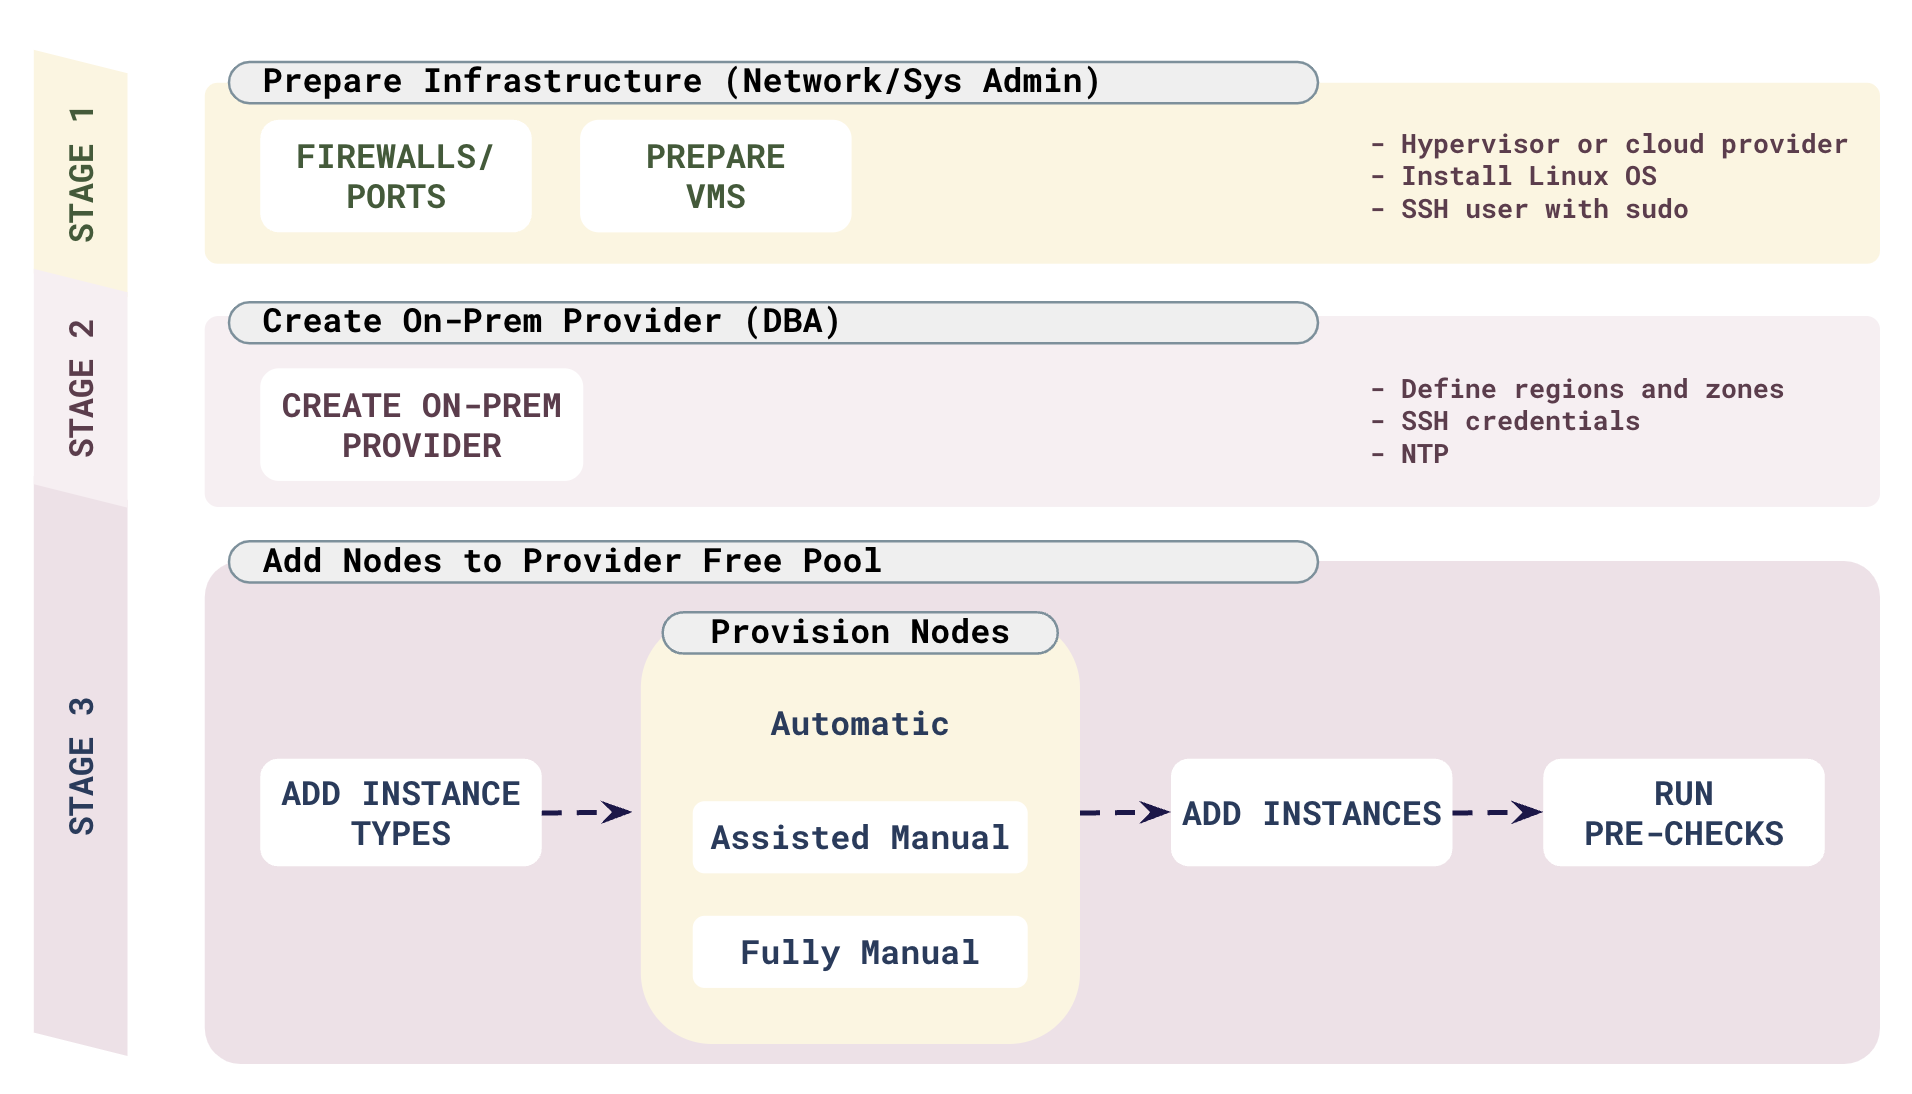
With on-premises providers, VMs are not auto-created by YugabyteDB Anywhere; you must manually create your VMs and add them to the free pool of the on-premises provider. Only after VM instances are added can YugabyteDB Anywhere auto-provision or can you manually provision the YugabyteDB database software and create universes from these database nodes.

Creating an on-premises provider requires the following steps:

  • Create your VMs. Do this using your hypervisor or cloud provider. You will need the IP addresses of the VMs.
  • Create the on-premises provider configuration. The provider configuration includes details such as the SSH user you will use to access your VMs while setting up the provider, and the regions where the nodes are located.
  • Specify the compute instance types that will be used in this provider.
  • Add the compute instances by provisioning each of the node instances that the provider will use for deploying YugabyteDB universes with the necessary software, and then adding them to the pool of nodes.

Configure the on-premises provider

Navigate to Configs > Infrastructure > On-Premises Datacenters to see a list of all currently configured on-premises providers.

View and edit providers

To view a provider, select it in the list of On Prem Configs to display the Overview.

To edit the provider, select Config Details, make changes, and click Apply Changes. For more information, refer to Provider settings. Note that, depending on whether the provider has been used to create a universe, you can only edit a subset of options.

To view the universes created using the provider, select Universes.

To delete the provider, click Actions and choose Delete Configuration. You can only delete providers that are not in use by a universe.

Create a provider

To create an on-premises provider:

  1. Click Create Config to open the OnPrem Provider Configuration page.

    Create On-Premises provider

  2. Enter the provider details. Refer to Provider settings.

  3. Click Create Provider Configuration when you are done and wait for the configuration to complete.

After the provider is created, configure the provider hardware. Refer to Configure hardware for YugabyteDB nodes.

Provider settings

Provider Name

Enter a Provider name. The Provider name is an internal tag used for organizing cloud providers.

Regions

To add regions for the provider, do the following:

  1. Click Add Region.

  2. Enter a name for the region.

  3. Select the region location.

  4. To add a zone, click Add Zone and enter a name for the zone.

  5. Click Add Region.

SSH Key Pairs

In the SSH User field, enter the name of the user that has SSH privileges on your instances. This is required because to provision on-premises nodes with YugabyteDB, YugabyteDB Anywhere needs SSH access to these nodes. Unless you plan to provision the database nodes manually, the user needs to have password-free sudo permissions to complete a few tasks.

If the SSH user requires a password for sudo access or the SSH user does not have sudo access, you must enable the Manually Provision Nodes option (under Advanced) and manually provision the instances.

SSH access

After you have provisioned and added the instances to the provider (including installing the node agent), YugabyteDB Anywhere no longer requires SSH or sudo access to nodes.

In the SSH Port field, provide the port number of SSH client connections.

In the SSH Keypair Name field, provide the name of the key pair.

Use the SSH Private Key Content field to upload the private key PEM file available to the SSH user for gaining access via SSH into your instances.

Advanced

Disable the DB Nodes have public internet access option if you want the installation to run in an air-gapped mode without expecting any internet access.

YugabyteDB Anywhere uses the sudo user to set up YugabyteDB nodes. However, if any of the following statements are applicable to your use case, you need to enable the Manually Provision Nodes option:

  • Pre-provisioned yugabyte:yugabyte user and group.
  • Sudo user requires a password.
  • The SSH user is not a sudo user.

For manual provisioning, you are prompted to run a Python pre-provisioning script at a later stage to provision the database instances. Refer to Add instances.

Optionally, use the YB Nodes Home Directory field to specify the home directory of the yugabyte user. The default value is /home/yugabyte.

Enable Install Node Exporter if you want the node exporter installed. You can skip this step if you have node exporter already installed on the nodes. Ensure you have provided the correct port number for skipping the installation.

The Node Exporter User field allows you to override the default prometheus user. This is helpful when the user is pre-provisioned on nodes (when the user creation is disabled). If overridden, the installer checks whether or not the user exists and creates the user if it does not exist.

Use the Node Exporter Port field to specify the port number for the node exporter. The default value is 9300.

NTP Setup lets you to customize the Network Time Protocol server, as follows:

  • Select Specify Custom NTP Server(s) to provide your own NTP servers and allow the cluster nodes to connect to those NTP servers.
  • Select Assume NTP server configured in machine image to prevent YugabyteDB Anywhere from performing any NTP configuration on the cluster nodes. For data consistency, ensure that NTP is correctly configured on your machine image.

Configure hardware for YugabyteDB nodes

After the provider has been created, you can configure the hardware for the on-premises configuration by navigating to Configs > Infrastructure > On-Premises Datacenters, selecting the on-prem configuration you created, and choosing Instances. This displays the configured instance types and instances for the selected provider.

Configure on-prem instances

To configure the hardware, do the following:

  1. Specify the compute instance types that will be used in this provider.
  2. Add the compute instances.

Add instance types

An instance type defines some basic properties of a VM.

To add an instance type, do the following:

  1. On the configuration Instances page, click Add Instance Type.

  2. Complete the Add Instance Type dialog fields, as follows:

    • Use the Machine Type field to define a value to be used internally as an identifier in the Instance Type universe field.
    • Use the Number of Cores field to define the number of cores to be assigned to a node.
    • Use the Memory Size (GB) field to define the memory allocation of a node.
    • Use the Volume Size (GB) field to define the disk volume of a node.
    • Use the Mount Paths field to define a mount point with enough space to contain your node density. Use /data. If you have multiple drives, add these as a comma-separated list, such as, for example, /mnt/d0,/mnt/d1.
  3. Click Add Instance Type.

Add instances

You can add instances to an on-prem provider using the YugabyteDB Anywhere UI.

Prerequisites

Before you add instances, you need the following:

  • The IP addresses of your VMs. Before you can add instances, you need to create your VMs. You do this using your hypervisor or cloud provider.
  • Instance type to assign each instance. The instance types define properties of the instances, along with the mount points. See Add instance types.

In addition, if either of the following conditions is true (and Manually Provision Nodes is enabled in the on-prem provider configuration), you must manually provision instances with the necessary software before you can add them to the on-premises provider:

Add instances to the on-prem provider

To add the instances, do the following:

  1. On the configuration Instances page, click Add Instances.

    On-prem Add Instance Types dialog

  2. For each node in each region, provide the following:

    • Select the zone.
    • Select the instance type.
    • Enter the IP address of the node. You can use DNS names or IP addresses when adding instances.
    • Optionally, enter an Instance ID; this is a user-defined identifier.

    Note that if you provide a hostname, the universe might experience issues communicating. To resolve this, you need to delete the failed universe and then recreate it with the use_node_hostname_for_local_tserver flag enabled.

  3. Click + Add to add additional nodes in a region.

  4. Click Add when you are done.

    The instances are added to the Instances list.

  5. After the instances are available in the Instances list, validate them by performing a preflight check. For each instance, click Actions, choose Perform check, and click Apply.

YugabyteDB Anywhere runs the check and displays the status in the Preflight Check column. Click in the column to view details; you can also view the results under Tasks.

If all your instances successfully pass the preflight check, your on-premises cloud provider configuration is ready, and you can proceed to configure the backup target or deploy universes.