Enable high availability
YugabyteDB Anywhere (YBA) high availability (HA) is an active-standby model for multiple YBA instances. YBA HA uses YugabyteDB's distributed architecture to replicate your YBA data across multiple virtual machines (VM), ensuring that you can recover quickly from a VM failure and continue to manage and monitor your universes, with your configuration and metrics data intact.
Each HA cluster includes a single active YBA instance and at least one standby YBA instance, configured as follows:
-
The active instance runs normally, but also pushes out backups of its state to all of the standby instances in the HA cluster at a configurable frequency (no more than once per minute).
The active instance also creates and sends one-off backups to standby instances whenever a task completes (such as creating a new universe).
-
A standby instance is passive while in standby mode and can't be used for managing clusters until you manually promote it to active.
The standby instance retains received state backups from the active instance, but does not apply them until it is promoted. Standby instances retain the ten most recent backups on disk.
The standby instance's Prometheus instance is federated to the active instance's Prometheus to constantly receive up to date metrics asynchronously.
When you promote a standby instance to active, YBA restores your selected backup, and then attempts to demote the previous active instance to standby mode. If the previous active instance is unavailable, it has to be manually decommissioned.
Prerequisites
Before configuring a HA cluster for your YBA instances, ensure that you have the following:
- Two or more YBA instances to be used in the HA cluster.
- The YBA instances can connect to each other over the port where the YBA UI is reachable (443 by default).
- Communication is open in both directions over port 443 and 9090 on all YBA instances.
- The YBA instances were installed using the same installation method (YBA Installer, Replicated, or Helm (Kubernetes)).
- The YBA instances are configured to use the same path for the installation root.
- If you are using custom ports for Prometheus, all YBA instances are using the same custom port. (The default Prometheus port for YugabyteDB Anywhere is 9090.)
- All YBA instances are running the same version of YBA software. (The YBA instances in a HA cluster should always be upgraded at approximately the same time.)
- The YBA instances have the same login credentials.
Configure active and standby instances
To set up HA, you first configure the active instance by creating an active HA replication configuration and generating a shared authentication key.
You then configure one or more standby instances by creating standby HA replication configurations, using the shared authentication key generated on the active instance.
By default, during initial setup, certificate validation is disabled for the HA configuration. To add certificate validation (recommended), follow the steps in Enable certificate validation after your instances are successfully connected.
Configure the active instance
You can configure the active instance as follows:
-
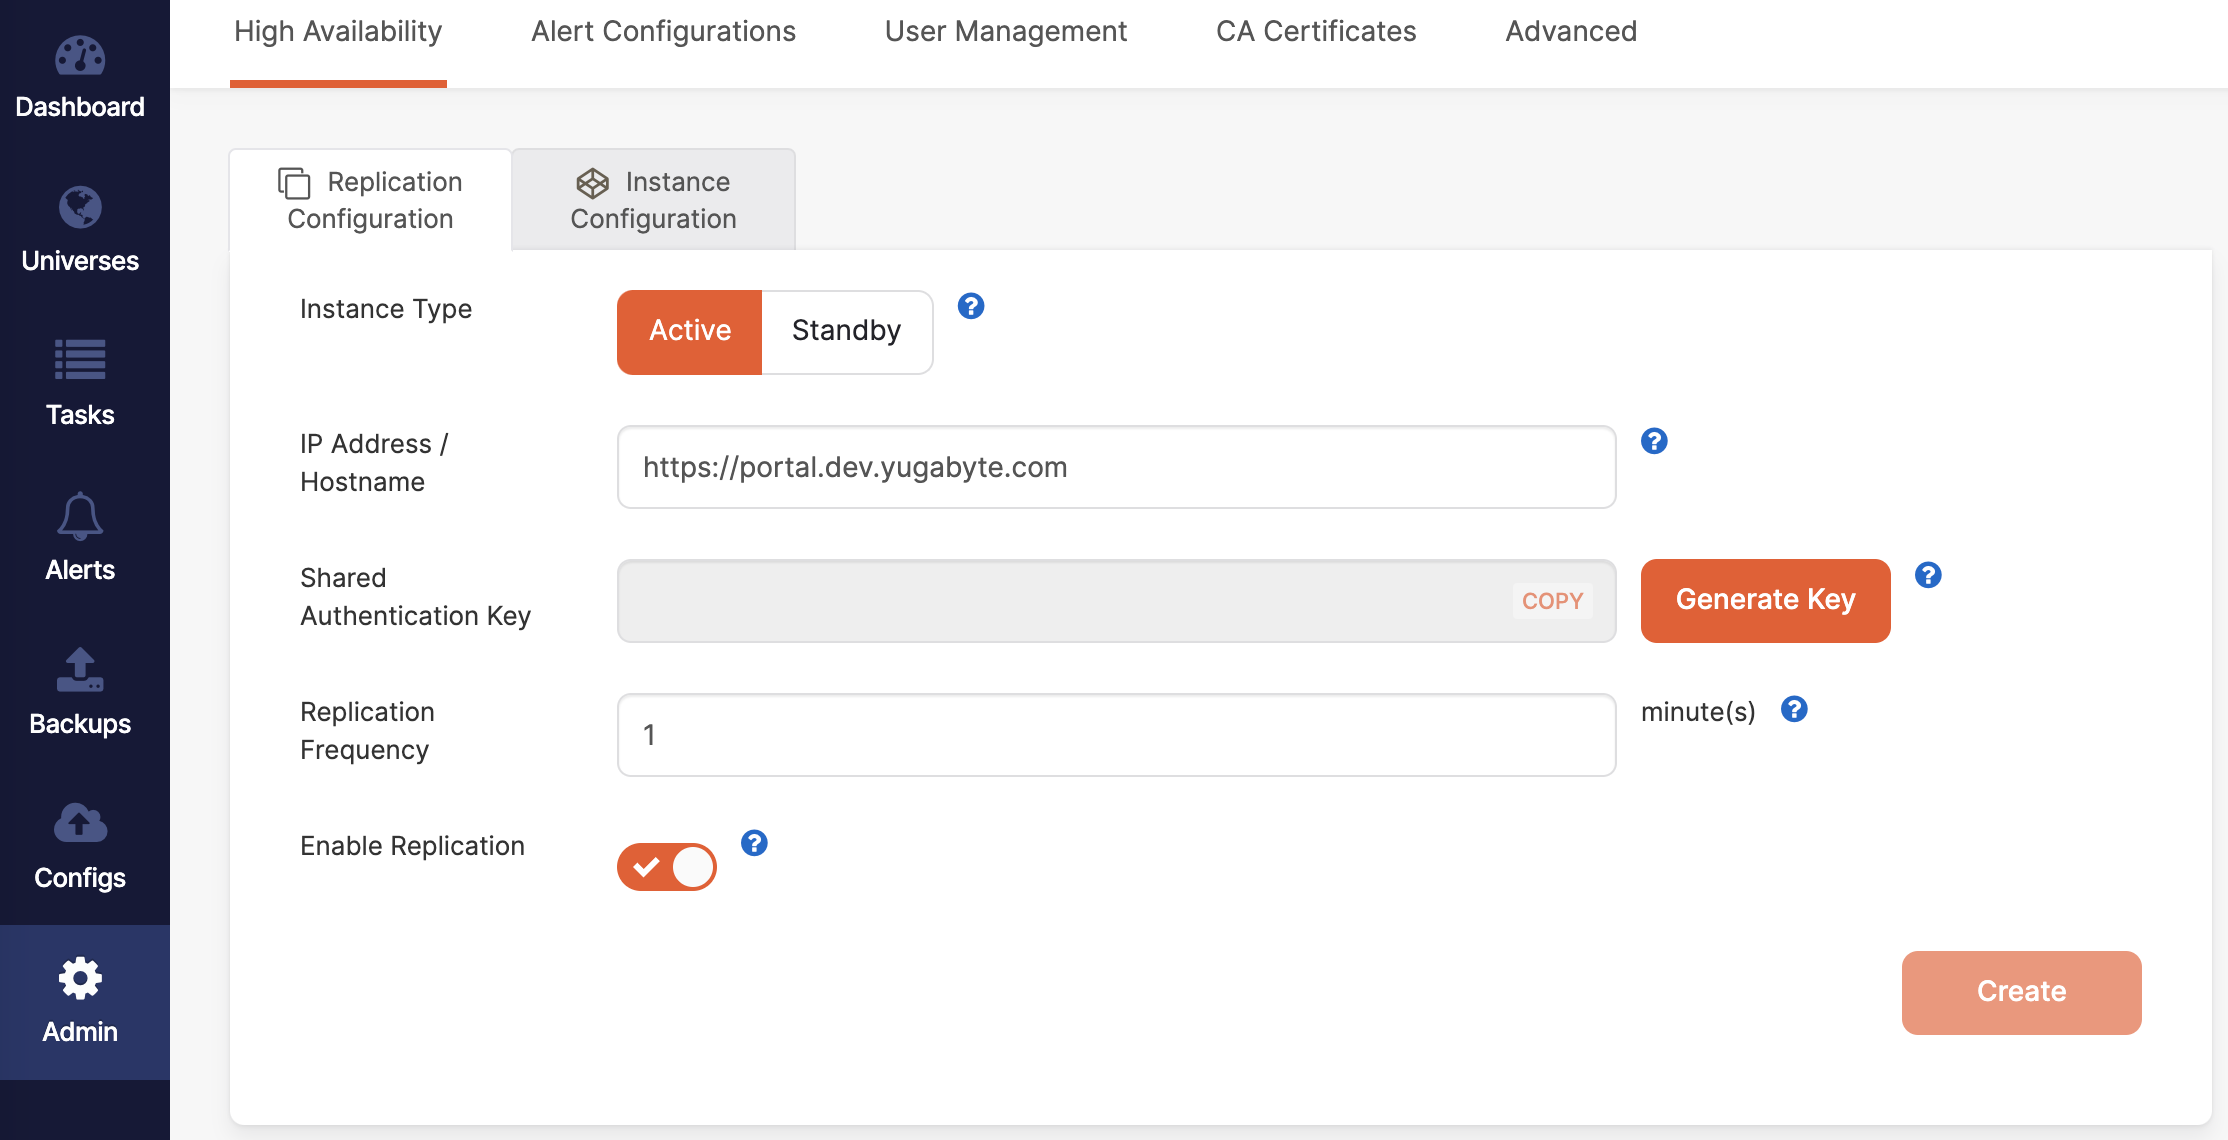
Navigate to Admin and make sure that High Availability > Replication Configuration > Active is selected, as per the following illustration:
-
Enter the active instance IP address or host name in the following format:
https://<ip-address or hostname>:<port>Port is only required if you are not using the default 443.
-
Click Generate Key and copy the shared key.
-
Select your desired replication frequency, in minutes.
In most cases, you do not need to replicate very often. A replication interval of 5-10 minutes is recommended. For testing purposes, a 1-minute interval is more convenient.
-
Click Create.
-
Switch to Instance Configuration.
The address for this active instance should be the only information under Instances.
Your active instance is now configured.
Configure standby instances
After the active instance has been configured, you can configure one or more standby instances by repeating the following steps for each standby instance you wish to add to the HA cluster:
-
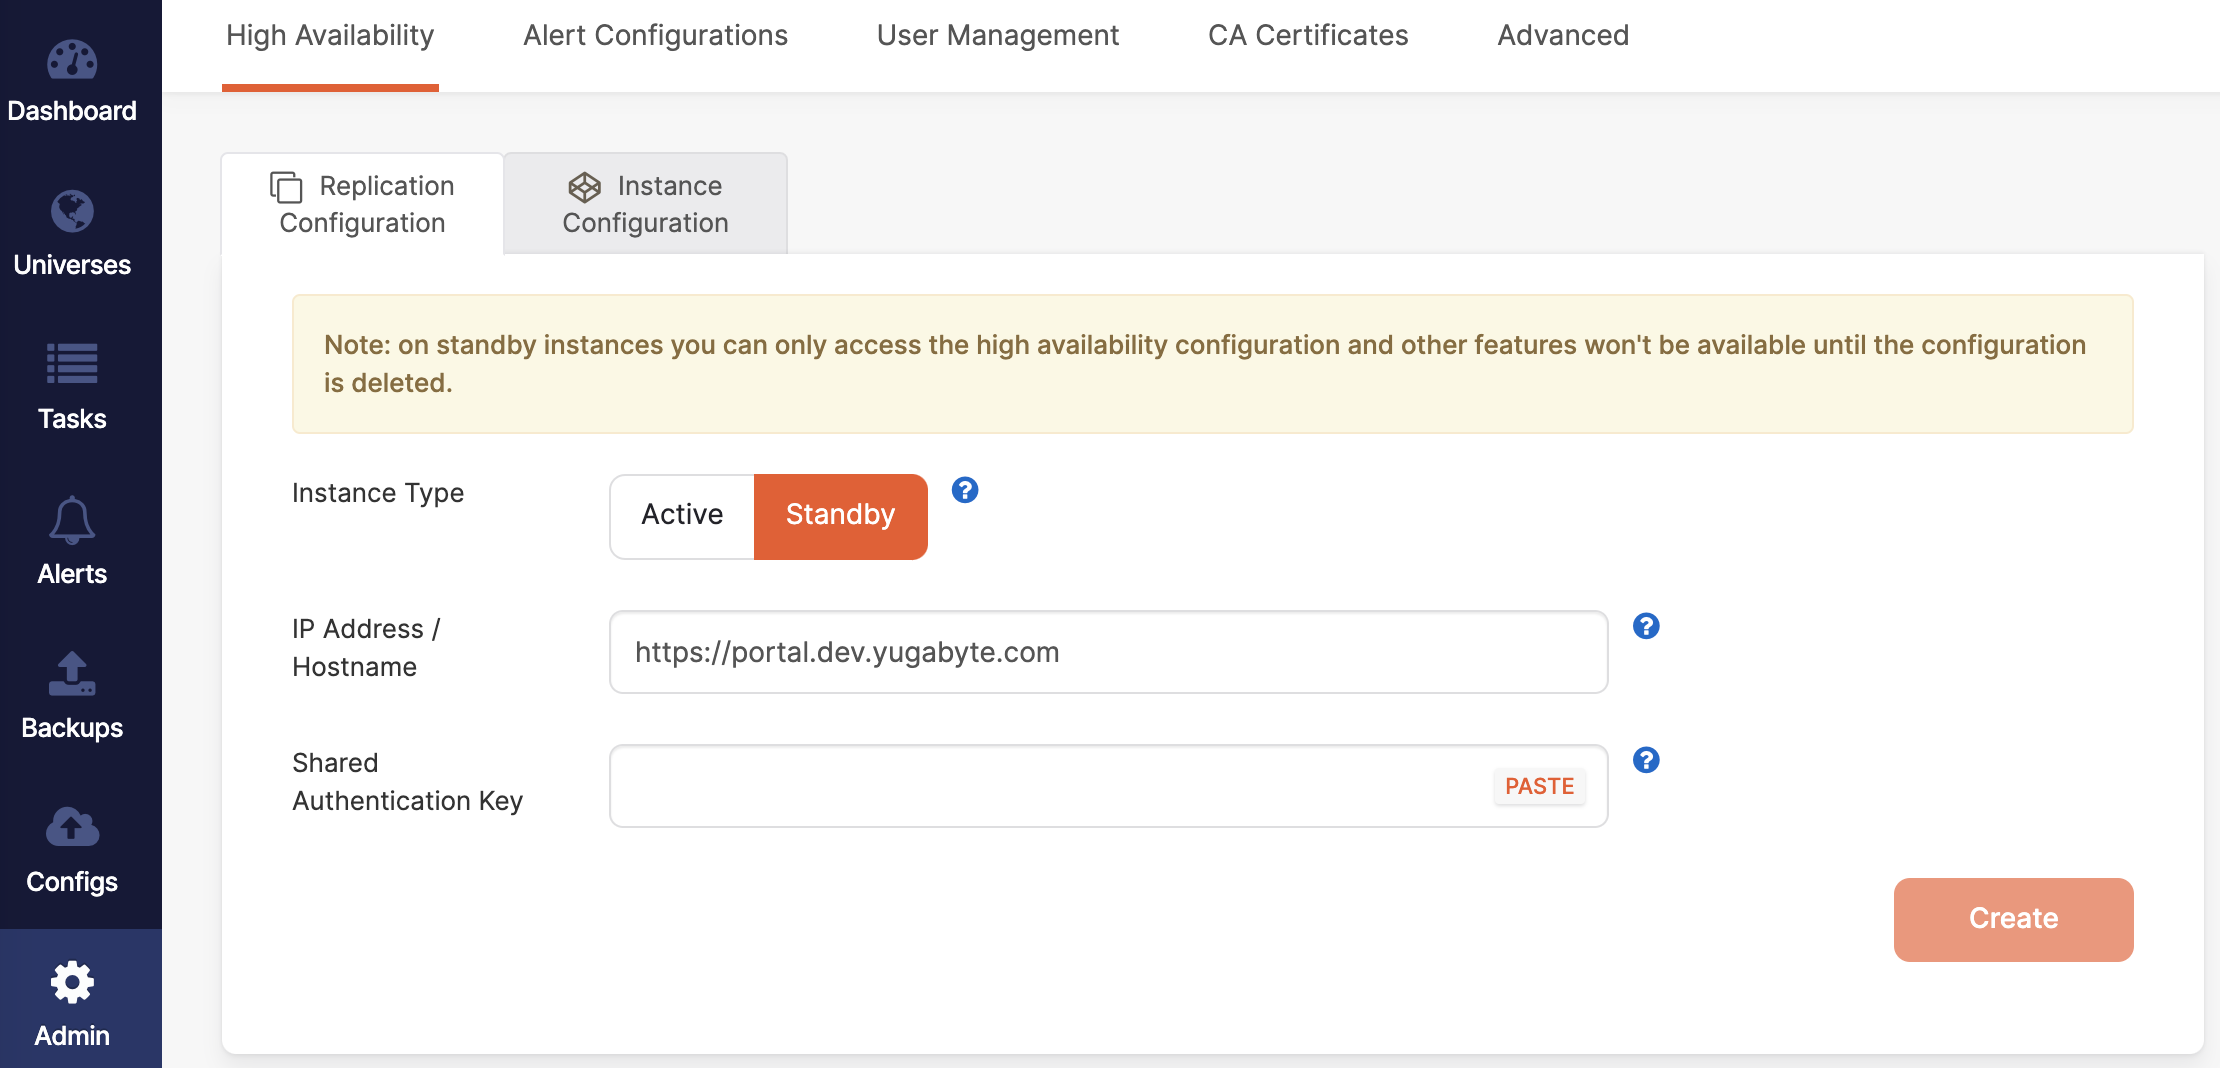
On the standby instance, navigate to Admin > High Availability > Replication Configuration and select Standby, as per the following illustration:
-
Enter the standby instance IP address or host name in the following format:
https://<ip-address or hostname>:<port>Port is only required if you are not using the default 443.
-
Paste the shared authentication key that you generated for the active instance into the Shared Authentication Key field.
-
Click Create.
Add standby instances to the active instance
After configuring a standby instance, you need to add it to the active instance. Note that standby instances and the active instance must use the same authentication key, and the standby instance must already be configured.
To add a standby, do the following:
-
On the active instance, navigate to Admin > High Availability > Replication Configuration and select Instance Configuration.
-
Click Add Instance and enter the standby instance IP address or host name in the following format:
https://<ip-address or hostname>:<port>Port is only required if you are not using the default 443.
-
Click Continue on the Add Standby Instance dialog.
If the add instance succeeds, it means replication was successful. You should now see the standby instance listed as connected on the active's Instance Configuration page.
If the operation fails, verify network connectivity and other prerequisites.
Verify HA
To confirm communication between the active and standby, you can do the following:
-
On the active instance, navigate to Admin > High Availability > Replication Configuration and verify the HA Global State is Operational.
-
On the active instance, navigate to Admin > High Availability > Instance Configuration and verify the time since last backup is within the replication frequency for each individual standby.
-
Verify that Prometheus on the standby is able to see similar metrics to the active. Navigate to
https://<standby-ip-address>:9090/targets; the federate target should have a status of UP, and the endpoint should match the active instance IP address.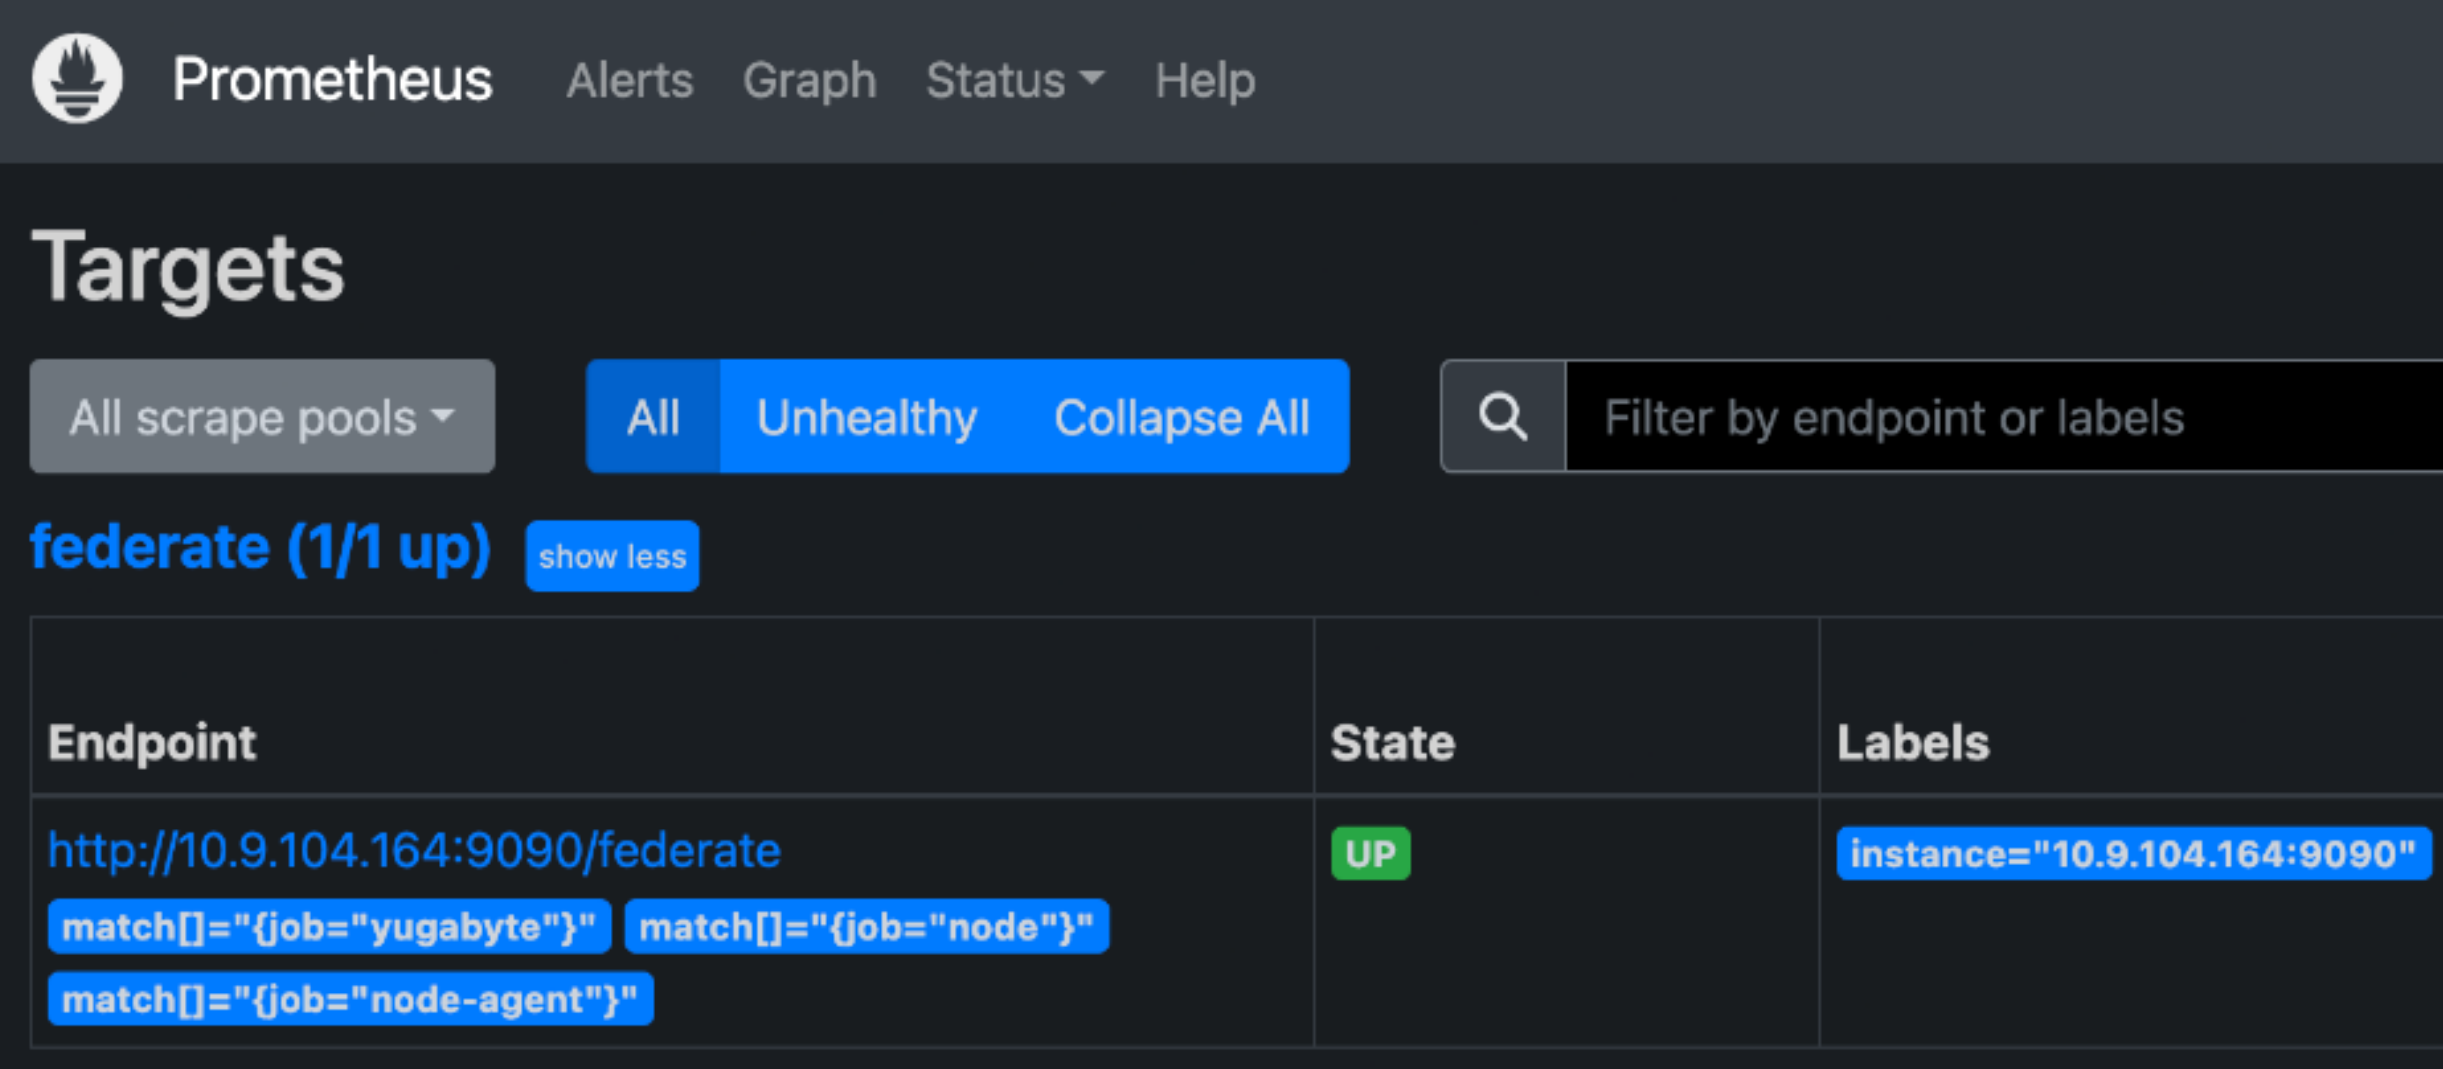
Metrics availability on the standby
Metrics on the standby are only available from the time the standby was activated. The standby begins collecting metrics from the active instance when activated; no historical metrics are copied from the active instance at that time.
For example, if your metrics retention is 14 days on your active instance, and you activated your standby 7 days ago, you will not see metrics for the 7 days prior to standby activation. After the standby has been active for 14 days, you will see the same metrics on both.
Enable certificate validation
After HA is operational, you should enable certificate validation to improve security of communication between the active and any standby instances. Enable certificate validation as follows:
-
Add Certificate Authority (CA) certificates for the active and all standbys to the active instance trust store. This allows a standby to connect to the active instance if the standby is promoted to active status.
Automatically generated CA certificates
If YBA was set up to use automatically generated self-signed certificates (the default), the CA certificate is in the following location on the active and standby instances:
Installation Certificate Location YBA Installer /opt/yugabyte/data/yba-installer/certs/ca_cert.pem
If you configured a custom install root, replace/opt/yugabytewith the path you configured.Replicated /var/lib/replicated/secrets/ca.crtKubernetes Locate the CA certificate by running the following command: kubectl get secret -n <namespace> <helm-release-name>-yugaware-tls-pem -o jsonpath="{.data['ca\.pem']}" | base64 -d
Replace<namespace>and<helm_release_name>with appropriate values.Custom CA certificates
If YBA was set up to use a custom server certificate, locate the corresponding CA certificate. Ensure the CA certificate includes the full chain (root and intermediate).
-
On the active instance, navigate to Admin > High Availability > Replication Configuration, click Actions, and choose Enable Certificate Validation.
When you click Enable Certificate Validation, YBA tests the connection between the active instance and all standby instances with the certificates in the trust store. If the validation fails for any of the standbys, the entire enablement will fail and certificate validation will remain disabled. Check the CA certificate files added to the trust store and try again.
Test custom CA certificates
If you are using a custom CA certificate and certificate validation fails, you can test the CA certificate using the following command (on the active and standby nodes):
openssl verify -CAfile CA.crt /path/to/server_cert.pem
Where path/to/server_cert.pem is the location you provided during installation (server_cert_path for YBA Installer).
If the command fails, check that the certificate chain is correct. You may need to concatenate the intermediate and root certificates to create a CA trust chain. To do this, you can use the cat command. For example:
cat CA_intermediate.crt CA_root.crt > CA_combined.crt
Upload the combined certificate to the trust store and try enabling certificate validation again.
Use a load balancer
To set up a single URL for signing in to YBA that points to the current active YBA, even after a switchover or failover, it is recommended to use an application (L7) load balancer. On the load balancer, set the health check URL for each HA instance to https://<instance IP or DNS>/api/v1/ha_leader. (Specify any custom port configuration if you changed the default 443 configuration.) Note that you may need to set the support origin URL for your YBA instance to the load balancer URL; this can be set during installation, refer to Install YugabyteDB Anywhere. Configure the load balancer to forward ports 443 for the YBA UI and 9090 for Prometheus.
Promote a standby instance to active
You can make a standby instance active as follows:
-
On the standby instance you want to promote, navigate to Admin > High Availability > Replication Configuration and click Make Active.
-
Select the backup from which you want to restore (in most cases, you should choose the most recent backup) and enable Confirm promotion.
Don't promote an old active backup
Immediately after upgrading the active instance to a new version of YBA, older state backups of the active instance (that is, before it was upgraded) will still be available on the standby. These are not deleted until the standby is promoted at some point, or until they expire.
Because these old backups are present, you need to be cautious promoting the standby in the time immediately following an upgrade.
When possible, only promote a standby when both standby and active are on the same version, and use the most recent backup that you are confident was received after the active instance was upgraded.
-
Click Continue. The restore takes a few seconds, after which expect to be signed out.
-
Sign in using the credentials that you had configured on the previously active instance.
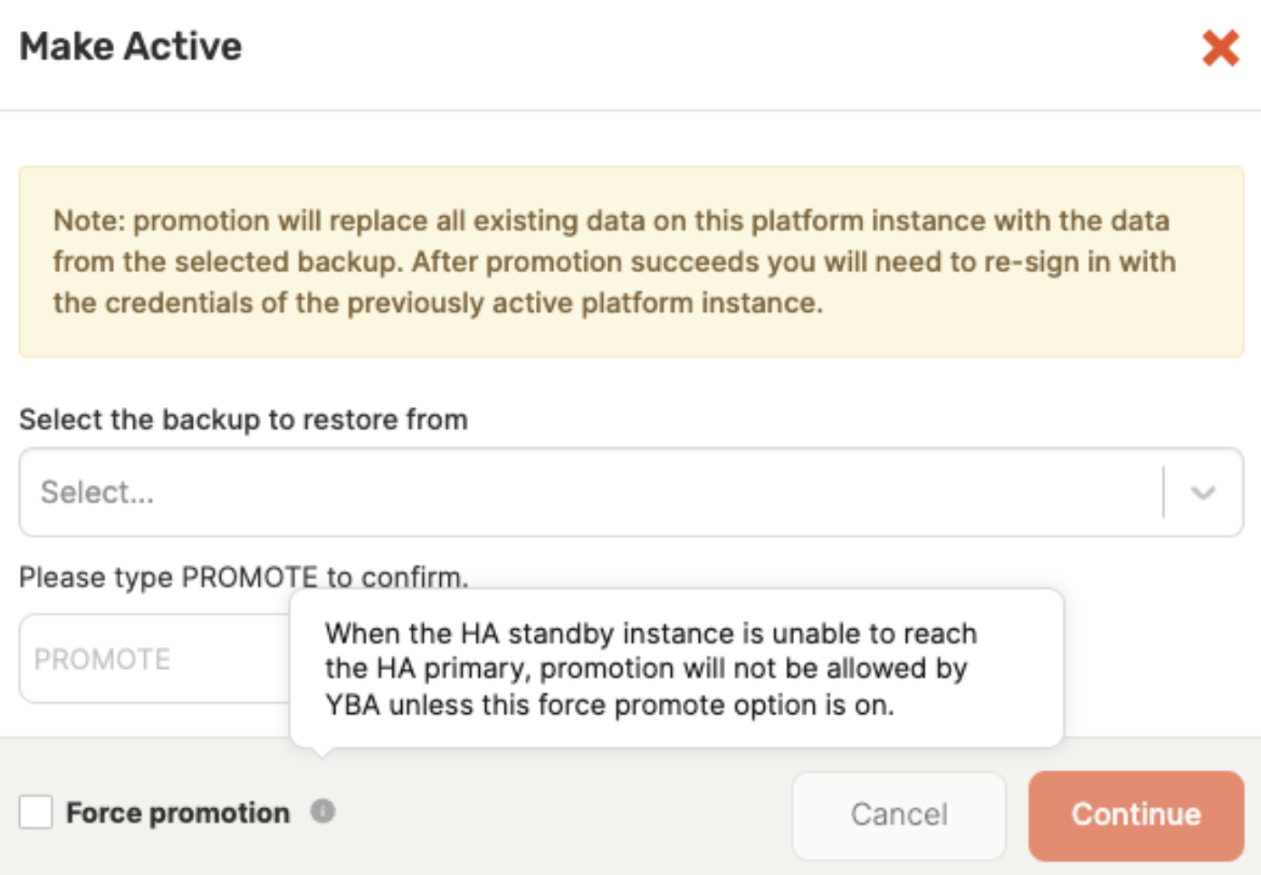
In cases of failover, the previous active instance may be unavailable or unreachable during promotion. In this case, you must perform a force promotion that will promote the standby without demoting the active as per the following illustration:
Afterwards, follow the steps in Failover to ensure that the old active does not come back up or that it goes into standby mode when it does come up.
You should be able to see that all of the data has been restored into the instance, including universes, users, metrics, alerts, task history, provider configurations, and so on.
Verify promotion
After switching or failing over to the standby, verify that the old active YBA instance is in standby mode (switchover), or is no longer available (failover).
If both YBA instances were to attempt to perform actions on a universe, it could have unpredictable side effects. It is critical to ensure that the old active instance is taken out of service or re-imaged as soon as possible if it is unavailable.
YugabyteDB release archives are not synchronized between the active and standby instances. If any custom releases were added to the old active instance, you will need to add them to the new active instance again. The Universe Release Files Missing alert will fire on any universes that are missing their corresponding release archives. If this alert fires, follow the steps in How to Configure YugabyteDB Anywhere to provide Older, Hotfix, or Debug Builds.
Switchover
After a switchover, do the following:
- Verify that HA is functioning properly.
- If the old active instance is not in standby mode, there could be a communication issue from the new active to the old active instance. Follow the setup instructions to verify that certificates and ports are set up correctly.
Failover
After a failover, do the following:
-
If the old active instance is hard down, verify that there is no chance that it can come back and run YBA at a later point. It is recommended to re-image the server hosting the active instance.
-
If the old active instance does come back up, it should automatically go into standby mode. If it does not go into standby mode, you should manually demote it using the YBA API. Refer to High Availability Workflows for an example.
-
If the old active instance has successfully switched to standby, verify that HA is functioning properly.
Upgrade instances
All instances involved in HA should use the same version of YugabyteDB Anywhere. This ensures that, in steady state operation, all instances run the same version of YugabyteDB Anywhere. You will receive alerts if a mismatch is detected between active and standby instances.
When upgrading YBA in a HA cluster, upgrade the standby instances first. If the active is upgraded first, state backups will stop replicating to any lower version standbys, causing HA to stop.
Upgrade instances in an HA configuration as follows:
-
Upgrade the standby instances.
-
After upgrading a standby instance, ensure that YBA is reachable by signing in and checking various pages.
-
Validate that replication is successful and the standby is receiving backups from the active.
-
After all standbys have been upgraded, proceed with upgrading the active instance.
After upgrading all instances, verify that the standbys are still receiving new backups from the active instance.
Certificates in the trust store should not require setup again.
If you are promoting a YBA standby that is running version 2024.1.0 or later, while the old active instance is running a version earlier than 2024.1.0, see the Limitations.
Remove a standby instance
To remove a standby instance from a HA cluster, you need to remove it from the active instance's list, and then delete the configuration from the instance to be removed, as follows:
-
On the active instance's list, click Delete Instance for the standby instance to be removed.
-
On the standby instance you wish to remove from the HA cluster, on the Admin > High Availability tab, click Delete Configuration.
The standby instance is now a standalone instance again.
After you have returned a standby instance to standalone mode, the information on the instance is likely to be out of date, which can lead to incorrect behavior. It is not recommended to continue to use this standby instance for any management operations. Uninstall YBA from this instance and reinstall it to return it to a clean state before using it as a standalone instance.
Monitoring
The easiest way to determine the health of your HA configuration is to monitor the overall HA state of your active YBA instance, which is displayed on the Replication Configuration tab as per the following illustration:
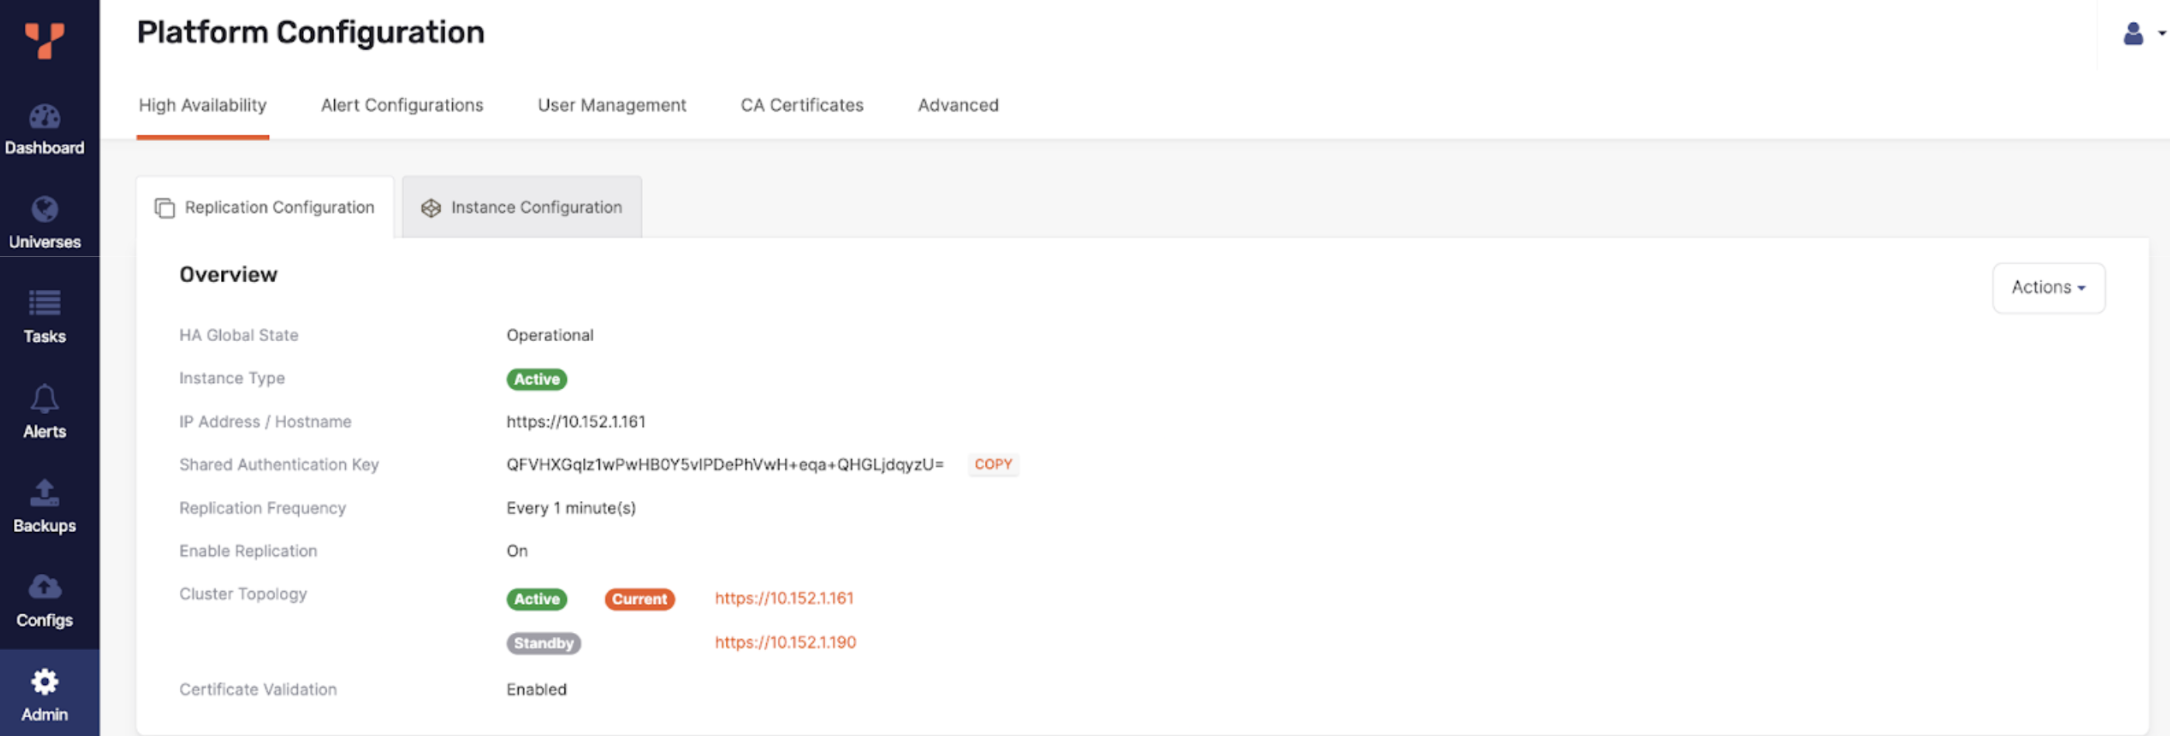
The overall HA state is computed from the individual instance states, which can be viewed on the Instance Configuration tab.
If some standbys are connected and some are disconnected, the global state will show Warning.
If all of your standby instances are disconnected, the state will show Error.
The following HA-related alerts are automatically configured to alert you of issues with your HA configuration:
-
HA Standby Sync
This alert fires when backup to a particular standby has failed for a specified amount of time. The default is 15 minutes, and can be changed by editing the HA Standby Sync alert policy.
-
HA Version Mismatch
This alert fires when there is a version mismatch between the active and standby instances, and clears automatically when both instances are upgraded to the same version.
-
Universe Release Files Missing
This alert fires if any of your universes are using a local YugabyteDB release that is not available in YBA. This can happen after a switchover or failover to a YBA instance that doesn't have the same releases. The alert clears after you add the missing releases.
Limitations
- No automatic failover. If the active instance fails, follow the steps in Promote a standby instance to active.
- Promotion will fail when HA is configured with an active instance at YBA version earlier than 2024.1, and a standby instance at version 2024.1 or later. It is not recommended to run in this configuration for an extended period. Reach out to Yugabyte Support if this is required.
- If you are making API calls to YBA through custom automation, note that the API token is different on the YBA active and standby until the standby has been promoted at least once to be an active instance. If you are using YBA with an API token, either generate a new token before every request, or perform a switchover after generating the API token (this process will have to be repeated when the API token is regenerated).
- If you have an older Replicated installation that uses HTTP, the default port is 80. Use
httpwhen specifying addresses.