Configure backup storage
Before you can back up universes, you need to configure a storage location for your backups.
Depending on your environment, you can save your YugabyteDB universe data to a variety of storage solutions.
Amazon S3
You can configure AWS S3 and S3-compatible storage as your backup target.
S3-compatible storage requires S3 path style access
By default, the option to use S3 path style access is not available. To ensure that you can use this feature, navigate tohttps://<my-yugabytedb-anywhere-ip>/features and enable the enablePathStyleAccess option.
Create an AWS backup configuration
To configure S3 storage, do the following:
-
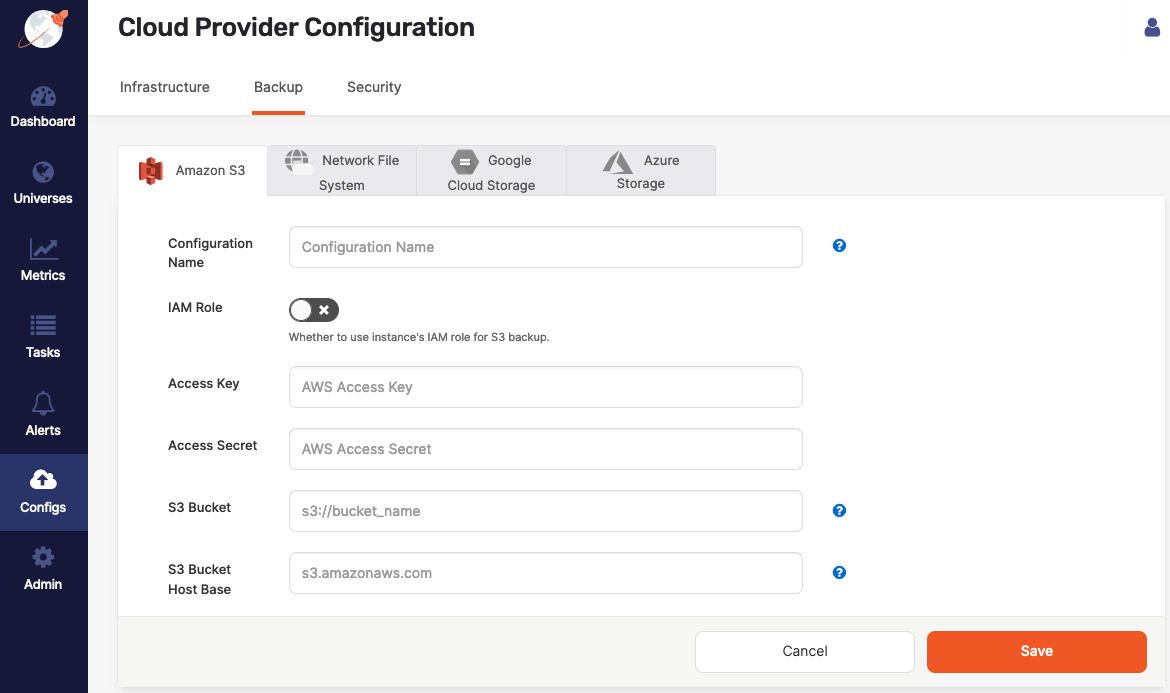
Navigate to Integrations > Backup > Amazon S3.
-
Click Create S3 Backup.
-
Use the Configuration Name field to provide a meaningful name for your storage configuration.
-
Enable IAM Role to use the YugabyteDB Anywhere instance's Identity Access Management (IAM) role for the S3 backup. See Required S3 IAM permissions.
-
If IAM Role is disabled, enter values for the Access Key and Access Secret fields.
For information on AWS access keys, see Manage access keys for IAM users.
-
In the S3 Bucket field, enter the bucket name in the format
s3://bucket_name, orhttps://storage_vendor/s3-bucket-namefor S3-compatible storage. -
In the S3 Bucket Host Base field, enter the HTTP host header (endpoint URL) of the AWS S3 or S3-compatible storage, in the form
s3.amazonaws.comormy.storage.com. -
If you are using S3-compatible storage, set the S3 Path Style Access option to true. (The option is only available if the enablePathStyleAccess feature is enabled.)
-
Click Save.
You can configure access control for the S3 bucket as follows:
-
Provide the required access control list (ACL), and then define List, Write permissions to access Objects, as well as Read, Write permissions for the bucket, as shown in the following illustration:

-
Create Bucket policy to enable access to the objects stored in the bucket.
Required S3 IAM permissions
The following S3 IAM permissions are required:
"s3:DeleteObject",
"s3:PutObject",
"s3:GetObject",
"s3:ListBucket",
"s3:ListAllMyBuckets",
"s3:GetBucketLocation"
Google Cloud Storage
You can configure Google Cloud Storage (GCS) as your backup target.
Required GCP service account permissions
To grant access to your bucket, create a GCP service account with IAM roles for cloud storage with the following permissions:
roles/storage.admin
The credentials for this account (in JSON format) are used when creating the backup storage configuration. For information on how to obtain GCS credentials, see Cloud Storage authentication.
You can configure access control for the GCS bucket as follows:
- Provide the required access control list (ACL) and set it as either uniform or fine-grained (for object-level access).
- Add permissions, such as roles and members.
Create a GCS backup configuration
To create a GCP backup configuration, do the following:
-
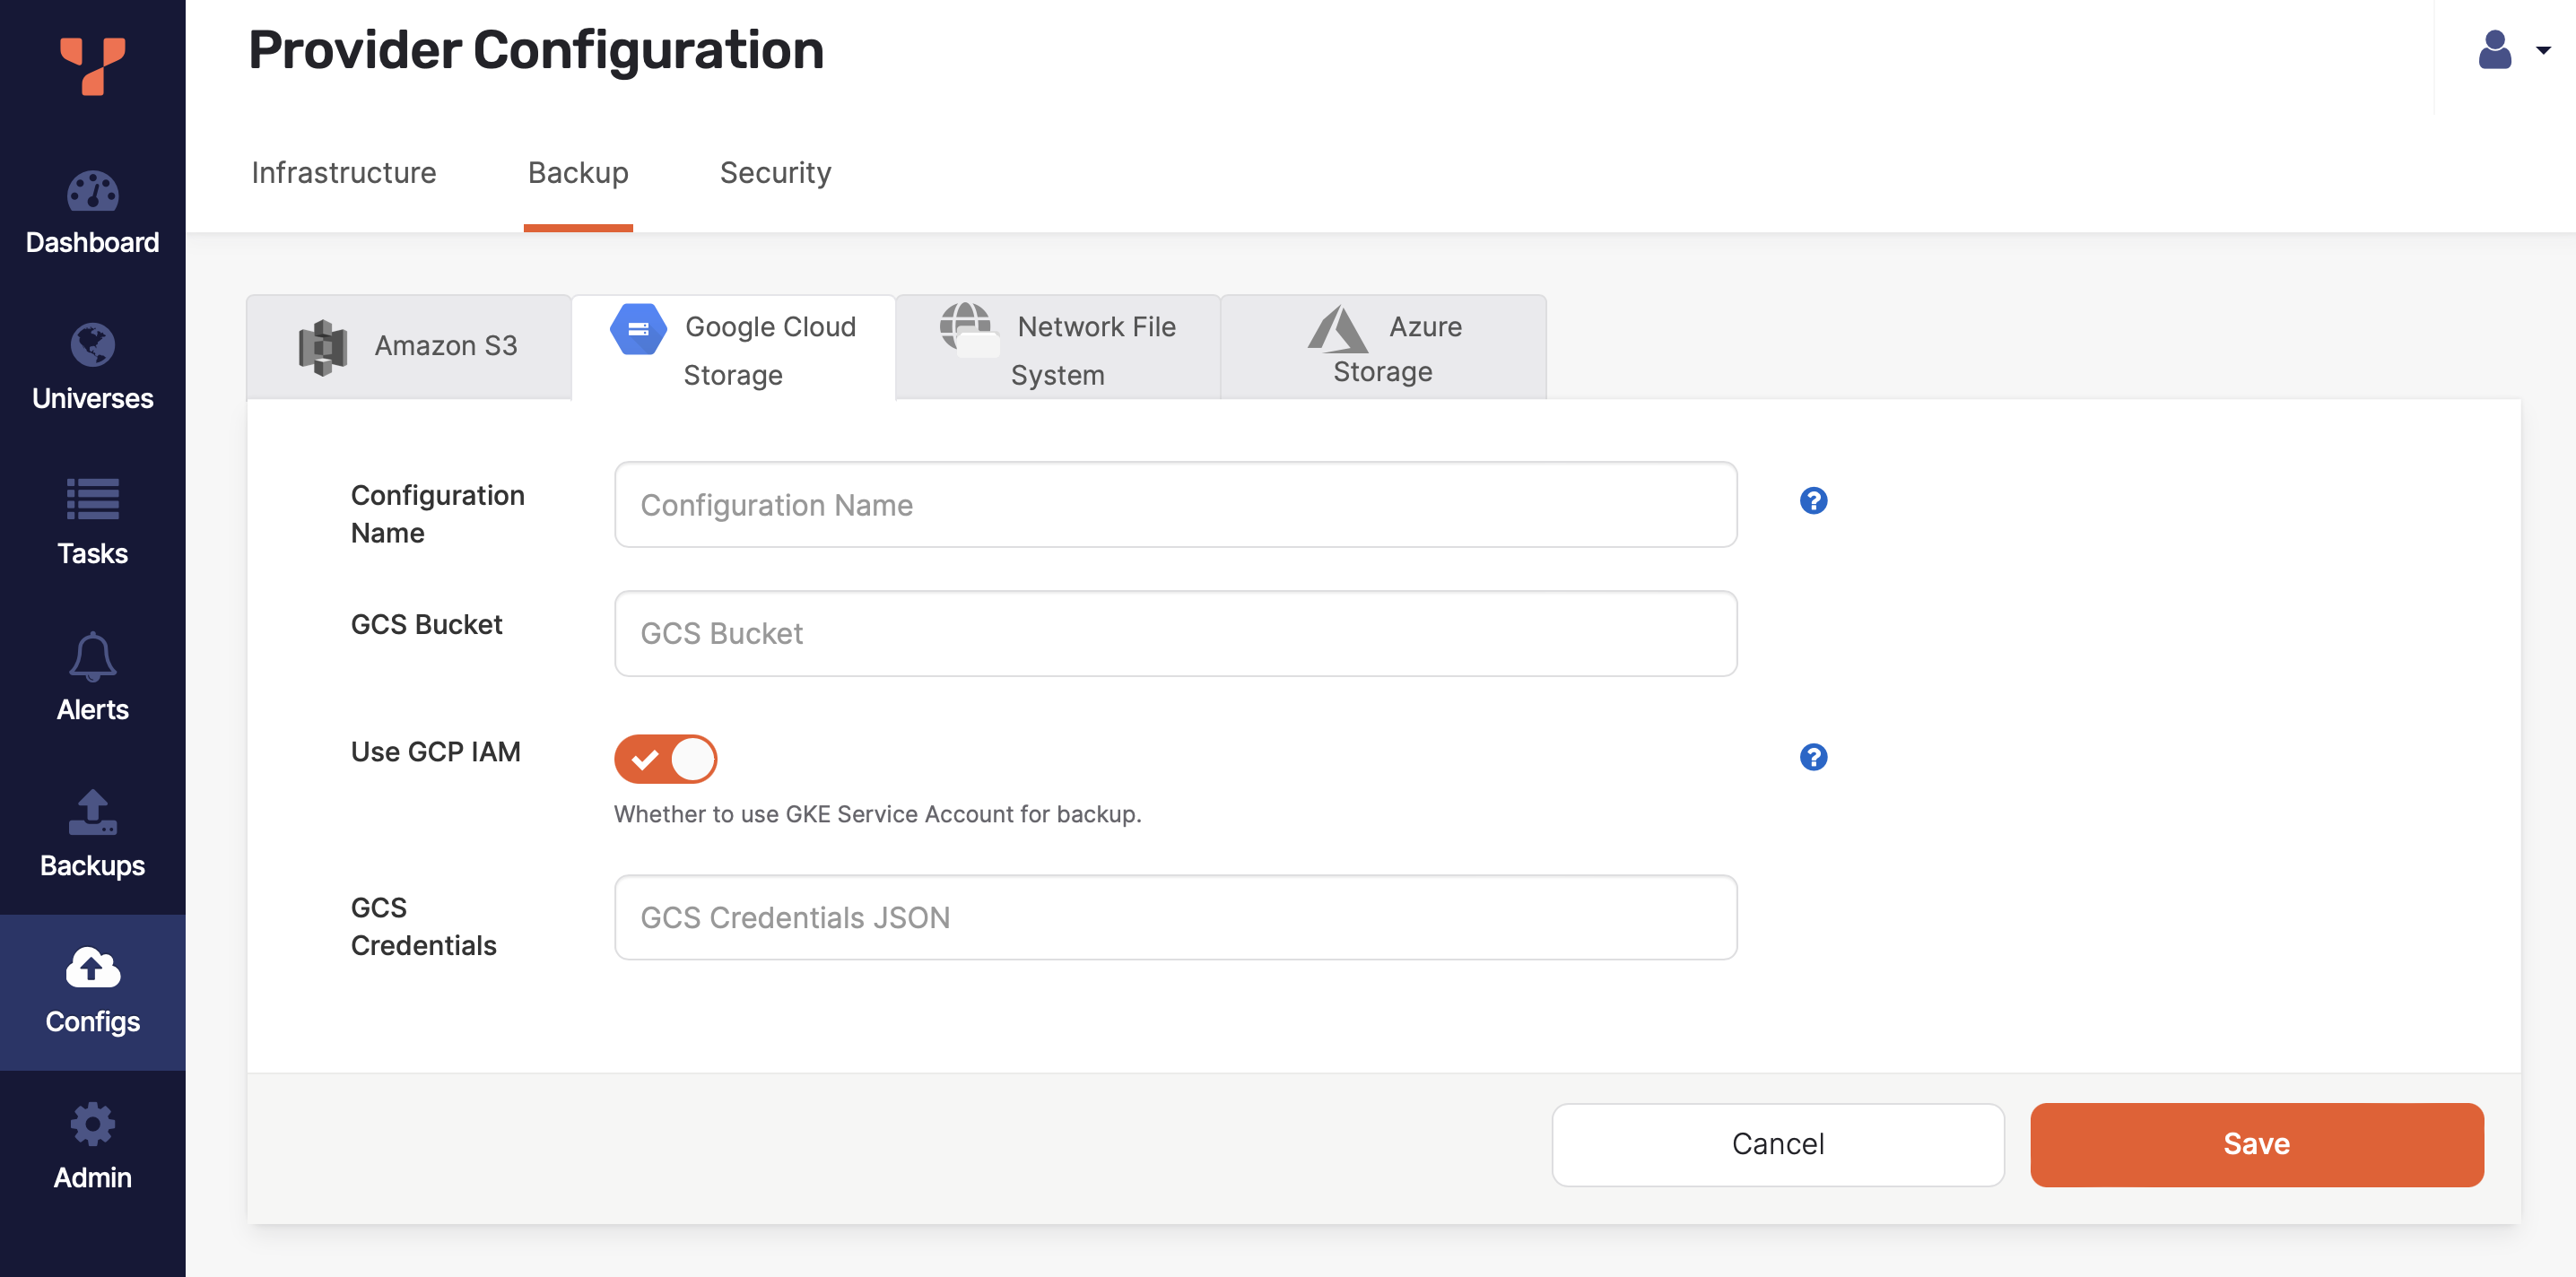
Navigate to Integrations > Backup > Google Cloud Storage.
-
Click Create GCS Backup.
-
Use the Configuration Name field to provide a meaningful name for your storage configuration.
-
Enter the URI of your GCS bucket in the GCS Bucket field. For example,
gs://gcp-bucket/test_backups. -
Select Use GCP IAM to use the YugabyteDB Anywhere instance's Identity Access Management (IAM) role for the GCS backup.
-
If Use GCP IAM is disabled, enter the credentials for your account in JSON format in the GCS Credentials field.
-
Click Save.
Network File System
You can configure Network File System (NFS) as your backup target, as follows:
-
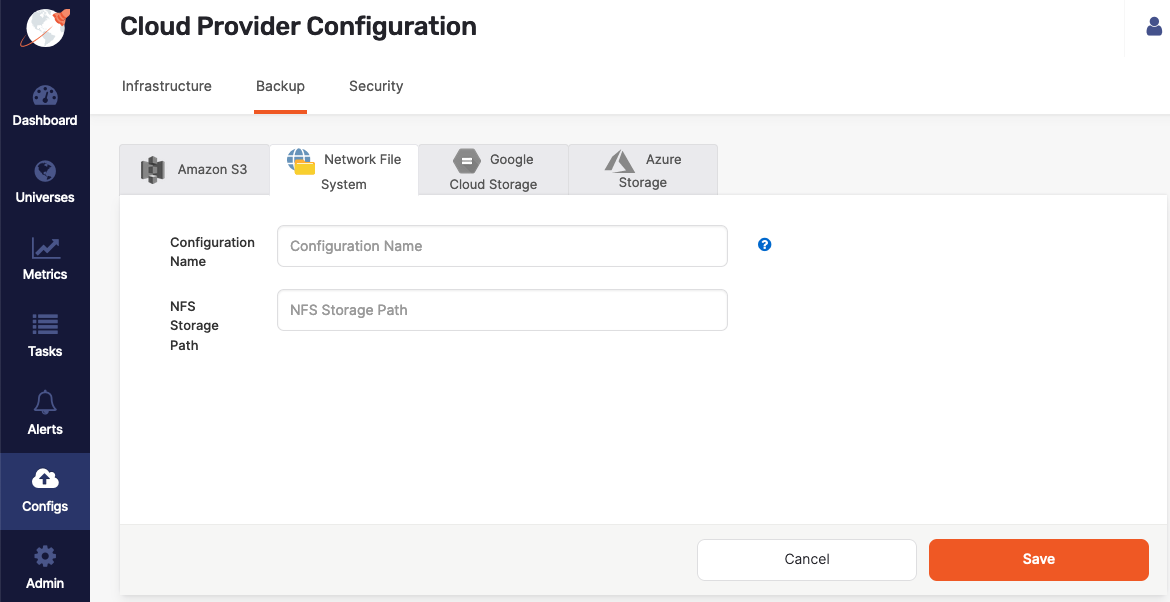
Navigate to Integrations > Backup > Network File System.
-
Click Create NFS Backup to access the configuration form shown in the following illustration:
-
Use the Configuration Name field to provide a meaningful name for your storage configuration.
-
Complete the NFS Storage Path field by entering
/backupor another directory that provides read, write, and access permissions to the SSH user of the YugabyteDB Anywhere instance. -
Click Save.
Prevent back up failure due to NFS unmount on cloud VM restart
To avoid potential backup and restore errors, add the NFS mount to/etc/fstab on the nodes of universes using the backup configuration. When a cloud VM is restarted, the NFS mount may get unmounted if its entry is not in /etc/fstab. This can lead to backup failures, and errors during backup or restore.
Azure Storage
You can configure Azure as your backup target.
Configure storage on Azure
-
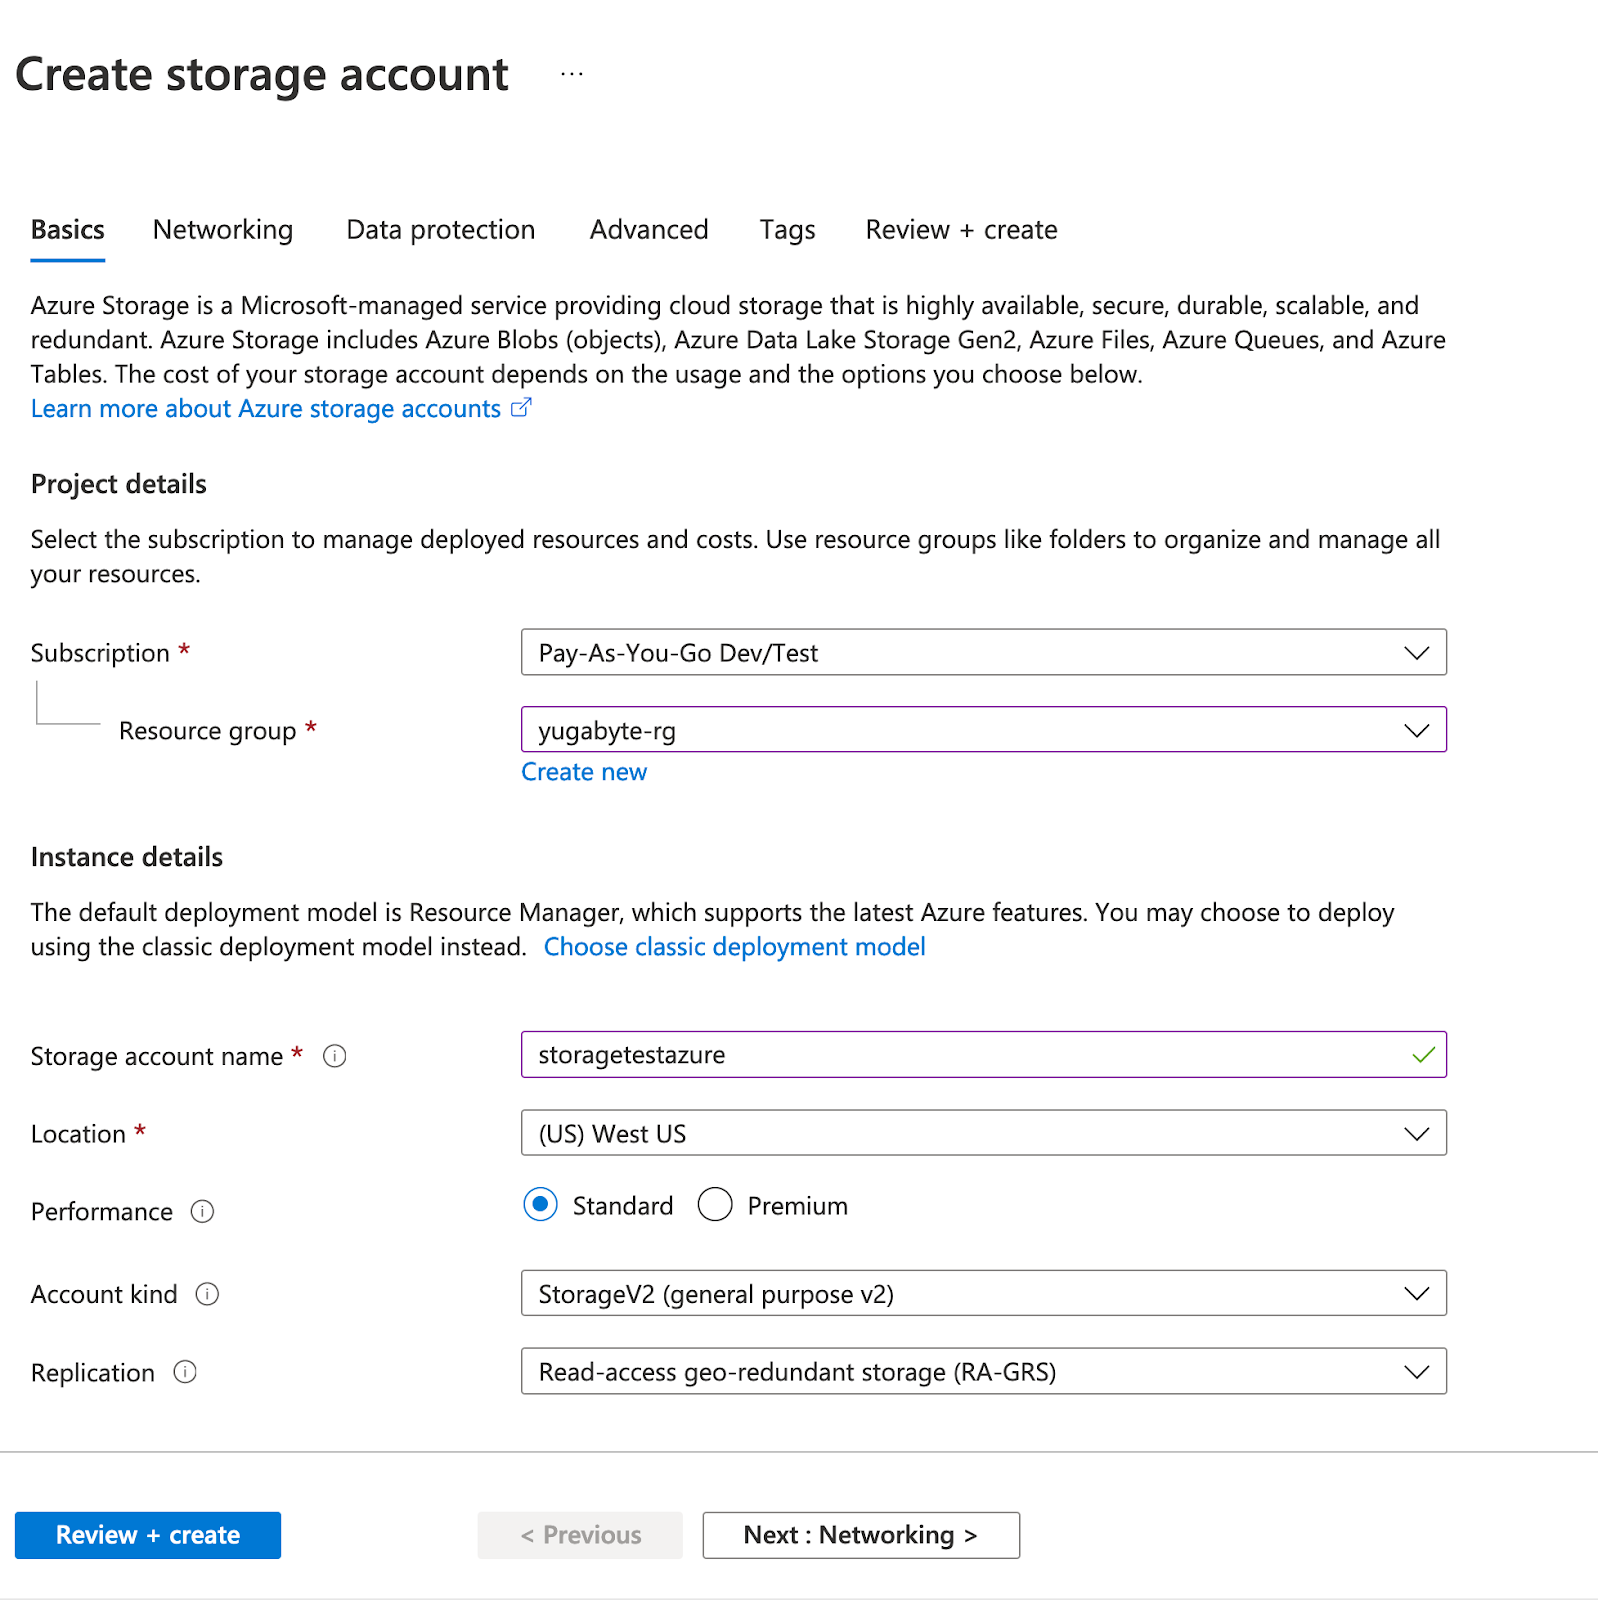
Create a storage account in Azure, as follows:
-
Navigate to Portal > Storage Account and click Add (+).
-
Complete the mandatory fields, such as Resource group, Storage account name, and Location, as per the following illustration:
-
-
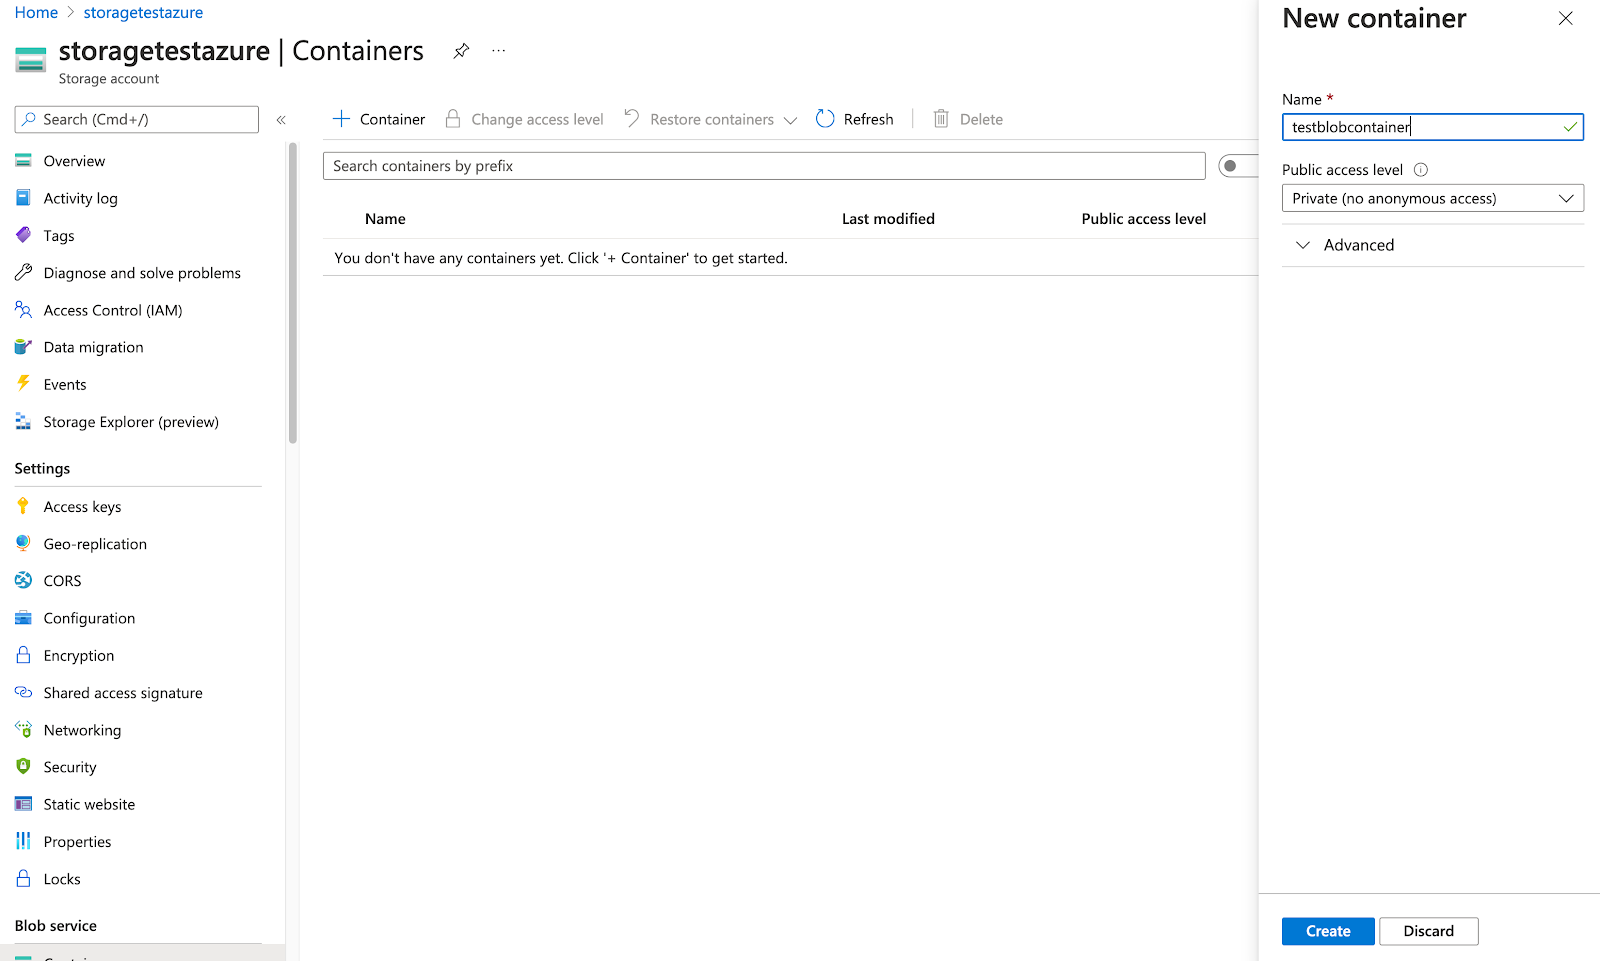
Create a blob container, as follows:
-
Open the storage account (for example, storagetestazure, as shown in the following illustration).
-
Navigate to Blob service > Containers > + Container and then click Create.
-
-
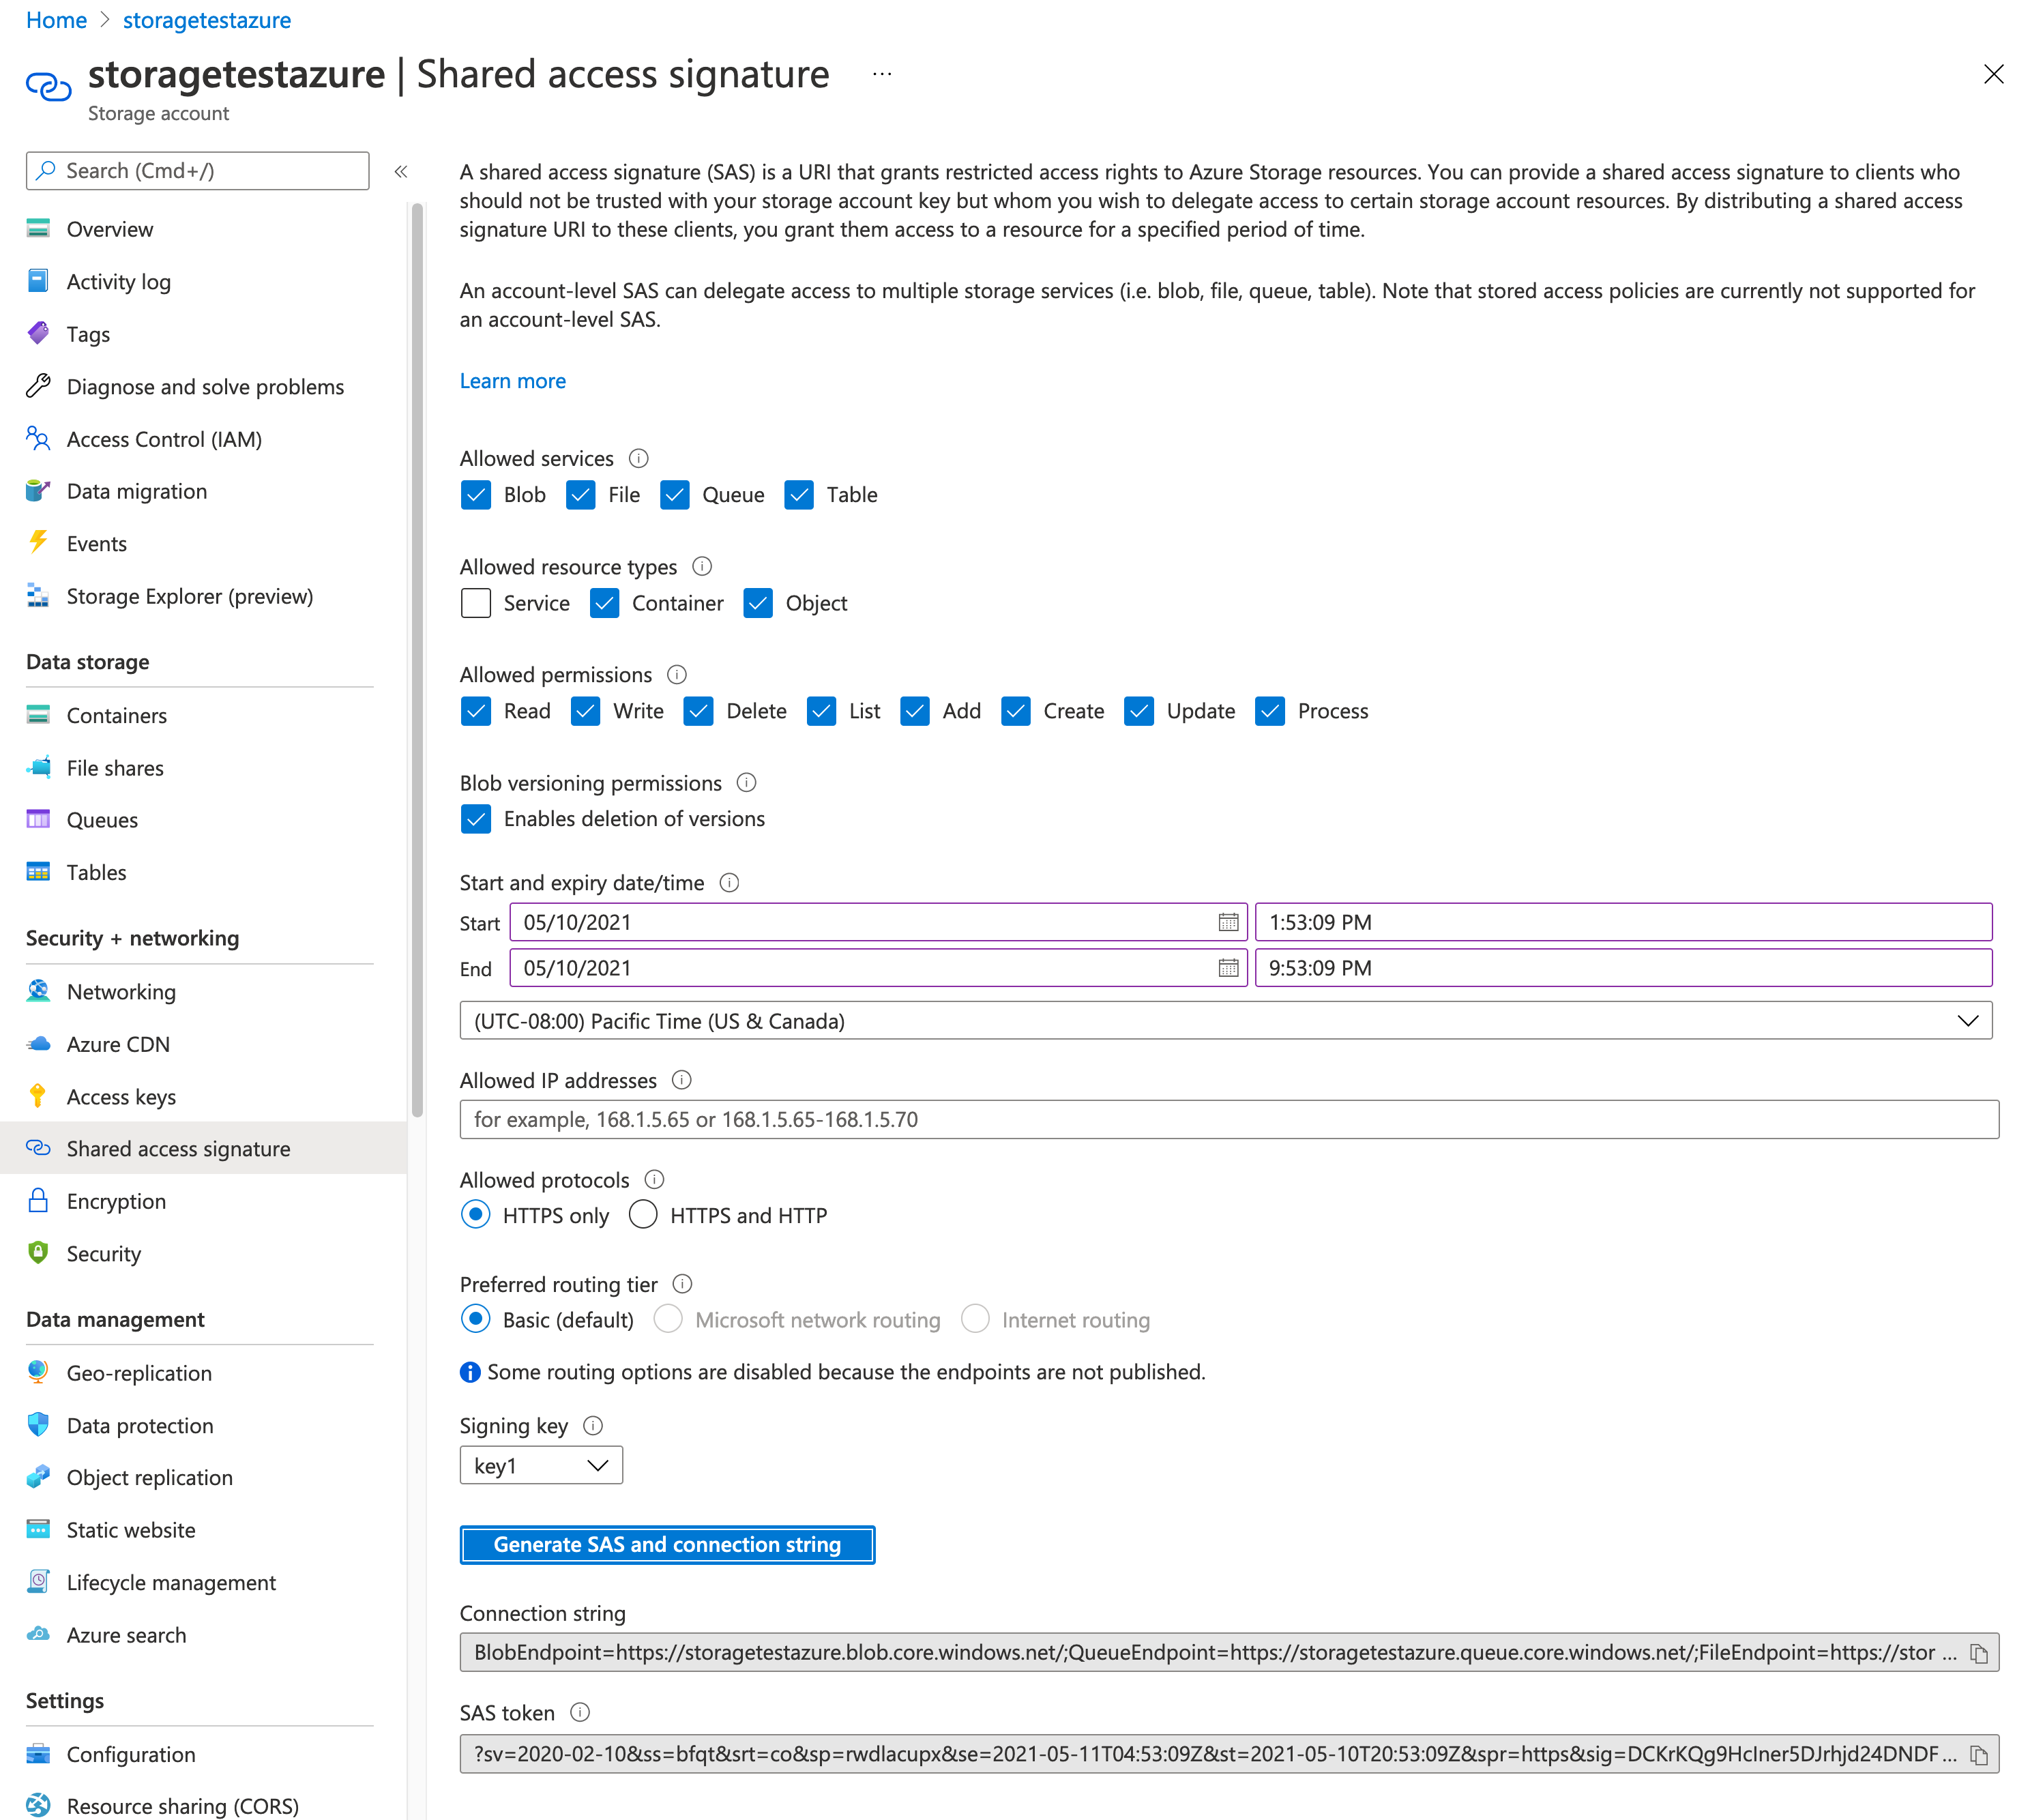
Generate an SAS Token, as follows:
-
Navigate to Storage account > Shared access signature, as shown in the following illustration. (Note that you must generate the SAS Token on the Storage Account, not the Container. Generating the SAS Token on the container will prevent the configuration from being applied.)
-
Under Allowed resource types, select Container and Object.
-
Under Allowed permissions, select all options as shown.
-
Click Generate SAS and connection string and copy the SAS token.
-
Create an Azure storage configuration
In YugabyteDB Anywhere:
-
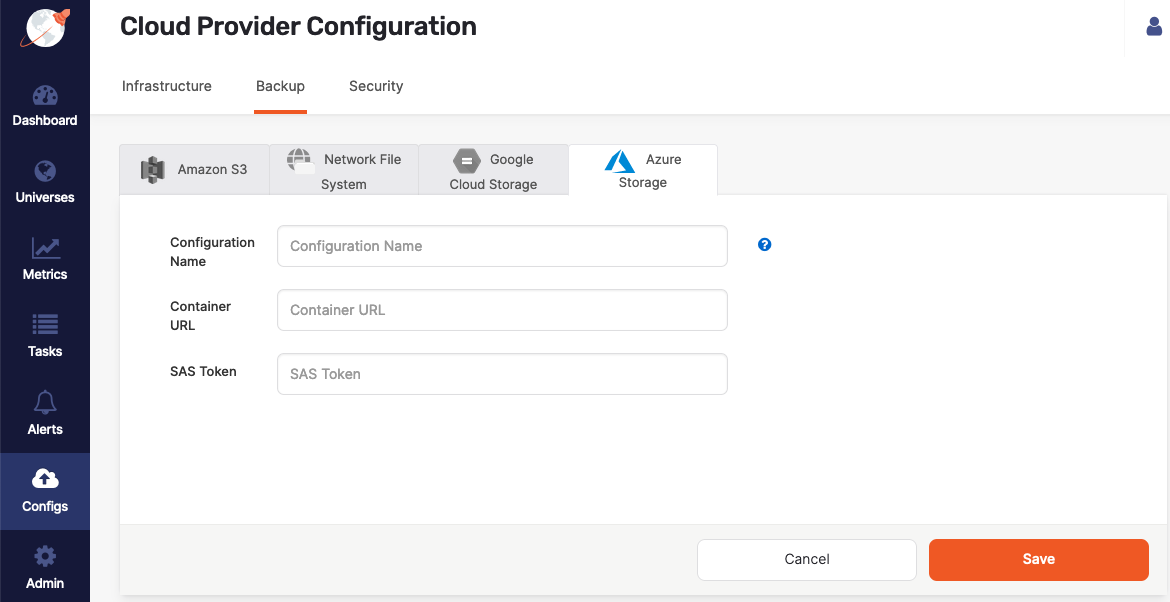
Navigate to Integrations > Backup > Azure Storage.
-
Click Create AZ Backup.
-
Use the Configuration Name field to provide a meaningful name for your storage configuration.
-
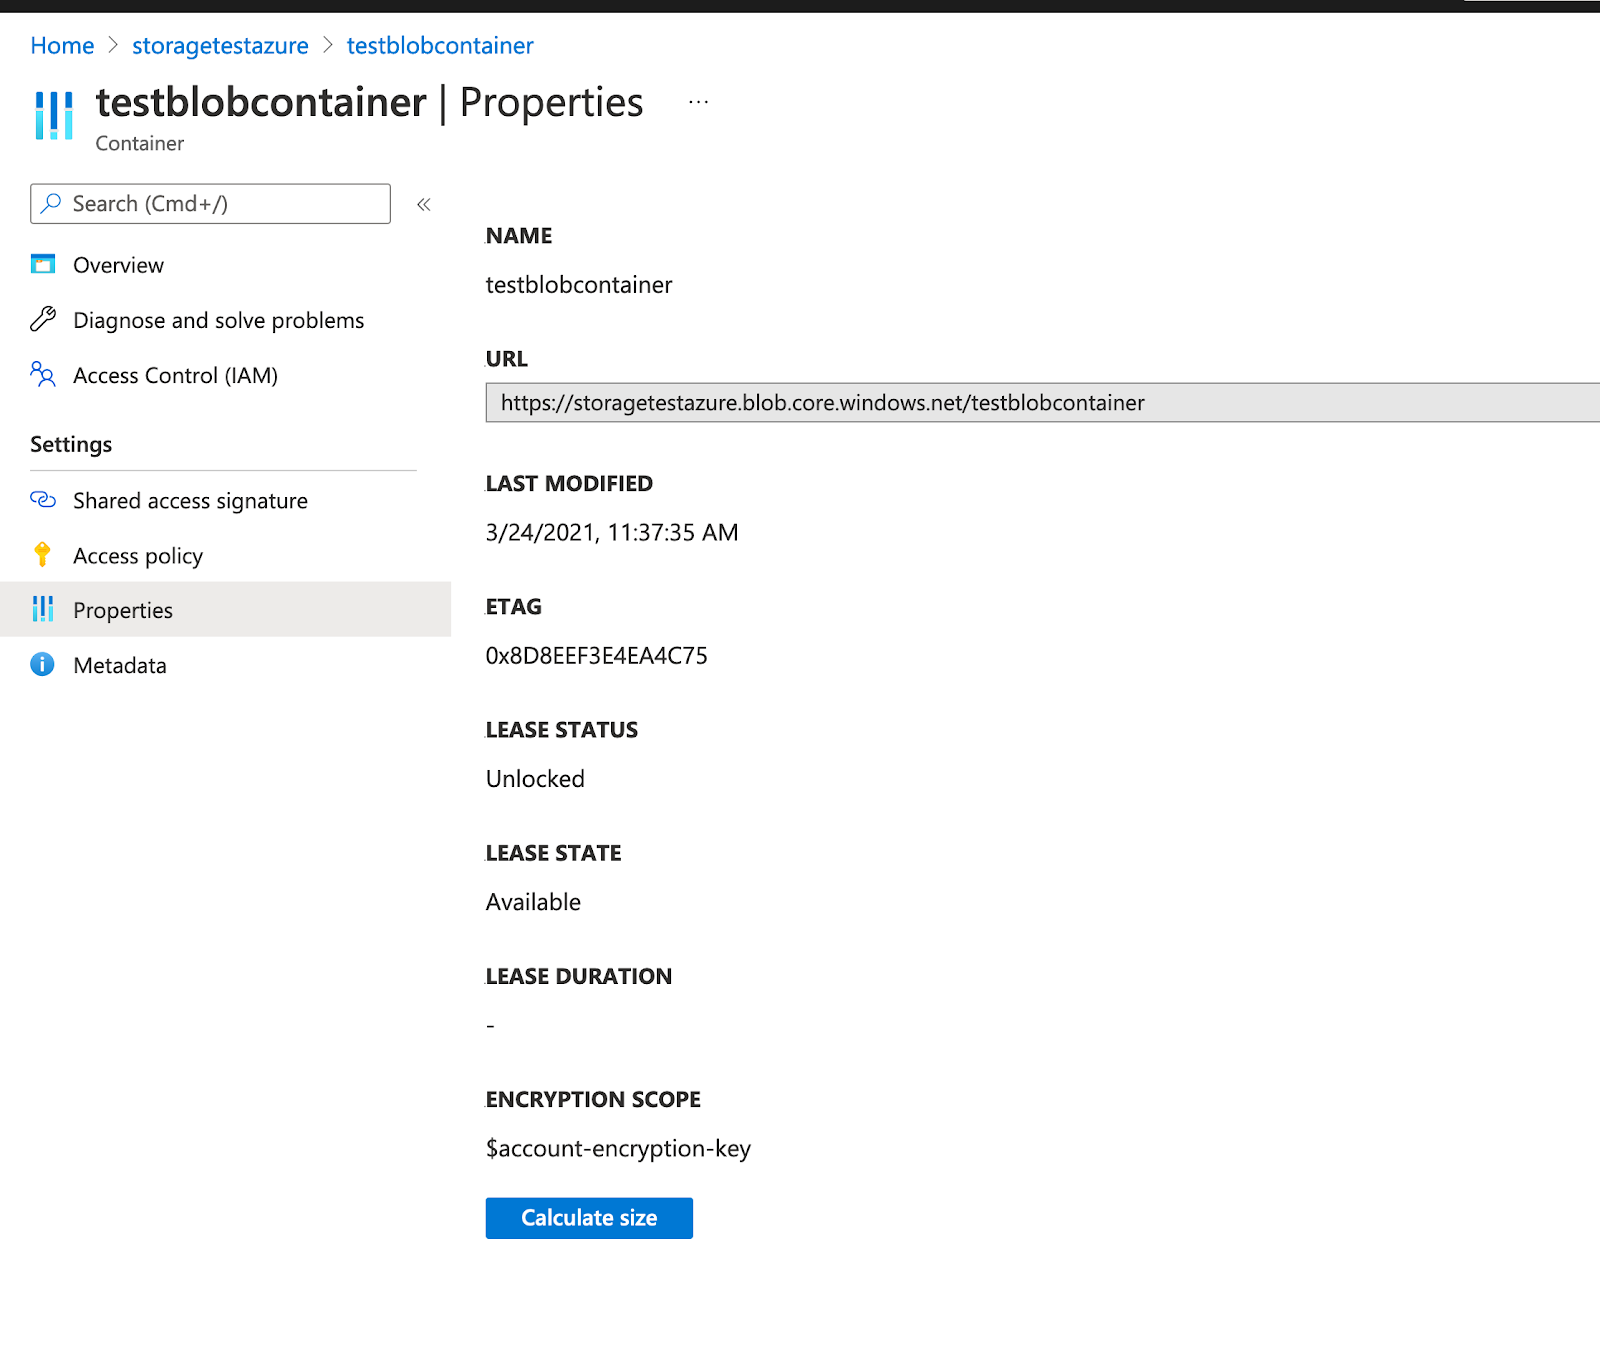
Enter the Container URL of the container you created. You can obtain the container URL in Azure by navigating to Container > Properties, as shown in the following illustration:
-
Provide the SAS Token you generated. You can copy the SAS Token directly from Shared access signature page in Azure.
-
Click Save.
Local storage
If your YugabyteDB universe has one node, you can create a local directory on a YB-TServer to which to back up, as follows:
-
Navigate to Universes, select your universe, and then select Nodes.
-
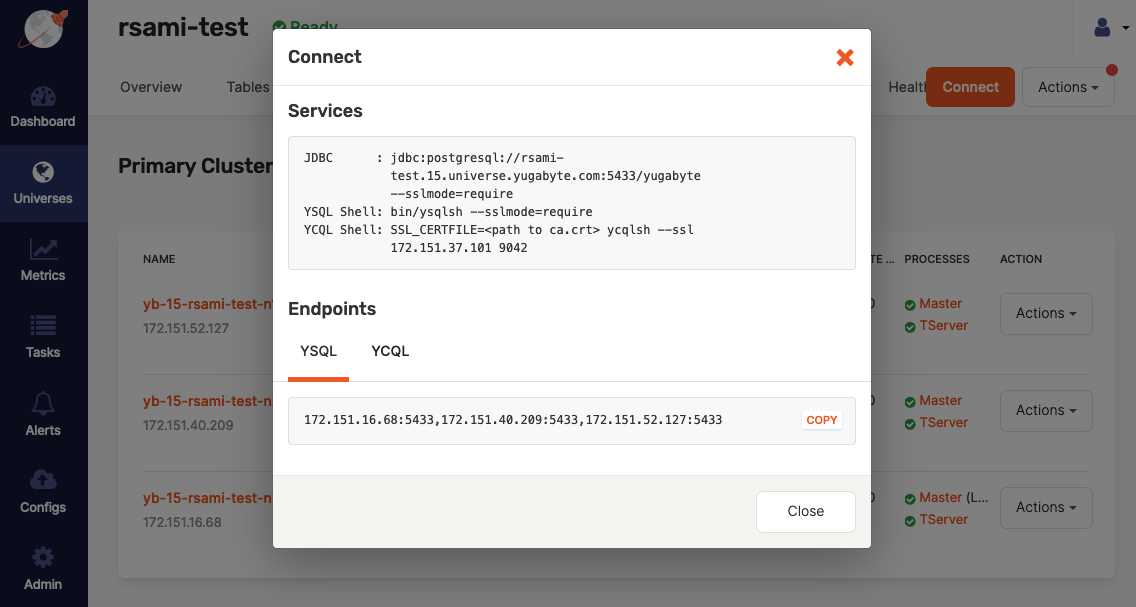
Click Connect.
-
Take note of the services and endpoints information displayed in the Connect dialog, as shown in the following illustration:
-
While connected using
ssh, create a directory/backupand then change the owner toyugabyte, as follows:sudo mkdir /backup; sudo chown yugabyte /backup
If there is more than one node, you should consider using a network file system mounted on each server.