Connect to a universe
Connect to your YugabyteDB database from your desktop using the YugabyteDB ysqlsh and ycqlsh client shells. Because YugabyteDB is compatible with PostgreSQL and Cassandra, you can also use psql and third-party tools to connect.
You can connect to the database on a universe in the following ways:
- Use SSH to tunnel to one of the universe nodes, and run ysqlsh or ycqlsh on the node.
- Download and run the client shells from your desktop.
Download the universe certificate
If the universe uses Client-to-Node encryption in transit, to connect you need to first download the universe TLS certificate. Do the following:
-
Navigate to Integrations > Security > Encryption in Transit.
-
Find your universe in the list.
-
Click Actions and choose Download Root CA Cert.
This downloads the
root.crtfile.
For information on connecting using a client shell using this certificate, see Connect from your desktop.
To use TLS to connect an application, refer to the driver documentation. If you are using a PostgreSQL JDBC driver to connect to YugabyteDB, you can also refer to Configuring the client for more details.
If you are using PostgreSQL/YugabyteDB JDBC driver with SSL, you need to convert the certificates to DER format. To do this, you need to perform only steps 6 and 7 from Set up SSL certificates for Java applications section after downloading the certificates.
Connect to a universe node
The YugabyteDB shells are installed in the tserver/bin directory on each YB-TServer of a YugabyteDB universe.
Access your YugabyteDB Anywhere instance
To connect to a universe node, you first need to be signed on to the machine where YugabyteDB Anywhere is installed, or connected via SSH.
To SSH to a YugabyteDB Anywhere instance hosted on the cloud provider, you enter the following:
ssh -i <path_to_secret> username@<platform_machine_external_ip>
For example, for an AWS instance, you can SSH using a command similar to the following:
ssh -i ~/.yugabyte/yb-dev-aws-2.pem ec2-user@my.yugabyte.aws
If your instance is on Kubernetes, use kubectl commands to connect. For example:
gcloud container clusters get-credentials --region us-west1 itest-release --project yugabyte
kubectl exec -it yw-ns-kvik-id7973-20230213-031611-yugaware-0 -n yw-ns-kvik-id7973-20230213-031611 -c yugaware -- bash
Connect to a node
To run a shell from a universe node, do the following:
-
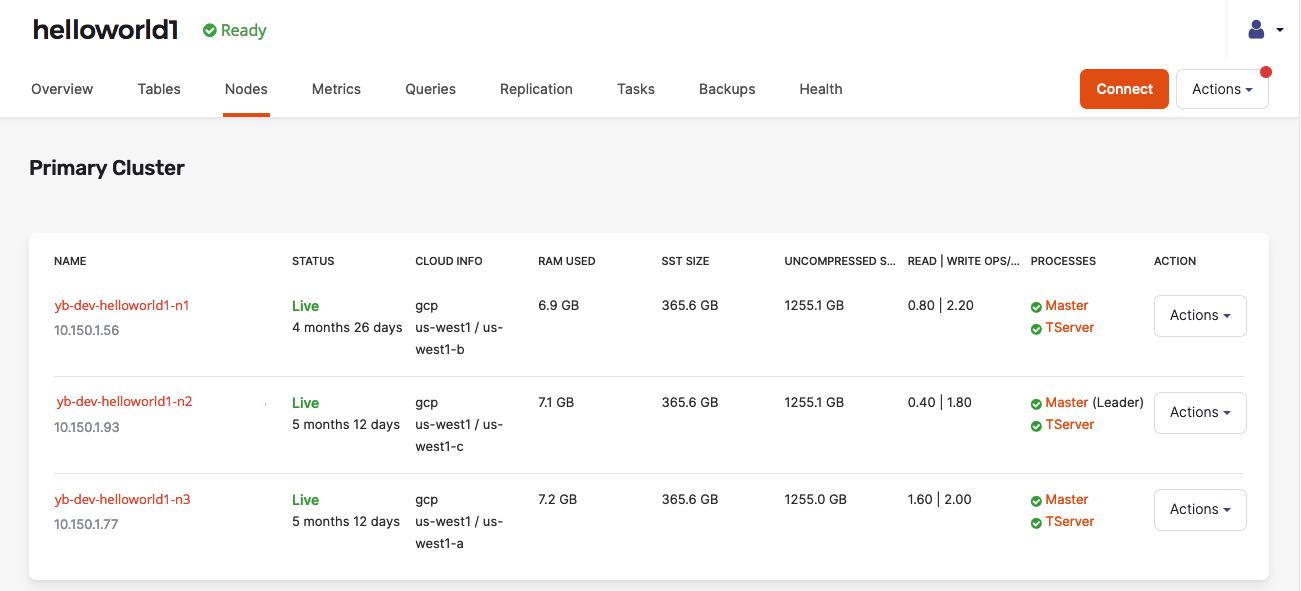
In YugabyteDB Anywhere, navigate to your universe and select the Nodes tab.

-
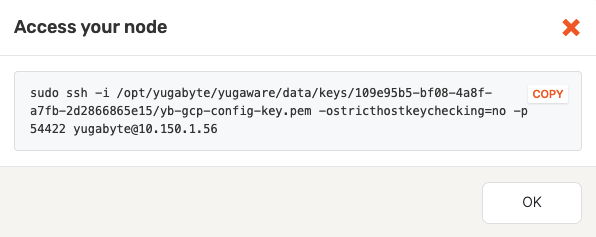
Determine the node to which you wish to connect and click Actions > Connect.
-
Copy the SSH command displayed in the Access your node dialog shown in the following illustration:

-
From the machine where YugabyteDB Anywhere is installed, run the command you copied. For example:
sudo ssh -i /opt/yugabyte/yugaware/data/keys/f000ad00-aafe-4a67-bd1f-34bdaf3bee00/yb-dev-yugabyte-google-provider_f033ad00-aafe-4a00-bd1f-34bdaf3bee00-key.pem -ostricthostkeychecking=no -p 22 yugabyte@<node_ip_address> Are you sure you want to continue connecting (yes/no)? yes [ec2-user@yb-dev-helloworld1-n1 ~]$ -
On the node, navigate to the tserver/bin directory:
cd /home/yugabyte/tserver/bin -
Run ysqlsh or ycqlsh as follows:
./ysqlsh -h <node_ip_address>./ycqlsh <node_ip_address>
Enable Tectia SSH
By default, YugabyteDB Anywhere uses OpenSSH for SSH to remote nodes. YugabyteDB Anywhere also supports the use of Tectia SSH that is based on the latest SSH G3 protocol.
Tectia SSH is used for secure file transfer, secure remote access and tunnelling. YugabyteDB Anywhere is shipped with a trial version of Tectia SSH client that requires a license to notify YugabyteDB Anywhere to permanently use Tectia instead of OpenSSH.
To upload the Tectia license, manually copy it at ${storage_path}/yugaware/data/licenses/<license.txt>, where storage_path is the path provided during installation.
After the license is uploaded, YugabyteDB Anywhere exposes the runtime flag yb.security.ssh2_enabled that you need to enable, as per the following example:
curl --location --request PUT 'http://<ip>/api/v1/customers/<customer_uuid>/runtime_config/00000000-0000-0000-0000-000000000000/key/yb.security.ssh2_enabled'
--header 'Cookie: <Cookie>'
--header 'X-AUTH-TOKEN: <token>'
--header 'Csrf-Token: <csrf-token>'
--header 'Content-Type: text/plain'
--data-raw '"true"'
Connect from your desktop
Prerequisites
-
If you are using ysqlsh or ycqlsh, ensure you are running the latest versions of the shells.
-
If your universe has Client-to-Node encryption in transit enabled, you need to download the certificate to your computer.
-
The host address of an endpoint on your universe.
To view your universe endpoints, navigate to your universe and click Connect.
Connect using a client shell
Use the ysqlsh, ycqlsh, and psql shells to connect to and interact with YugabyteDB using the YSQL and YCQL APIs.
To connect using ysqlsh, use the following connection string:
./ysqlsh "host=<HOST_ADDRESS> \
user=<DB USER> \
dbname=yugabyte \
sslmode=verify-full \
sslrootcert=<ROOT_CERT_PATH>"
Replace the following:
<HOST_ADDRESS>with the IP address of an endpoint on your universe.<DB USER>with your database username.yugabytewith the database name, if you're connecting to a database other than the default (yugabyte).<ROOT_CERT_PATH>with the path to the universe root certificate you downloaded to your computer.
To load sample data and explore an example using ysqlsh, follow the instructions in Install the Retail Analytics sample database.
To connect using ycqlsh, use the following connection string:
SSL_CERTFILE=<ROOT_CERT_PATH> \
./ycqlsh \
<HOST_ADDRESS> 9042 \
-u <DB USER> \
--ssl
Replace the following:
-
<HOST_ADDRESS>with the IP address of an endpoint on your universe. -
<DB USER>with your database username. -
<ROOT_CERT_PATH>with the path to the universe root certificate you downloaded to your computer.
To connect using psql, use the following connection string:
./psql --host=<HOST_ADDRESS> --port=5433 \
--username=<DB USER> \
--dbname=yugabyte \
--set=sslmode=verify-full \
--set=sslrootcert=<ROOT_CERT_PATH>
Replace the following:
-
<HOST_ADDRESS>with the IP address of an endpoint on your universe. -
<DB USER>with your database username. -
yugabytewith the database name, if you're connecting to a database other than the default (yugabyte). -
<ROOT_CERT_PATH>with the path to the universe root certificate you downloaded to your computer.
Connect using third party clients
Because YugabyteDB is compatible with PostgreSQL and Cassandra, you can use third-party clients to connect to your YugabyteDB clusters in YugabyteDB Aeon.
To connect, follow the client's configuration steps for PostgreSQL or Cassandra, and use the following values:
- host address of an endpoint on your universe.
- port 5433 for YSQL, 9042 for YCQL.
- database name; the default YSQL database is yugabyte.
- username and password of a user with permissions for the database; the default admin user is
yugabyte(YSQL) orcassandra(YCQL).
Your client may also require the use of the universe certificate.
For information on using popular third-party tools with YugabyteDB, see Third party tools.
Run workloads
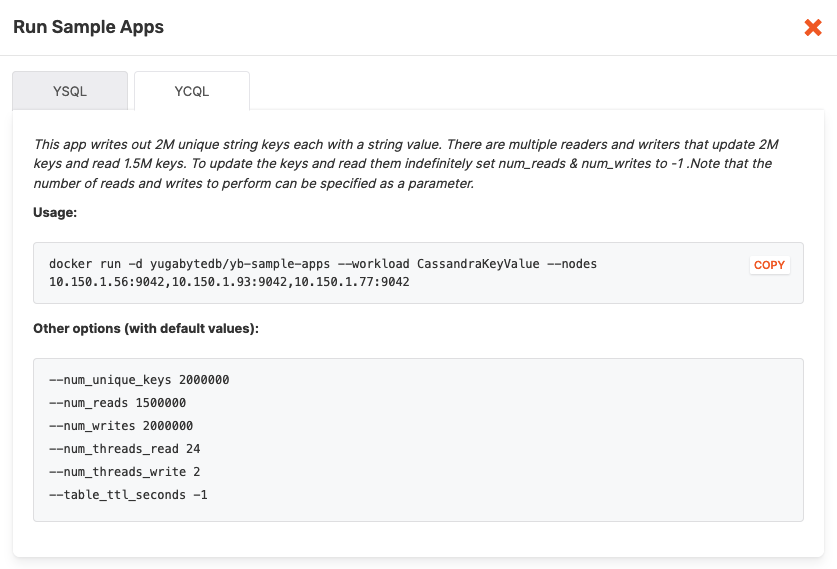
YugabyteDB Anywhere includes a number of sample applications provided in Docker containers.
To run sample applications on your universe, do the following:
-
Navigate to your universe and click Actions > Run Sample Apps to open the Run Sample Apps dialog shown in the following illustration:

-
Run the suggested Docker command in your SSH session on the node.
The Metrics tab of the universe allows you to see the metrics graphs, where server-side metrics tally with the client-side metrics reported by the load tester.
You can also view metrics at a per-node level.
You can stop the load tester as follows:
-
Find the container by executing the following command:
user@yugaware-1:~$ sudo docker container ls | grep "yugabytedb/yb-sample-apps"Expect an output similar to the following:
<container_id> yugabytedb/yb-sample-apps "/usr/bin/java -jar …" 17 seconds ago Up 16 seconds jovial_morseFor example, if the container ID is ac144a49d57d, you would see the following output:
ac144a49d57d yugabytedb/yb-sample-apps "/usr/bin/java -jar …" 17 seconds ago Up 16 seconds jovial_morse -
Stop the container by executing the following command:
user@yugaware-1:~$ sudo docker container stop <container_id>Expect the following output:
<container_id>For example, for a container with ID ac144a49d57d, you would need to execute the following command:
user@yugaware-1:~$ sudo docker container stop ac144a49d57dYou would see the following output:
ac144a49d57d
Examine data
Connect to the YCQL service by executing the following command:
/home/yugabyte/tserver/bin/ycqlsh <ip_address_of_the_node>
You can view the table schema and the data, as follows:
ycqlsh> DESCRIBE ybdemo_keyspace.cassandrakeyvalue;
CREATE TABLE ybdemo_keyspace.cassandrakeyvalue (
  k text PRIMARY KEY,
  v blob
) WITH default_time_to_live = 0;
ycqlsh> SELECT * FROM ybdemo_keyspace.cassandrakeyvalue LIMIT 5;
 k          | v
------------+-----------------------------------------
 key:101323 | 0x4276616c3a3130313332336be1dd6597e2...
 key:159968 | 0x4276616c3a3135393936381ed99587c08f...
  key:24879 | 0x4276616c3a3234383739054071b34c3fb6...
 key:294799 | 0x4276616c3a3239343739398b312748e80e...
 key:297045 | 0x4276616c3a32393730343525764eedee94...

(5 rows)
Learn more
- Securing YugabyteDB: Client-to-Server Encryption in Transit
- ysqlsh — Overview of the command line interface (CLI), syntax, and commands.
- YSQL API — Reference for supported YSQL statements, data types, functions, and operators.
- ycqlsh — Overview of the command line interface (CLI), syntax, and commands.
- YCQL API — Reference for supported YCQL statements, data types, functions, and operators.