Troubleshoot and manage nodes
The following section describes how to use YugabyteDB Anywhere to manage nodes in running universes.
For information on how to respond to DB Node Restart, DB Instance Down, and DB Instance Restart alerts, refer to Handle node alerts.
Automatic YB-Master failover
EA To avoid under-replication, YugabyteDB Anywhere can automatically detect a YB-Master server that is not responding to the master leader, or that is lagging WAL operations, and fail over to another available node in the same availability zone.
Note that automatic failover only works for a single unhealthy master server.
Prerequisites
-
Automatic YB-Master failover is EA . To enable the feature for a universe, set the Auto Master Failover Universe Runtime Configuration option (config key
yb.auto_master_failover.enabled) to true. Refer to Manage runtime configuration settings. -
The universe has the following characteristics:
- running v2.20.3.0, v2.21.0.0, or later
- is on-premises or on a cloud provider (Kubernetes is not supported)
- has a replication factor of 3 or more
- does not have dedicated masters
-
A replacement node (running a TServer) is available in the same availability zone. (Read replica nodes are not valid for failover.)
How it works
Automatic master failover works as follows:
-
When active, by default YugabyteDB Anywhere checks universe masters every minute to see if they are healthy.
You can customize this interval using the universe runtime configuration option
yb.auto_master_failover.detect_interval. -
YugabyteDB Anywhere declares a master is failed or potentially failed when any of the following conditions are met:
- The Master heartbeat delay is greater than the threshold.
- Maximum tablet follower lag is greater than the threshold.
-
When YugabyteDB Anywhere detects an unhealthy master in a universe, it displays a message on the universe Overview indicating a potential master failure, and indicating the estimated time remaining until auto failover.
The warning is displayed when a master lags more than the threshold defined by the universe runtime configuration option
yb.auto_master_failover.master_follower_lag_soft_threshold.You can configure the time to failover using the universe runtime configuration option
yb.auto_master_failover.master_follower_lag_hard_threshold. -
During this time, you can investigate and potentially fix the problem. Navigate to the universe Nodes tab to check the status of the nodes. You may need to replace or eliminate unresponsive nodes, or fix a lagging master process. Refer to the following sections.
If you fix the problem, the warning is dismissed, and YugabyteDB Anywhere returns to monitoring the universe.
If you need more time to investigate or fix the problem manually, you can opt to snooze the failover.
-
Failover is triggered if the time expires and the issue hasn't been fixed.
For a universe to successfully fail over masters, the following must be true:
- The universe is not paused.
- The universe is not locked (that is, another locking operation is running).
- All nodes are live; that is, there aren't any stopped, removed, or decommissioned nodes.
Note that master failover may not fix all the issues with the universe. Be sure to address other failed or unavailable nodes or other issues to bring your universe back to a healthy state.
For master failover, if the task fails, a retry is made automatically. The retry limit for failover tasks is set by the universe runtime configuration option
yb.auto_master_failover.max_task_retries. -
After starting up a new master on a different node in the same availability zone as the failed master, YugabyteDB Anywhere waits for you to recover any failed VMs, including the failed master VM, so that it can update the master address configuration on those VMs. Follow the steps in Replace a live or unreachable node.
You can set the delay for post automatic master failover using the universe runtime configuration option
yb.auto_master_failover.sync_master_addrs_task_delay. The reference start time is calculated from the time that YugabyteDB Anywhere finds that all processes are running fine on all the VMs.Post failover, there is no retry limit as it is a critical operation.
Replace a live or unreachable node
To replace a live node for extended maintenance or replace an unhealthy node, do the following:
-
Navigate to Universes, select your universe, and open the Nodes tab.
-
Click the associated node Actions > Replace Node.
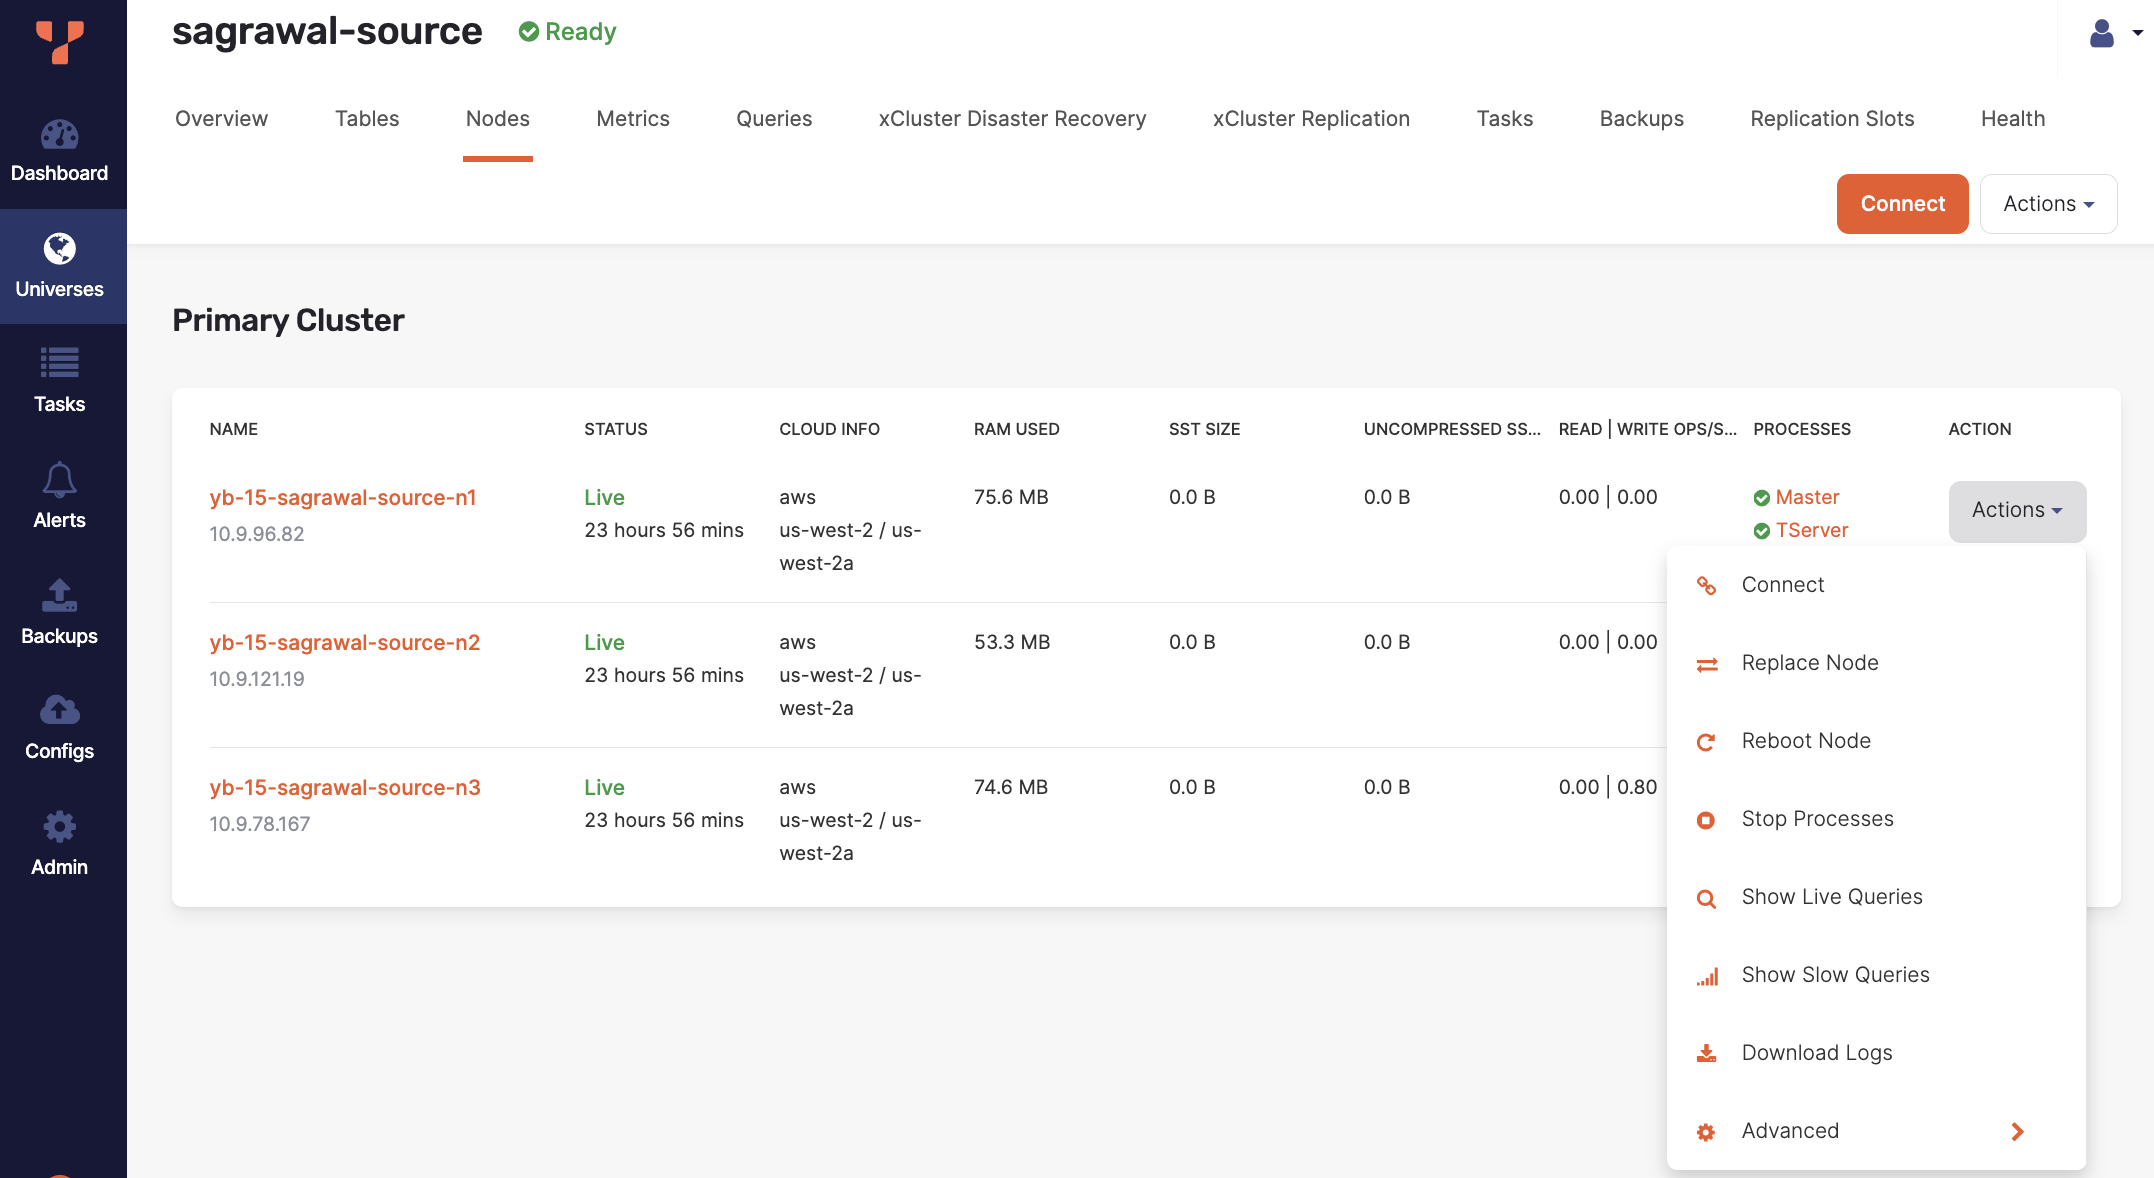
-
Click OK to confirm.
YugabyteDB Anywhere (YBA) starts the node replacement process, and you can view the progress on the Tasks tab. As part of the node replacement process, all data (tablets) on the existing node will be moved to other nodes to ensure that the desired replication factor is maintained throughout the operation.
For cloud providers (AWS, Azure, or GCP), YBA returns the existing node back to the provider and provisions a new replacement node from the cloud provider. For on-premises universes, the existing node is returned to the on-premises provider node pool and a new replacement node is selected from the free pool.
For on-premises universes, clean up of existing data directories and running processes may fail if the node is unhealthy. In such cases, YBA sets the state to Decommissioned. This prevents the node from being added to a new universe.
Check on-premises node state
On-premises nodes have three states: In use, Free, and Decommissioned as described in the following illustration.
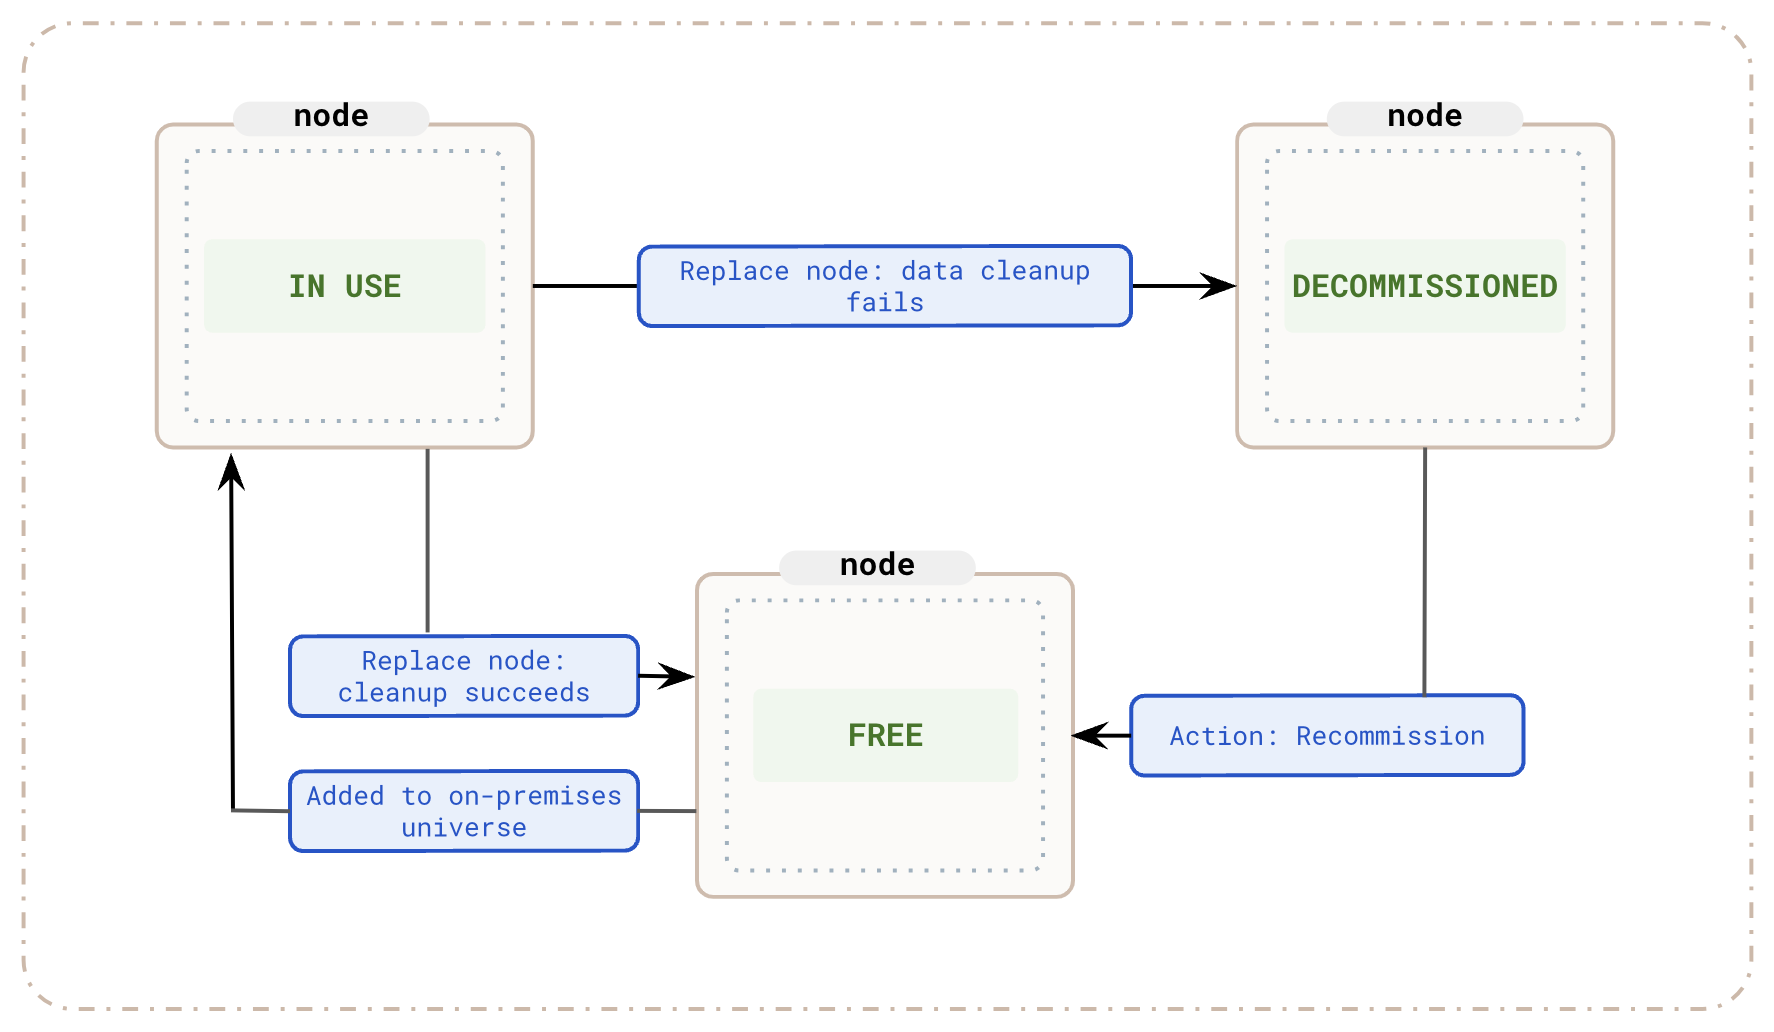 To check the state of an on-premises node, navigate to Integrations > Infrastructure > On-Premises Datacenters, select the associated on-premises configuration, and click Instances.
Recommission a decommissioned on-premises node
You can return a Decommissioned node to the on-premises provider Free pool after it becomes reachable and is cleaned up.
Perform the following steps to recommission a node:
-
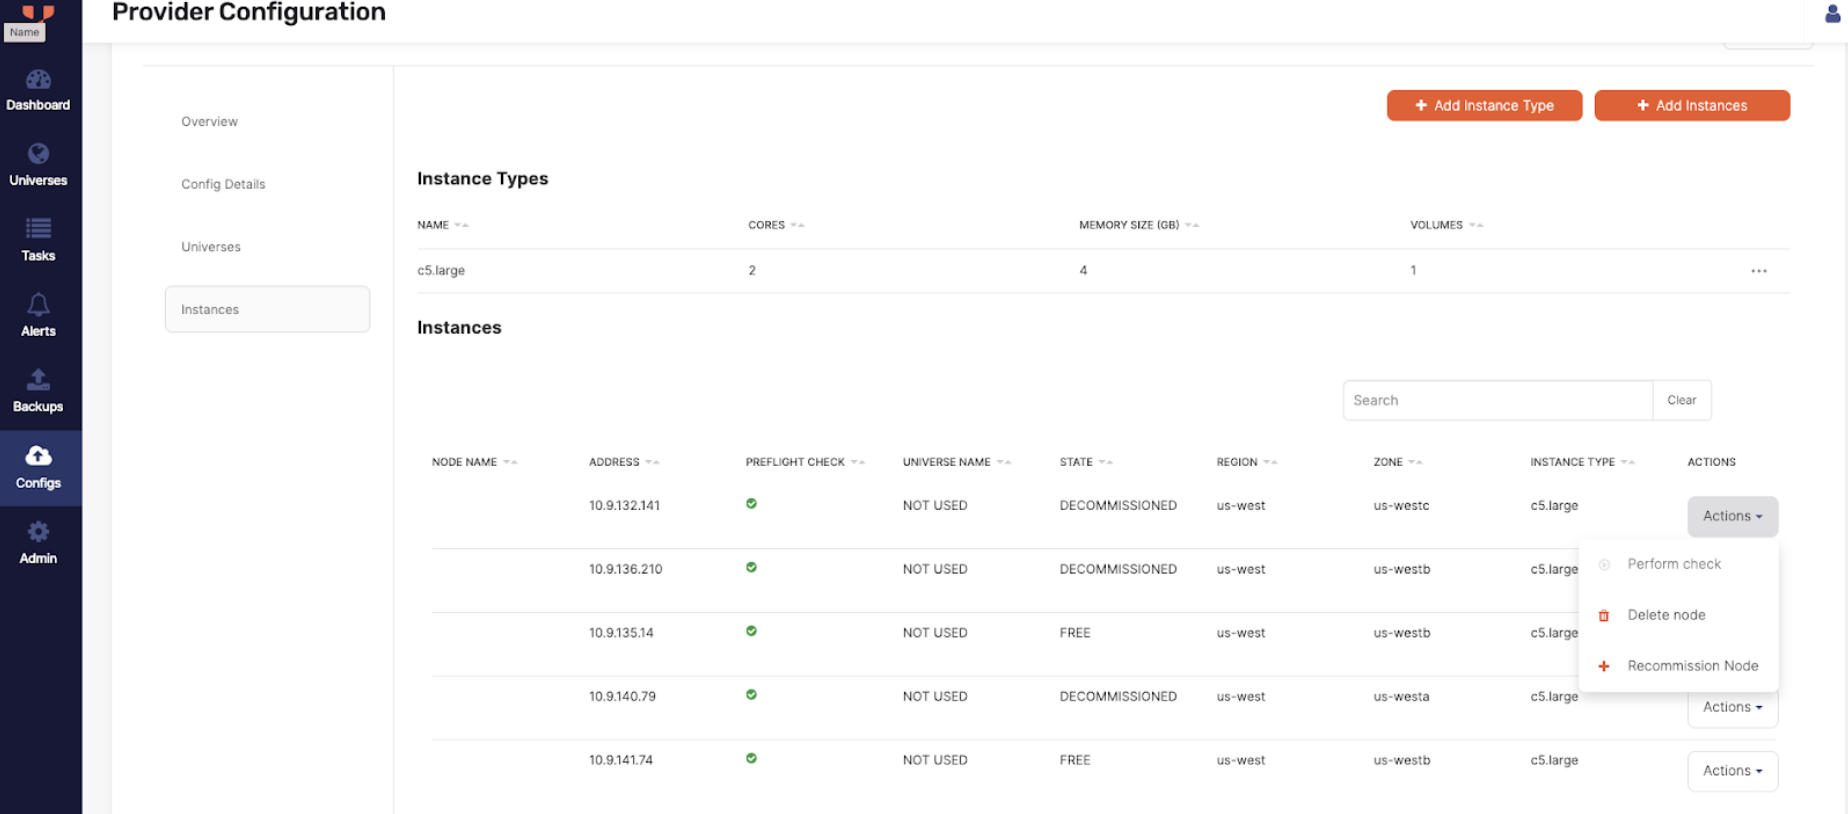
Navigate to Integrations > Infrastructure > On-Premises Datacenters, select the associated on-premises configuration, and click Instances.
-
Under Instances, for the decommissioned node, click Actions > Recommission Node. YBA will now re-attempt to clean up existing data directories and processes on this node.
-
Click OK to confirm.
YugabyteDB Anywhere (YBA) starts the node recommissioning process, and you can view the progress on the Tasks tab.
Eliminate an unresponsive node
If a virtual machine or a physical server in a universe reaches its end of life and has unrecoverable hardware or other system issues (such as problems with its operating system, disk, and so on) it is detected and displayed in YugabyteDB Anywhere as an unreachable node, as per the following illustration:
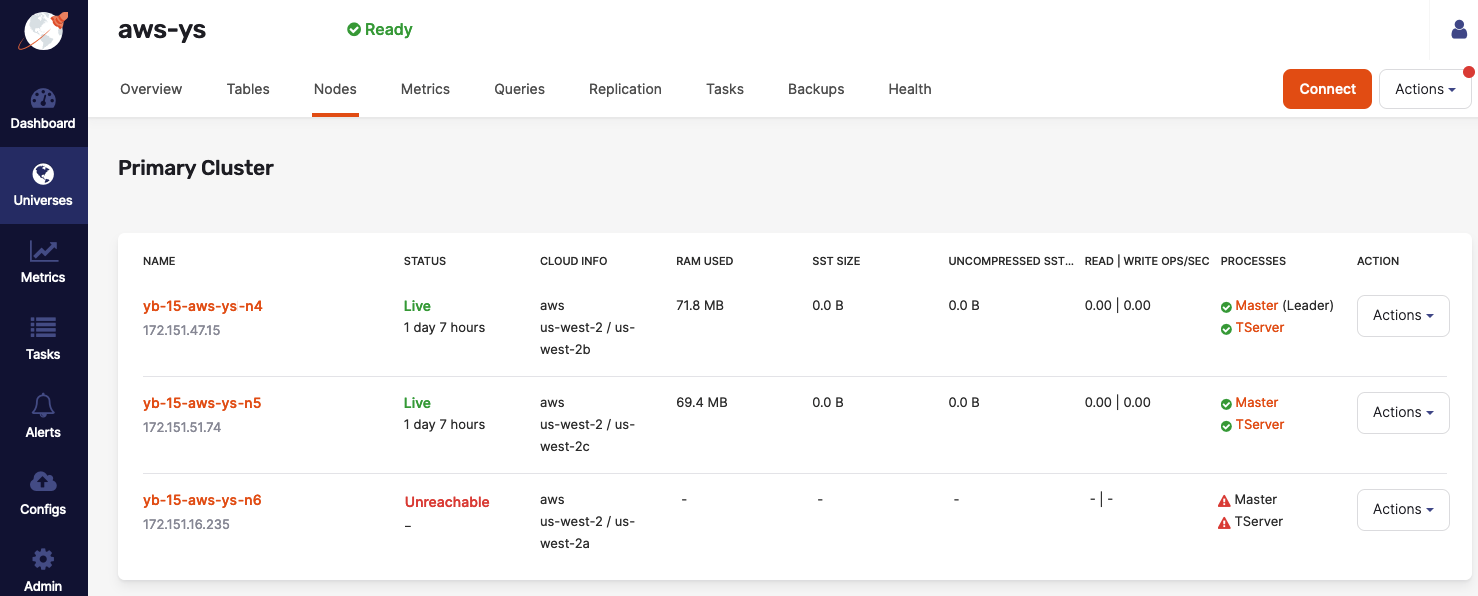
When this happens, new tablet leaders are elected for the underlying data shards and availability is maintained. If no other nodes are available to rebuild the lost copies of these tablets, the universe enters a partially under-replicated state and it would not be able to tolerate additional failures. To remedy the situation, it is recommended that you replace the node.
Note
A node status displayed in the UI is not always entirely indicative of the node's internal state. For example, a node whose status is shown as Unreachable can have various internal states, some of which are recoverable, and others that are not.Start and stop node processes
Prevent back up failure due to NFS unmount on cloud VM restart
If the universe uses NFS for backup storage, make sure the NFS mount is added to/etc/fstab on the node. When a cloud VM is restarted, the NFS mount may get unmounted if its entry is not in /etc/fstab. This can lead to backup failures, and errors during backup or restore.
Stop a process
If a node needs to be briefly taken out of service (for example, to perform a quick OS patch), you can click its associated Actions > Stop Processes. It is expected that this node will be returned to service soon through the Actions > Start Processes operation.
After the YB-TServer and (where applicable) YB-Master server are stopped, the node status is updated and the instance is ready for the planned system changes.
Generally, when a YB-Master is stopped on a node, YugabyteDB Anywhere automatically attempts to start a new YB-Master on another node in the same Availability Zone as the node on which YB-Master is stopped. This ensures that the number of YB-Master servers equals the replication factor (RF) and YB-Master servers are never under-replicated.
In general, you shouldn't stop more than one node at a time. For example, two stopped nodes might share a common tablet. This could cause unavailability on a universe with replication factor of 3.
Start a process
You can restart the node's processes by navigating to Universes, selecting your universe, then selecting Nodes, and then clicking Actions > Start Processes corresponding to the node. This returns the node to the Live state.
Remove node
To perform the remove action on a node, click its corresponding Actions > Remove Node.
This changes the value in the Status column from Unreachable to Removed and prevents access to data from this node. In addition, there are no values in the Master and TServer columns for the node. Leader elections also occur for tablets for which this node was the leader tablet server.
The action to remove a node is available from the following internal states of the node:
- ToJoinCluster
- Live
- Stopped
- ToBeRemoved
Taking this action transfers the node to a Removing and then Removed internal state, as follows:
- If the node is running a Master process, the Master is removed from the Master quorum. The Master process is stopped if the node is still reachable. YugabyteDB Anywhere waits for a new Master leader to be elected. At this point, there is less than a replication factor (RF) number of Masters running, which affects the resilience of the Master quorum. For information on how to restore resilience, see Start a new Master process.
- The TServer is marked as blacklisted on the Master leader.
- There is a wait for tablet quorums to remove the blacklisted TServer.
- Data migration is performed and the TServer process stops only if it is reachable.
- The node is marked as having neither Master nor TServer processes.
- DNS entries are updated.
The node removal action results in the instance still being allocated but not involved in any schemas.
Start a new Master process
A typical universe has an RF of 3 or 5. At the end of the node removal action, the Master quorum is reduced to (RF - 1) number of Masters. To restore the resilience of the Master quorum, you can start a new Master process, as follows:
-
Select a node in the same availability zone as the removed node.
-
Click Actions > Start Master corresponding to the node, as per the following illustration.
This action is only available if there are additional nodes in the same availability zone and these nodes do not have a running Master process.
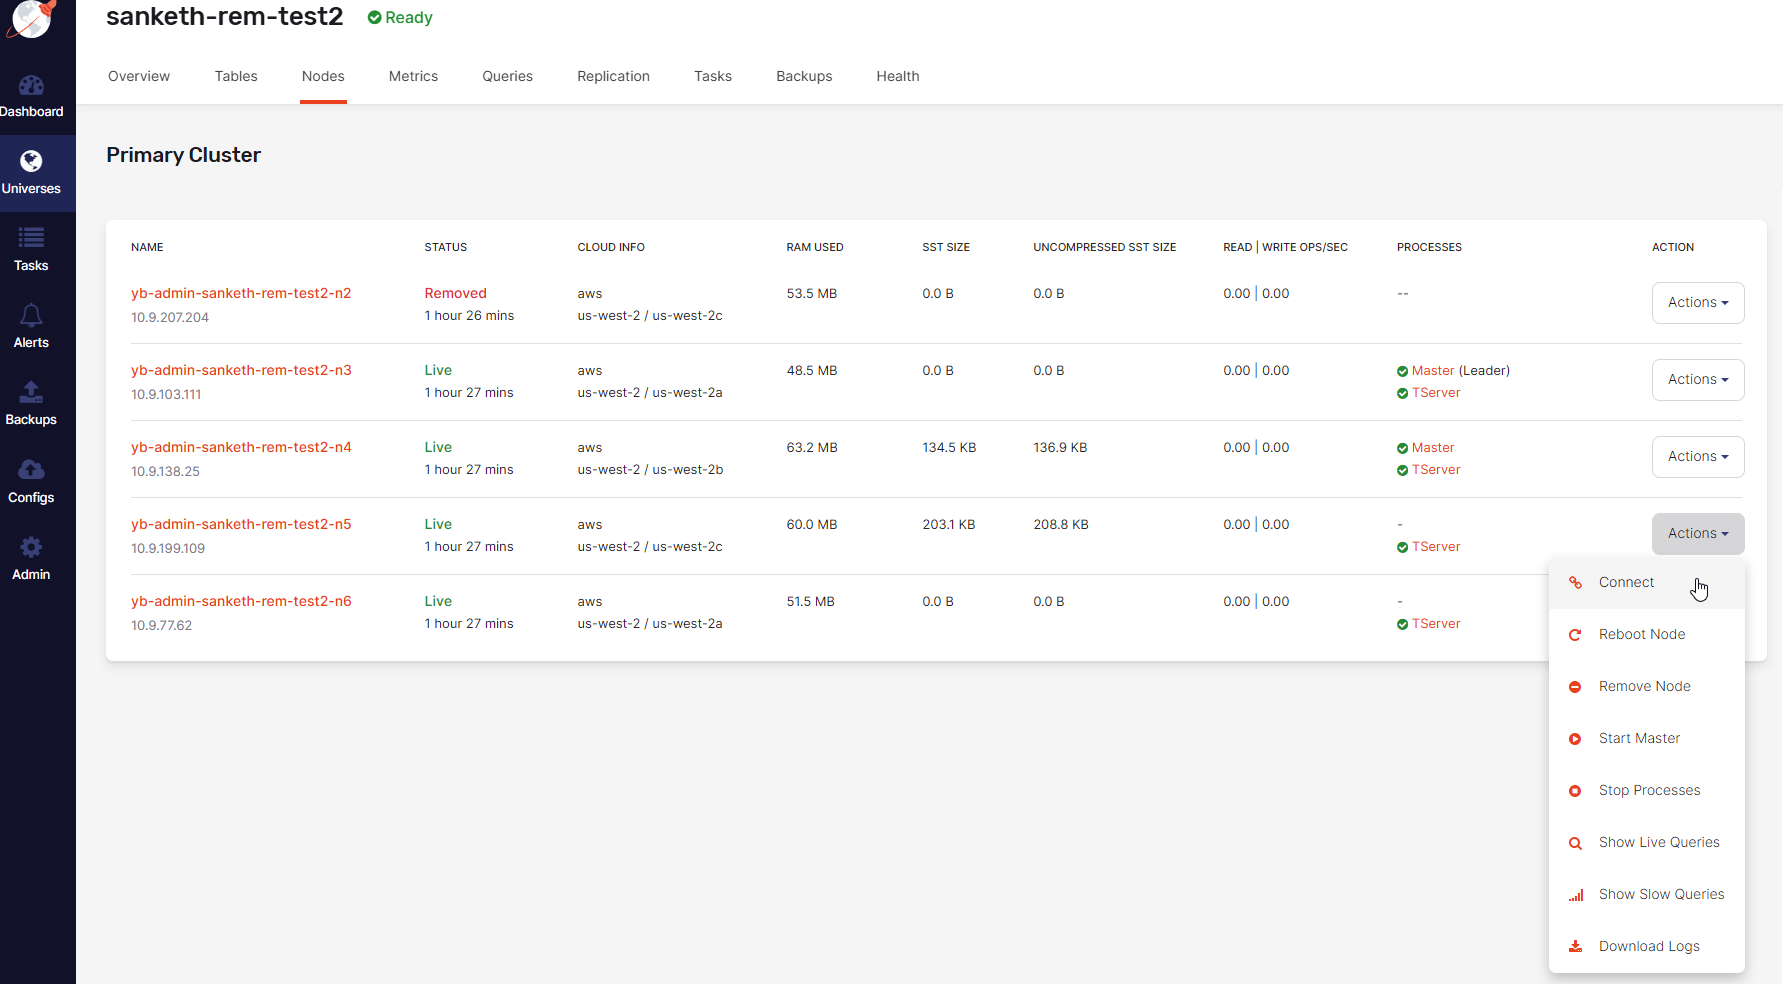
When you execute the start Master action, YugabyteDB Anywhere performs the following:
-
Configures the Master on the subject node.
-
Starts a new Master process on the subject node (in Shell mode).
-
Adds the new Master to the existing Master quorum.
-
Updates the Master addresses flag on all other nodes to inform them of the new Master.
Fix a lagging master process
If a master process is down for more than its WAL log retention period (defaults to 2 hrs) and then becomes healthy, it will be unable to catch up to its peers. In this scenario, the Nodes tab shows that the master is in a healthy state but YugabyteDB Anywhere generates an "under-replicated masters" alert. To fix this situation, do the following:
- Identify the lagging master. Navigate to Universes, select your universe, open the Metrics tab, and select Master > Master Follower Lag metric.
- On the Nodes page, click the Actions > Stop Processes action on the node with the lagging master. As part of the execution of this action, a new master process might be started on a different node in the same Availability Zone (if possible).
- When the "Stop Processes" task completes, click the Actions > Start Processes action on the same node.
- Verify that the cluster has an RF count of healthy masters.
Release node instance
To release the IP address associated with a removed node, click its corresponding Actions > Release Instance. This changes the value in the Status column from Removed to Decommissioned.
The Release Instance action releases the node instances in a cloud or frees up on-premise nodes.
The action to release a node instance is available from the Removed internal state of the node.
Taking this action transfers the node to a BeingDecommissioned and then Decommissioned internal state, as follows:
- There is a wait for Master leader.
- This server is removed from blacklist on Master leader (blacklisting is described in Remove node).
- The Master and TServer server tasks are stopped, if they have not been stopped already.
- The instance is destroyed.
- DNS entries are updated.
- Prometheus rules are updated and instructed to stop gathering metrics from this instance.
You can recover a node whose Status column displays Decommissioned by following instructions provided in Recover a node.
Delete node
You can perform the delete action via Actions corresponding to the node.
The action to delete a node is available from the following internal states of the node:
- ToBeAdded
- SoftwareInstalled
- Adding
- Decommissioned
Taking this action completely eliminates the node, as follows:
- Removes the node record from the universe metadata.
- Updates metadata in the database only.
Note that, for on-premises deployments only, if you want to reuse the node, after deleting it you must manually remove YugabyteDB components from the server node. Refer to Delete on-premises database server nodes.
Recover a node
In some cases, depending on the node's status, YugabyteDB Anywhere allows you to recover a removed node on a new backing instance, as follows:
-
Navigate to Universes, select your universe, and open the Nodes tab.
-
Find a node with a Decommissioned status and click its corresponding Actions > Add Node, as per the following illustration:
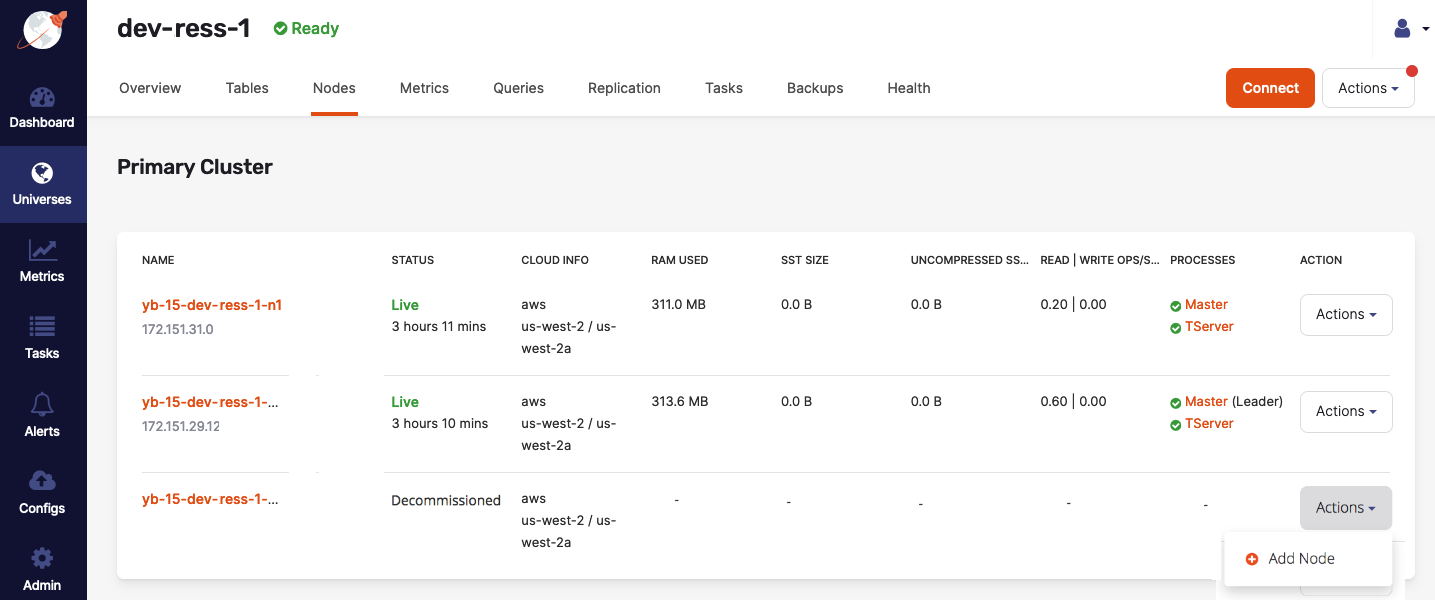
For Infrastructure as a service (IaaS) such as AWS and GCP, YugabyteDB Anywhere will spawn with the existing node instance type in the existing region and zone of that node. When the process completes, the node will have the Master and TServer processes running, along with data that is load-balanced onto this node. The node's name will be reused and the status will be shown as Live.
For information on removing and eliminating nodes, see Eliminate an unresponsive node.