Create cloud provider configuration
Before you can deploy universes using YugabyteDB Anywhere (YBA), you must create a provider configuration. Create a Microsoft Azure provider configuration if your target cloud is Azure.
When deploying a universe, YBA uses the provider configuration settings to do the following:
-
Create VMs on Azure using the following:
- the resource group
- specified regions and availability zones (this can be a subset of those specified in the provider configuration)
- a Linux image
-
Provision those VMs with YugabyteDB software
Prerequisites
You need to add the following Azure cloud provider credentials:
- Application client ID and (if using credentials) client secret
- Resource group name
- Subscription ID
- Tenant ID
- SSH port and user
YBA uses the credentials to automatically provision and deprovision YugabyteDB instances.
For more information on setting up an Azure account and resource groups, refer to Cloud permissions to deploy nodes.
Configure Azure
Navigate to Integrations > Infrastructure > Microsoft Azure to see a list of all currently configured Azure providers.
Create a provider
To create an Azure provider:
-
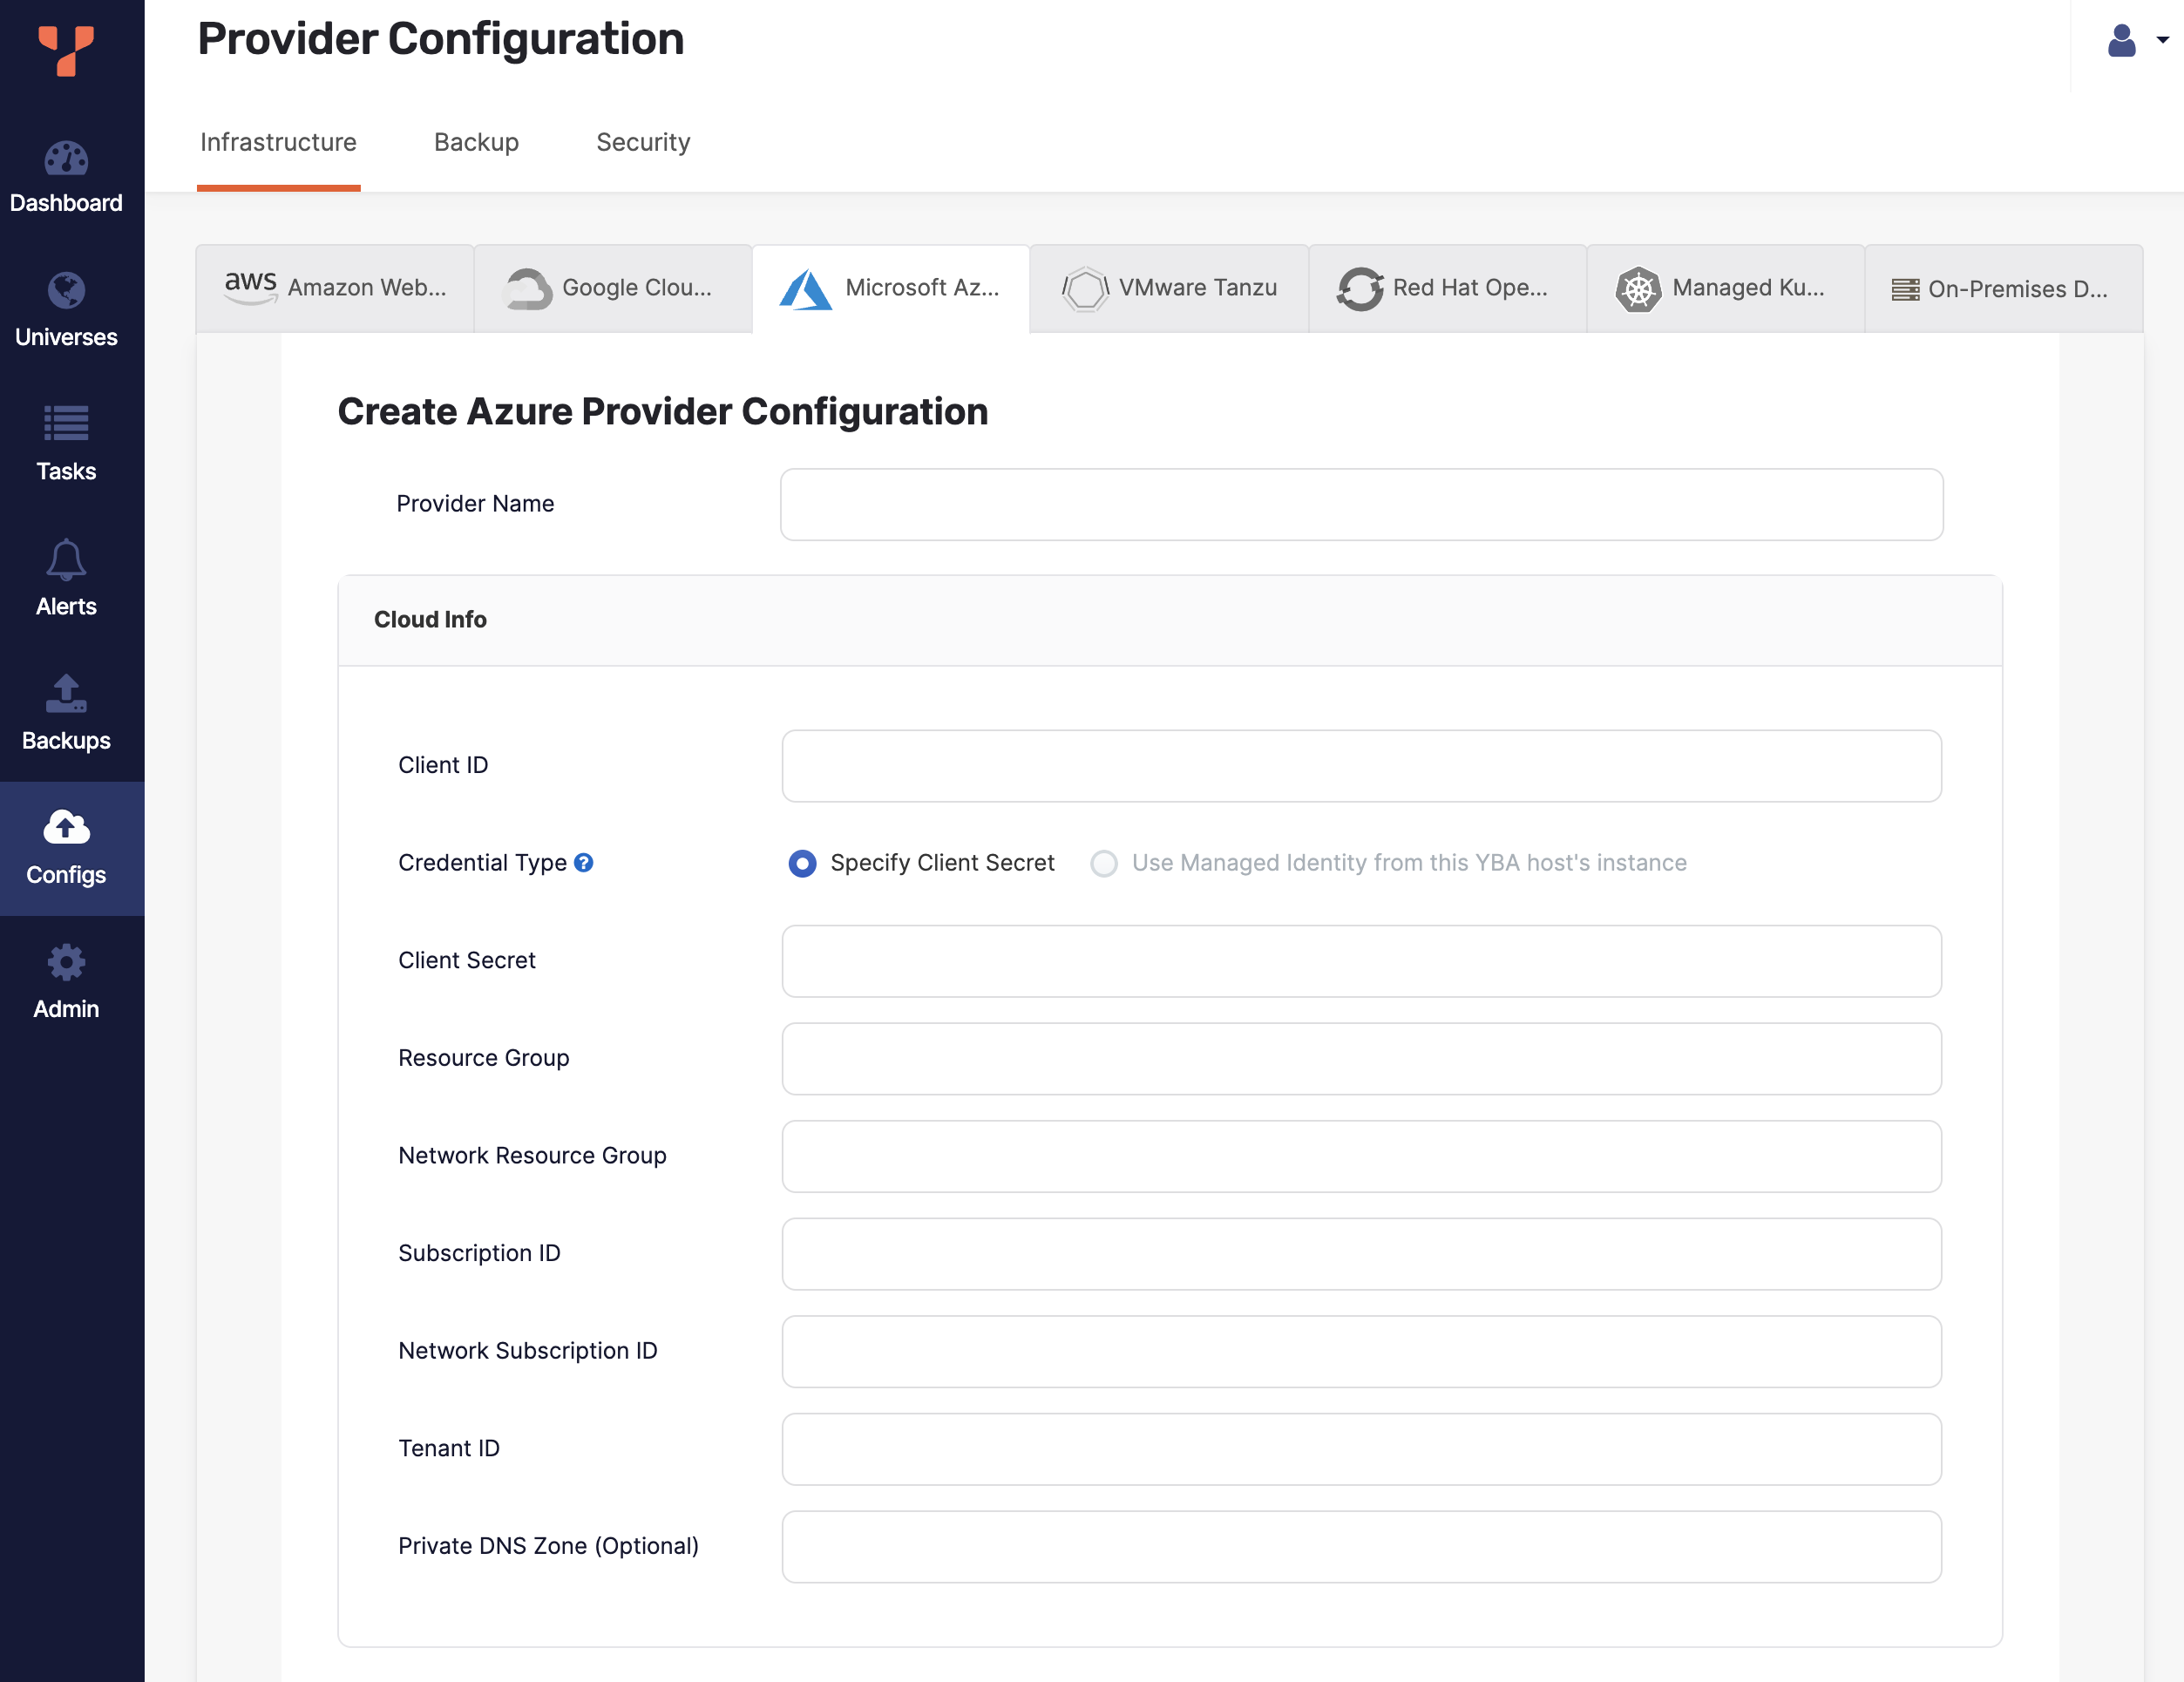
Click Create Config to open the Create Azure Provider Configuration page.
-
Enter the provider details. Refer to Provider settings.
-
Click Validate and Save Configuration when you are done and wait for the configuration to validate and complete.
If you want to save your progress, you can skip validation by choosing the Ignore and save provider configuration anyway option, which saves the provider configuration without validating. Note that you may not be able to create universes using an incomplete or unvalidated provider.
The create provider process includes configuring a network, subnetworks in all available regions, firewall rules, VPC peering for network connectivity, and a custom SSH key pair for YugabyteDB Anywhere-to-YugabyteDB connectivity.
When the configuration is completed, you can see all the resources managed by YBA in your resource group, including virtual machines, network interface, network security groups, public IP addresses, and disks.
If you encounter problems, see Troubleshoot Azure cloud provider configuration.
View and edit providers
To view a provider, select it in the list of AZU Configs to display the Overview.
To edit the provider, select Config Details, make changes, and click Apply Changes. For more information, refer to Provider settings. Note that for YBA version 2.20.1 and later, depending on whether the provider has been used to create a universe, you can only edit a subset of fields such as the following:
-
Provider Name
-
Client Secret
-
Regions
-
To add a region, click Add Region. See Regions.
-
To change an existing region, click Edit for the region. The options are the same as for Add Region.
-
To delete a region, click Delete for the region.
Note that you cannot delete a region if any of the region's zones are in use, or delete zones that are in use.
-
To view the universes created using the provider, select Universes.
To delete the provider, click Actions and choose Delete Configuration. You can only delete providers that are not in use by a universe.
Provider settings
Provider Name
Enter a Provider name. The Provider name is an internal tag used for organizing cloud providers.
Cloud Info
Enter the following details of your Azure cloud account, as described in Azure cloud permissions.
Client ID
Provide the ID of the application you registered with the Microsoft Identity Platform.
Credential type
If you added credentials in the form of a client secret to your registered application:
- Select Specify Client Secret.
- Enter the Client Secret of the application associated with the Client ID you provided. You need to enter the
Valueof the secret (not theSecret ID).
If you are using the managed identity of the Azure VM hosting YugabyteDB Anywhere to authenticate:
-
Select Use Managed Identity from this YBA host's instance.
This option is only available if YugabyteDB Anywhere is deployed on an Azure VM that has a managed identity assigned.
Additional fields
- Resource Group is the name of the resource group you created for your application, and in which YugabyteDB node compute and network resources will be created.
- Subscription ID is required for cost management. The virtual machine resources managed by YBA are tagged with this subscription. To get the subscription ID, open Subscriptions in Azure portal and find your subscription. Then, copy the Subscription ID.
- Optionally, if you created a different resource group for your network interfaces, provide the Network Resource Group name and the associated Network Subscription ID. If you do not provide a Network Resource Group or Network Subscription ID, network resources will be created in the default resource group.
- Tenant ID represents the tenant ID which belongs to an active subscription. To find your tenant ID, follow instructions provided in How to find your Microsoft Entra tenant ID.
- Private DNS zone lets you use a custom domain name for the nodes in your universe. For details and instructions, see Define a private DNS zone.
Regions
You can specify a region as follows:
-
Click Add Region to display the Add Region dialog.
-
Select an Azure region and provide a virtual network name from your Azure portal.
-
Optionally, specify the security group, if the database VM is in a different network than your YugabyteDB Anywhere instance.
-
Optionally, specify a Network Resource Group and Resource Group for the region. If you do not provide a Network Resource Group or Resource Group, node compute and network resources for the region will be created in the resource group specified for the provider.
-
Click Add Zone and provide a mapping of subnet IDs to use for each availability zone you wish to deploy. This is required for ensuring that YBA can deploy nodes in the correct network isolation that you need in your environment.
-
Click Done.
Linux version catalog
Specify the machine images to be used to install on nodes of universes created using this provider.
To add machine images recommended and provisioned by YBA, select the Include Linux versions that are chosen and managed by YugabyteDB Anywhere in the catalog option, and choose the architectures.
To add your own machine images to the catalog:
-
Click Add Linux Version.
-
Provide a name for the Linux version. You can see this name when creating universes using this provider.
-
Provide a URN to a marketplace image or a shared gallery image by following instructions provided in Use a shared image gallery.
-
Provide the SSH user and port to use to access the machine image OS. Leave this empty to use the default SSH user.
-
Click Add Linux Version.
To edit custom Linux versions, remove Linux versions, and set a version as the default to use when creating universes, click ... for the version you want to modify.
Important
For YugabyteDB Anywhere v2025.1 and later, if you want to deploy a universe on Azure in an airgapped environment, you must provide your own Linux version.
SSH Key Pairs
To be able to provision cloud instances with YugabyteDB, YBA requires SSH access.
Enter the SSH user and port to use by default for machine images. You can override these values for custom Linux versions that you add to the Linux Version Catalog.
You can manage SSH key pairs in the following ways:
- Enable YBA to create and manage Key Pairs. In this mode, YBA creates SSH Key Pairs and stores the relevant private key so that you will be able to SSH into future instances.
- Use your own existing Key Pairs. To do this, provide the name of the Key Pair, as well as the private key content.
Advanced
You can customize the Network Time Protocol server, as follows:
-
Select Use AZU's NTP server to enable cluster nodes to connect to the Azure internal time servers. For more information, consult the Microsoft Azure documentation such as Time sync for Linux VMs in Azure.
-
Select Specify Custom NTP Server(s) to provide your own NTP servers and allow the cluster nodes to connect to those NTP servers.
-
Select Assume NTP server configured in machine image to prevent YBA from performing any NTP configuration on the cluster nodes. For data consistency, you will be responsible for manually configuring NTP.
Important
Use this option with caution. Time synchronization is critical to database data consistency; failure to run NTP may cause data loss.
Configuring Azure Portal
Obtain Azure resource IDs
To find an Azure resource's ID, navigate to the resource in question and click JSON View at the top right, as per the following illustration:

Azure resource IDs typically have the following format:
/subscriptions/<subscriptionID>/resourceGroups/<resourceGroup>/providers/Microsoft.<service>/path/to/resource
Define a private DNS zone
You may choose to define a private DNS zone to instruct YBA to register the universe name to all of the IP addresses in the universe in that DNS zone. For more information, see What is a private Azure DNS zone.
You can set a private DNS zone as follows:
-
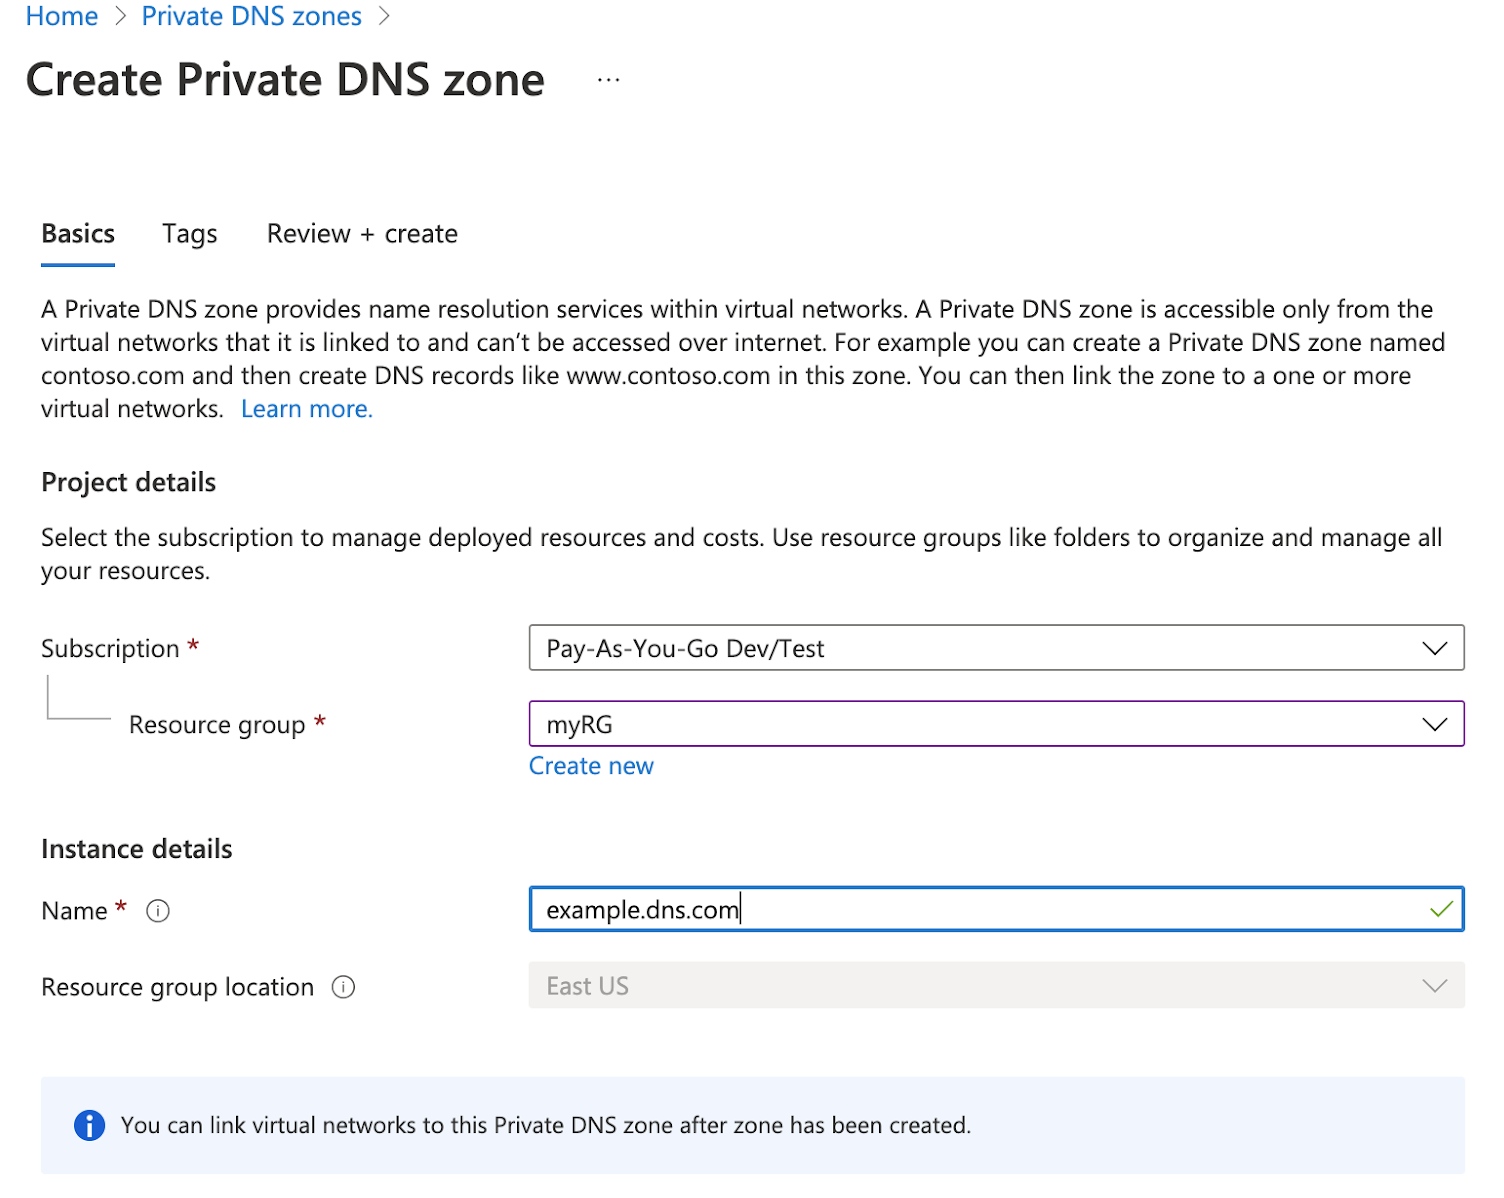
On the Azure portal, create the Private DNS Zone, as per the following illustration:
-
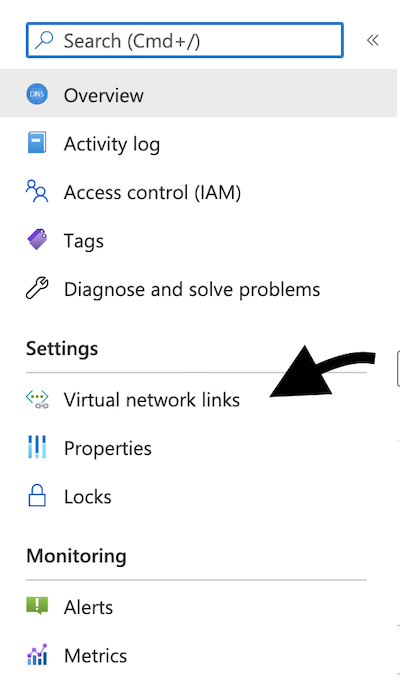
Navigate to the resource page and click Settings > Virtual Network Links, as per the following illustration:
-
Add a link to the virtual network to which you want it to be connected. For more information, see Create an Azure private DNS zone using the Azure portal.
-
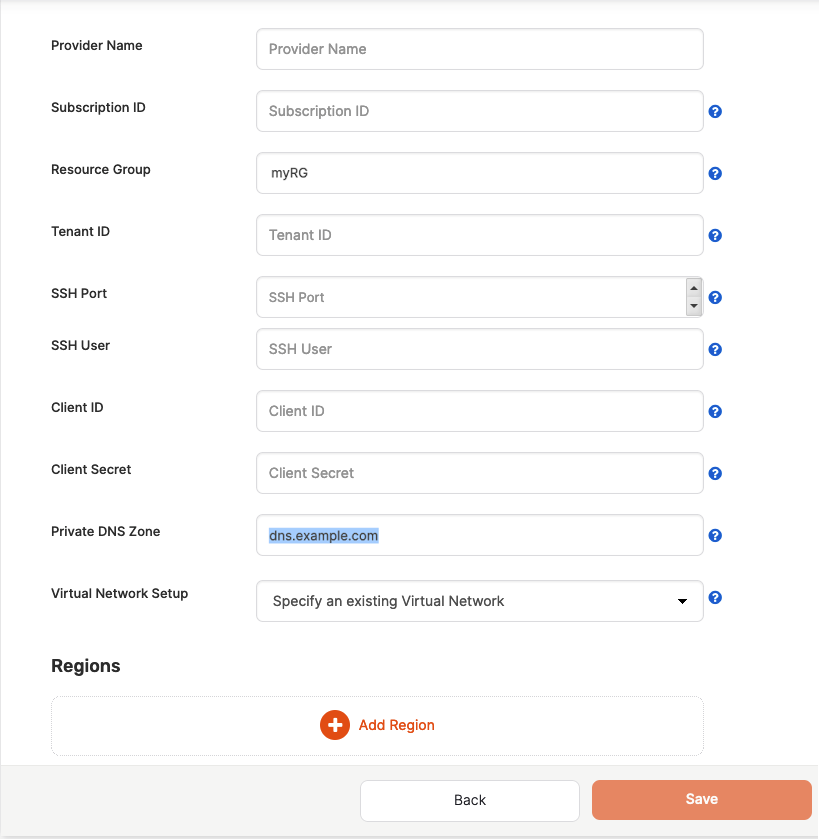
To use the private DNS zone in YBA, add either the resource ID or the name of the DNS zone to the Private DNS Zone field of the Cloud Provider Configuration page in the YBA UI.
If the private DNS zone is defined by an ID, YBA will use it together with the default subscription ID and the resource group. If the private DNS zone is defined by a full URL that contains both the subscription ID and resource group, then these two values will be used instead of default values.
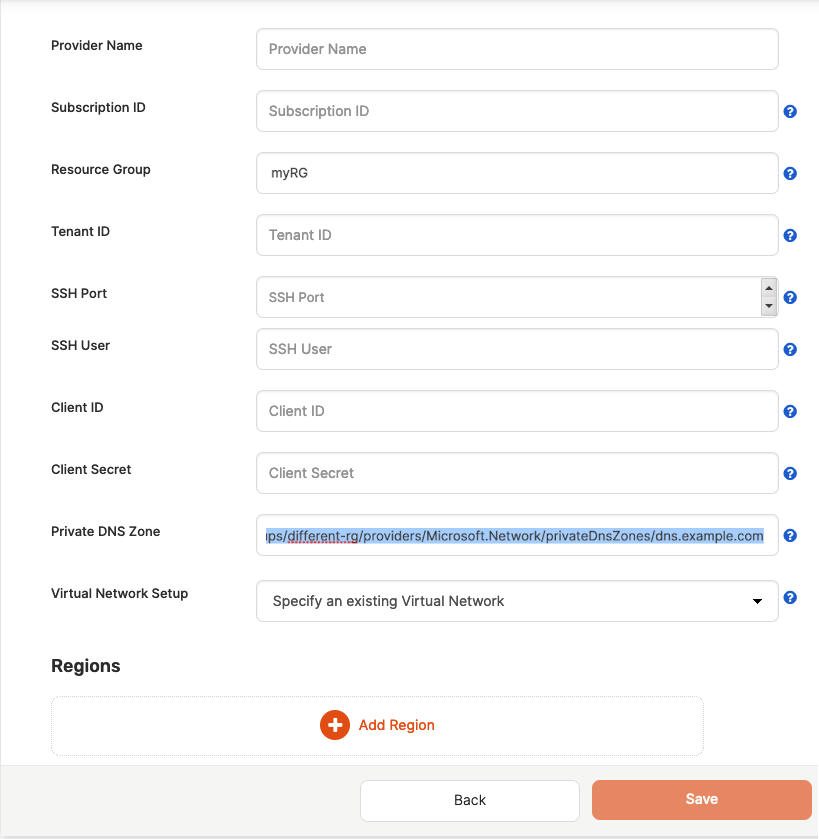
In the setup example shown in the following illustration, the private DNS zone is specified as dns.example.com, and the resource group is explicitly specified as myRG:
In the following setup example, a complete resource ID is specified for the private DNS zone:
/subscriptions/SUBSCRIPTION_ID/resourceGroups/different-rg/providers/Microsoft.Network/privateDnsZones/dns.example.com
The preceding setting specifies the resource group as different-rg and the DNS zone as dns.example.com. The different-rg resource group in the resource ID overrides the setting in the Resource Group field, as shown in the following illustration:
Use a shared image gallery
You can use shared image galleries as an alternative to using marketplace image URNs. A gallery allows you to provide your own custom image to use for creating universe instances. For more information on shared image galleries, refer to Store and share images in an Azure Compute Gallery.
You set up a shared gallery image on Azure as follows:
-
On the Azure portal, create a shared image gallery.
-
Create an image definition.
-
Create a VM of which you want to take a snapshot.
-
Navigate to the VM and click Capture on the top menu.
-
Fill in the information and then choose the gallery and image definition you created in the previous steps, as per the following illustration:

Ensure that the images are replicated to each region in which you are planning to use them. For example, configuration shown in the following illustration would only work for US East:
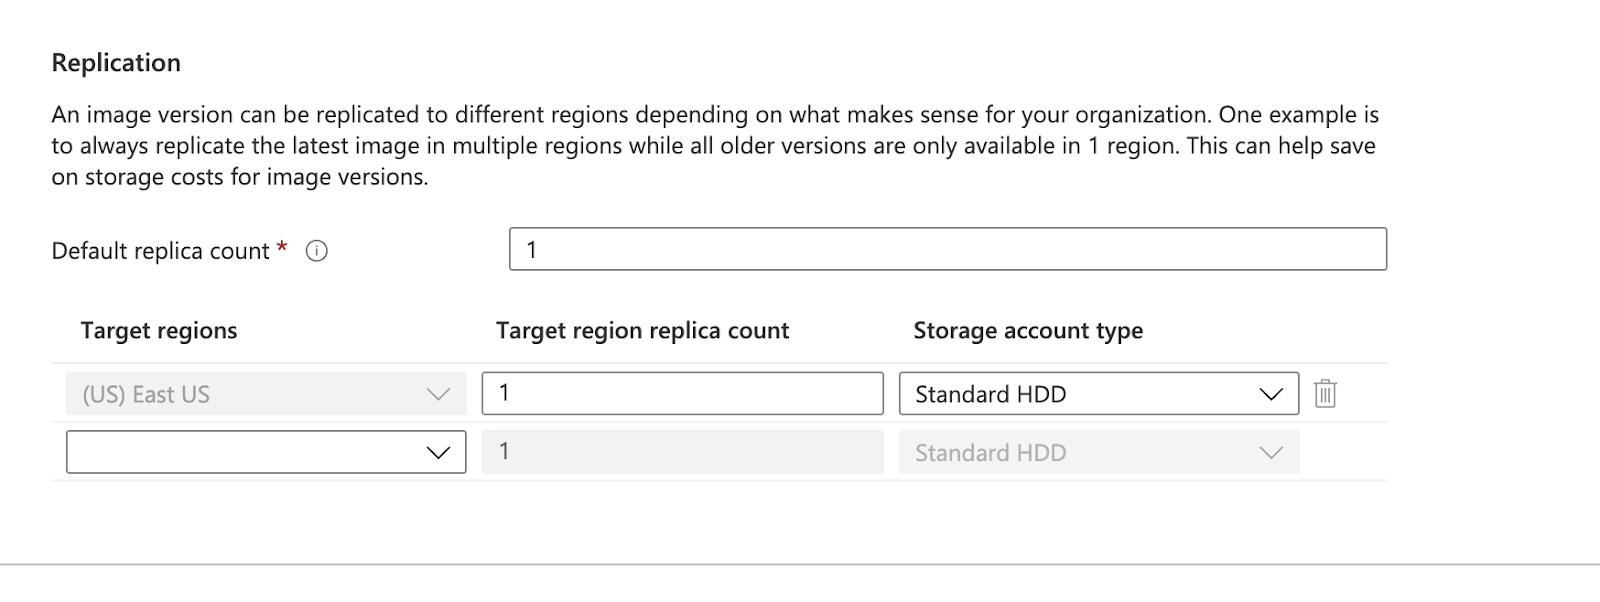
-
To use the image in YBA, enter the image version's resource ID into the Marketplace Image URN / Shared Gallery Image ID field of the Specify Region Info dialog.
The gallery image ID could be defined by a full URL containing a subscription ID, a resource group name, and the resource name itself. If the subscription ID or the resource group is different from the default values, YBA will use them instead.