Create a multi-zone universe
YugabyteDB Anywhere allows you to create a universe in one geographic region across multiple availability zones using Kubernetes as a cloud provider.
Prerequisites
Before you start creating a universe, ensure that you performed steps described in Create Kubernetes provider configuration.
Note that the provider example used in this document has a cluster-level admin access.
Create a universe
To create a universe:
-
Navigate to Dashboard or Universes, and click Create Universe.
-
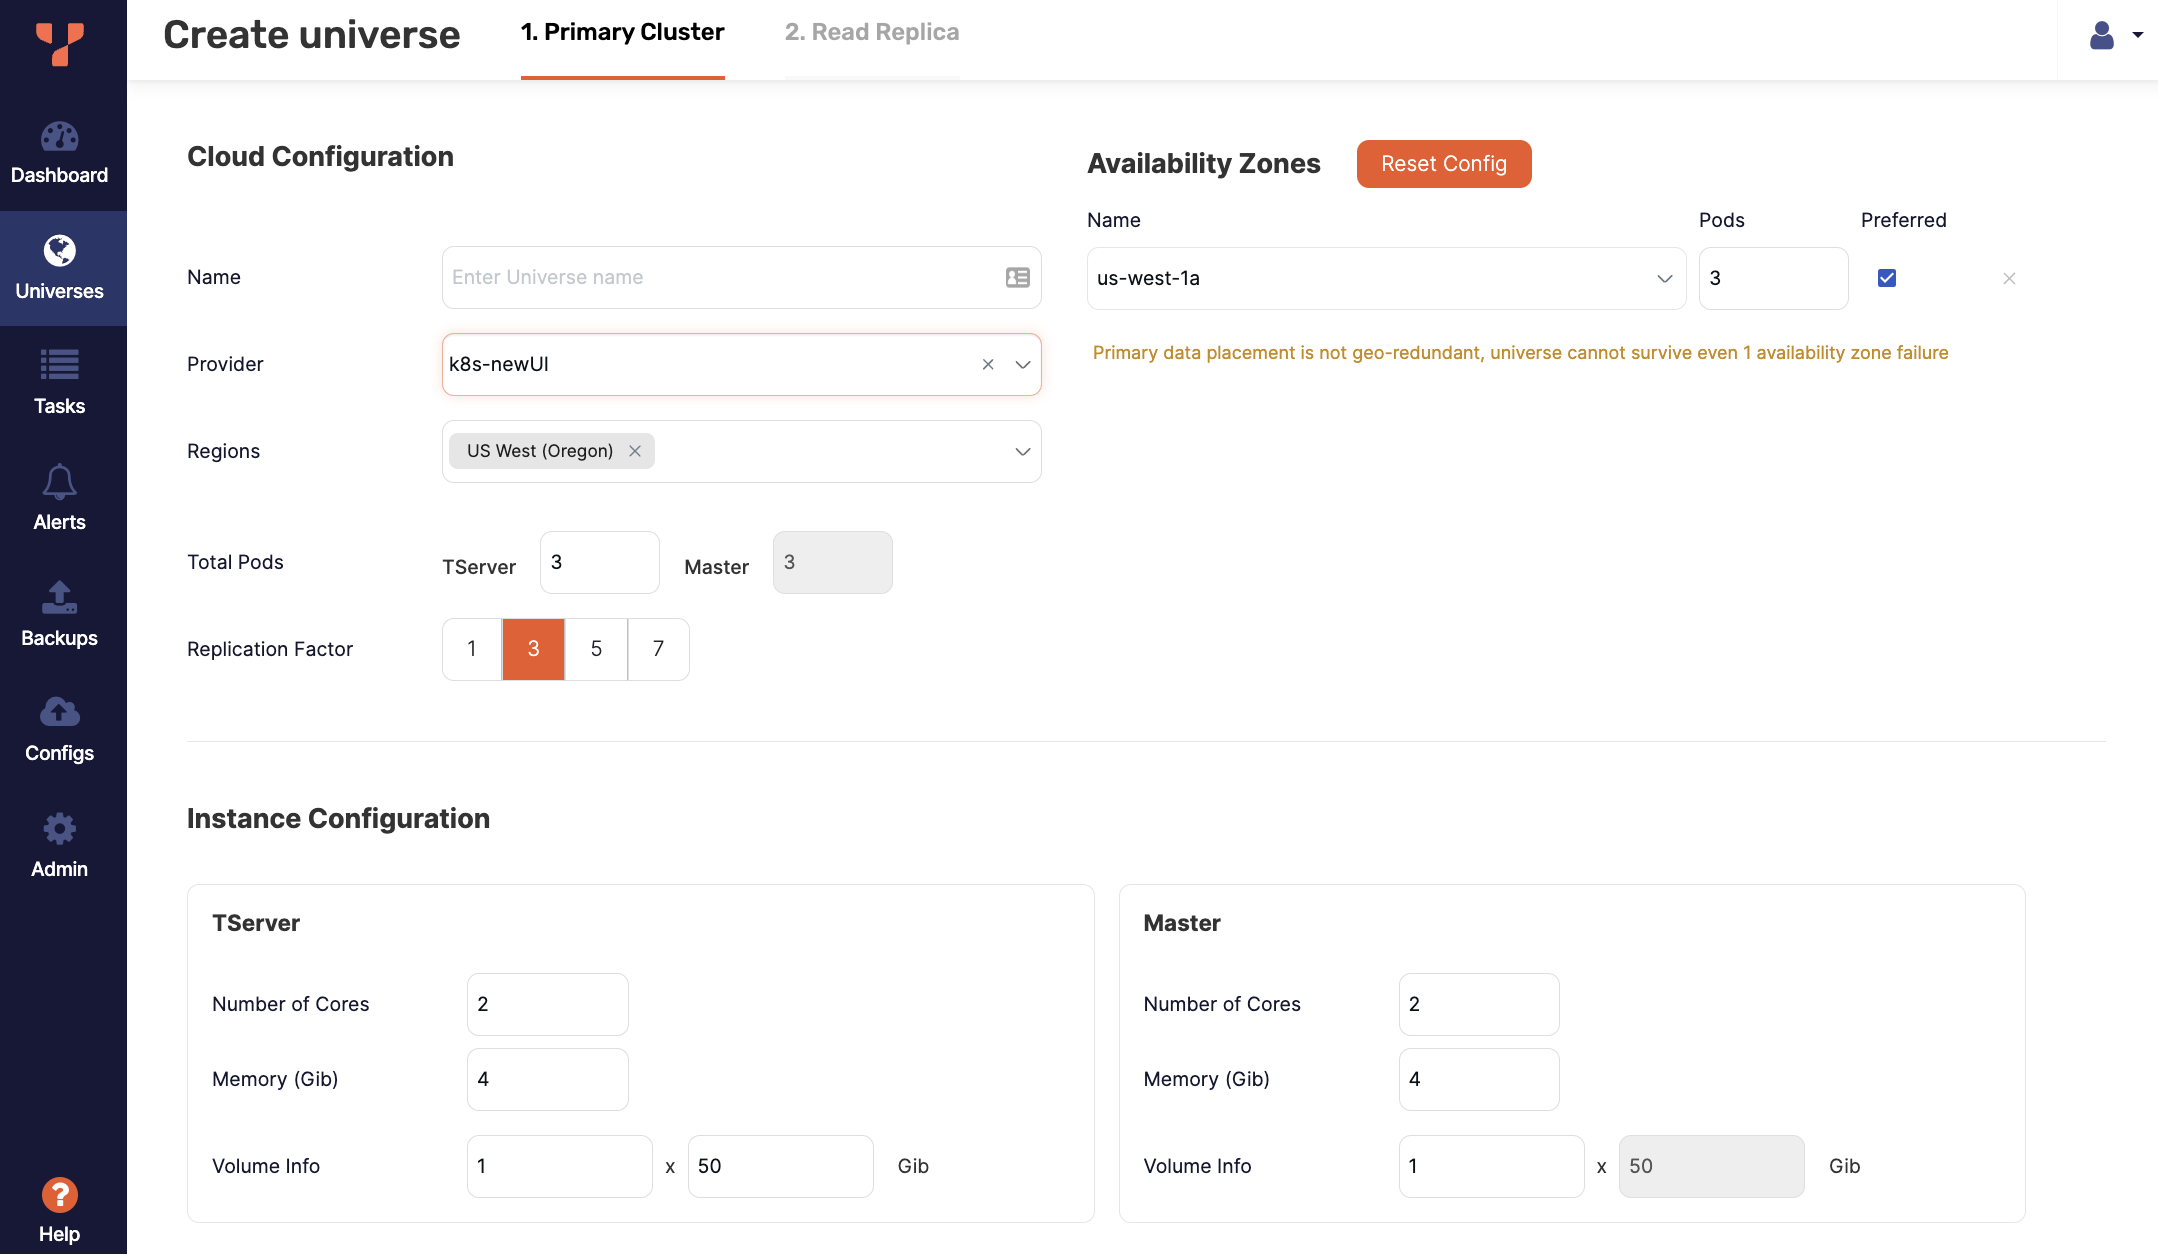
Enter the universe details. Refer to Universe settings.
-
To add a read replica, click Configure Read Replica. Refer to Create a read replica cluster.
-
Click Create when you are done and wait for the configuration to complete.

Universe settings
Cloud Configuration
Specify the provider and geolocations for the pods in the universe:
-
Enter a name for the universe.
-
Choose the Kubernetes provider configuration to use to create the universe.
-
Select the regions in which to deploy pods. The available regions will depend on the provider you selected.
-
Enter the number of pods to deploy in the universe. When you provide the value in the TServer field, the pods are automatically placed across all the availability zones to guarantee the maximum availability.
-
Select the replication factor for the universe.
-
Configure the availability zones where the pods will be deployed by clicking Add Zone.
-
Use the Preferred setting to set the preferred zone or region.
Instance Configuration
Complete the Instance Configuration section for TServer and Master as follows:
- Number of Cores - specify the total number of processing cores or CPUs assigned to the TServer and Master.
- Memory(GiB) - specify the memory allocation of the TServer and Master.
- Volume Info - specify the number of volumes multiplied by size for the TServer and Master. The default is 1 x 100GB.
YugabyteDB supports ARM instances, which are specified using Helm overrides. See Helm Overrides.
Security Configurations
Authentication Settings
Enable the YSQL and YCQL endpoints and database authentication.
Enter the password to use for the default database admin superuser (for YSQL the user is yugabyte, and for YCQL cassandra). Be sure to save your password; the password is not saved in YugabyteDB Anywhere. For more information, refer to Database authorization.
By default, the API endpoints use ports 5433 (YSQL) and 9042 (YCQL). You can customize these ports.
Encryption Settings
Enable encryption in transit to encrypt universe traffic. You can enable the following:
-
Node-to-Node TLS to encrypt traffic between universe nodes.
-
Client-to-Node TLS to encrypt traffic between universe nodes and external clients.
Note that if you want to enable Client-to-Node encryption, you first must enable Node-to-Node encryption.
Encryption requires a certificate. YugabyteDB Anywhere can generate a self-signed certificate automatically, or you can use your own certificate.
To use your own, you must first add it to YugabyteDB Anywhere; refer to Add certificates.
To have YugabyteDB Anywhere generate a certificate for the universe, use the default Root Certificate setting of Create New Certificate. To use a certificate you added or a previously generated certificate, select it from the Root Certificate menu.
For more information on using and managing certificates, refer to Encryption in transit.
To encrypt the universe data, select the Enable encryption at rest option and select the KMS configuration to use for encryption. For more information, refer to Encryption at rest.
Advanced Configuration
Complete the Advanced section as follows:
- In the DB Version field, specify the YugabyteDB version. The default is either the same as the YugabyteDB Anywhere version or the latest YugabyteDB version available for YugabyteDB Anywhere. If the version you want to add is not listed, you can add it to YugabyteDB Anywhere. Refer to Manage YugabyteDB releases.
- Use the Enable IPV6 field to specify whether or not you want to use IPV6 networking for connections between database servers. This setting is disabled by default.
- Use the Enable Public Network Access field to specify whether or not to assign a load balancer or nodeport for connecting to the database endpoints over the Internet. This setting is disabled by default.
If database version is v2024.2 or later, you can enable early access features for PostgreSQL compatibility. For more information, refer to Enhanced PostgreSQL Compatibility Mode.
G-Flags
Optionally, add configuration flags for your YB-Master and YB-TServer nodes. You can also set flags after universe creation. Refer to Edit configuration flags.
Helm overrides
Optionally, use the Helm Overrides section, as follows:
-
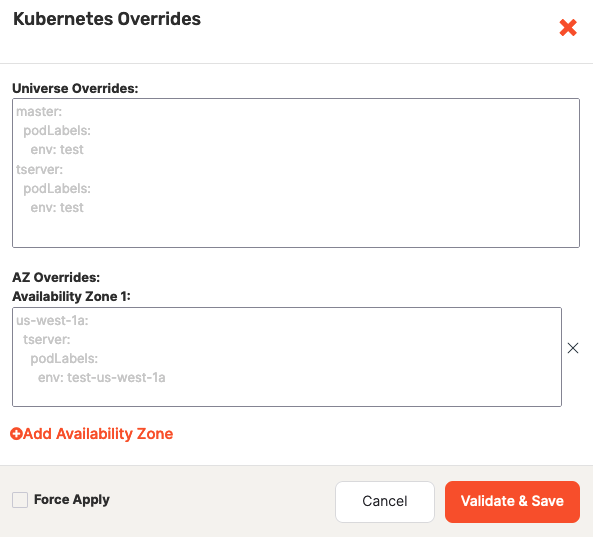
Click Add Kubernetes Overrides to open the Kubernetes Overrides dialog.

-
Using the YAML format (which is sensitive to spacing and indentation), specify the universe-level overrides for YB-Master and YB-TServer, as per the following example:
master: podLabels: service-type: 'database' -
Optionally, click Add Availability Zone to add availability zone overrides, which only apply to pods that are deployed in that specific availability zone.
For example, to define overrides for the availability zone us-west-2a, you would click Add Availability Zone and use the text area to insert YAML in the following form:
us-west-2a:
  master:
    podLabels:
      service-type: 'database'
If you specify conflicting overrides, YugabyteDB Anywhere would use the following order of precedence: universe availability zone-level overrides, universe-level overrides, provider overrides.
-
Select Force Apply if you want to override any previous overrides.
-
Click Validate and Save.
If there are any errors in your overrides definitions, a detailed error message is displayed. You can correct the errors and try to save again. To save your Kubernetes overrides regardless of any validation errors, select Force Apply.
GKE service account
If you want to enable GKE service account-based IAM for backup and restore using GCS at the universe level, add the following overrides:
tserver:
  serviceAccount: <KSA_NAME>
nodeSelector:
  iam.gke.io/gke-metadata-server-enabled: "true"
If you don't provide namespace names for each zone/region during provider creation, add the names using the following steps:
- Add the Kubernetes service account to the namespaces where the pods are created.
- Follow the steps in Upgrade universes for GKE service account-based IAM to add the annotated Kubernetes service account to pods.
To enable the GKE service account service at the provider level, refer to Overrides.
Readiness probes
If you want to enable readiness probes, add the following overrides:
master:
  readinessProbe:
    enabled: true

tserver:
  readinessProbe:
    enabled: true
ARM VMs
EA If you want to use ARM VMs, add the following overrides:
# Point to the aarch64 image in case multi-arch is not available.
Image:
    tag: 2024.2.3.2-b6-aarch64
# Add a nodeSelector to deploy universe to arm64 nodes in the cluster
nodeSelector:
    kubernetes.io/arch: arm64

# For each master and tserver add tolerations for any taints that might be
# present on the nodes. These taints can be added by default by the
# managed k8s provider or by the cluster administrator
master:
  tolerations:
    - key: kubernetes.io/arch
      operator: Equal
      value: aarch64
      effect: NoSchedule
    - key: kubernetes.io/arch
      operator: Equal
      value: arm64
      effect: NoSchedule
    - key: arch
      operator: Equal
      value: aarch64
      effect: NoSchedule

tserver:
  tolerations:
    - key: kubernetes.io/arch
      operator: Equal
      value: aarch64
      effect: NoSchedule
    - key: kubernetes.io/arch
      operator: Equal
      value: arm64
      effect: NoSchedule
    - key: arch
      operator: Equal
      value: aarch64
      effect: NoSchedule
Examine the universe and connect to nodes
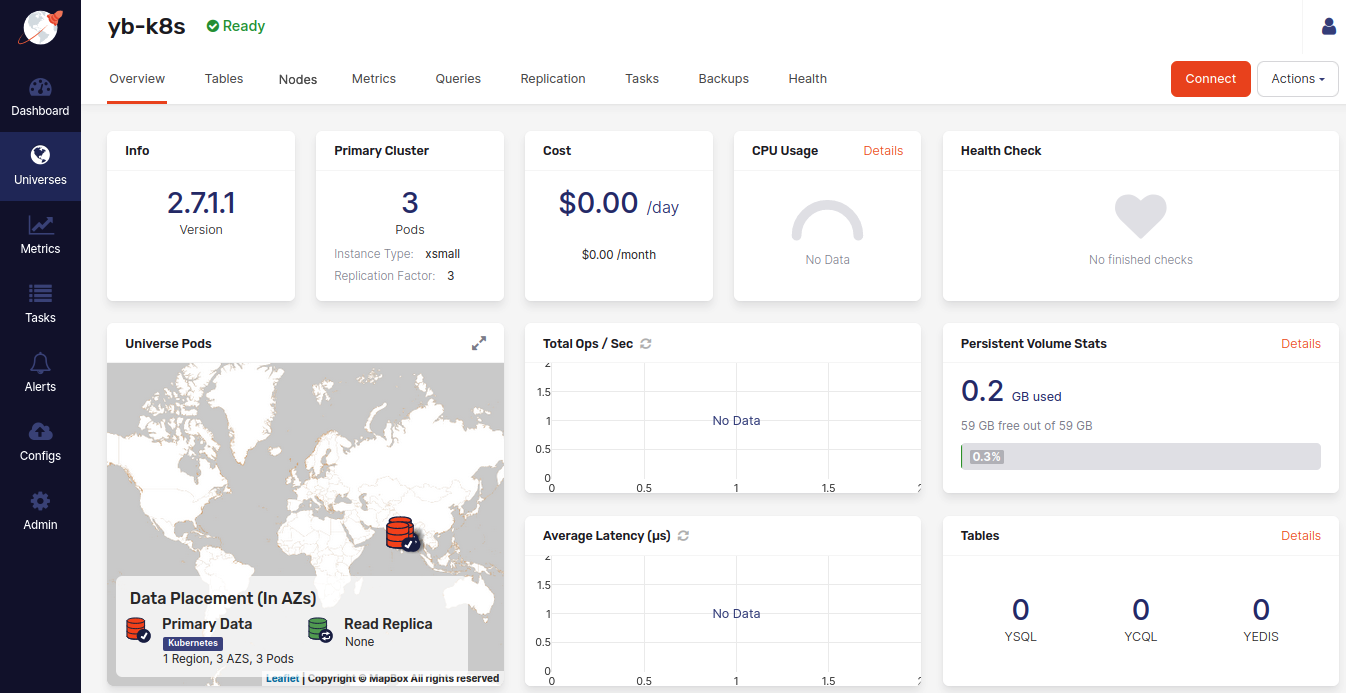
The universe view consists of several tabs that provide different information about this universe.
The following illustration shows the Overview tab of a newly-created universe:

If you have defined Helm overrides for your universe, you can modify them at any time through Overview by clicking Actions > Edit Kubernetes Overrides.
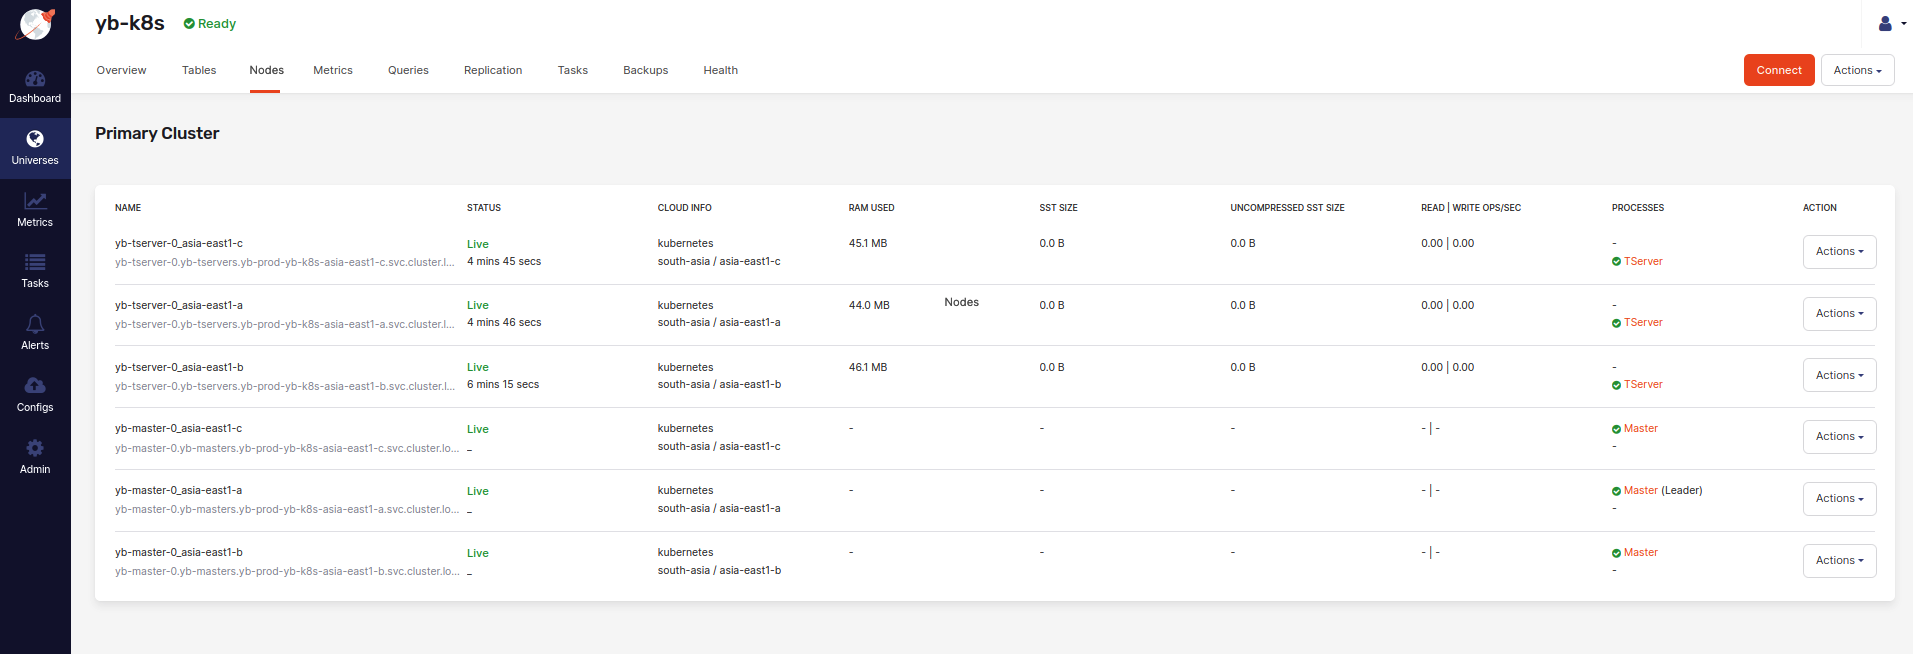
The following illustration shows the Nodes tab that allows you to see a list of nodes with their addresses:

You can create a connection to a node as follows:
-
Click Connect to access the information about the universe's endpoints to which to connect.
-
On a specific node, click Actions > Connect to access the
kubectlcommands that you need to copy and use to connect to the node.
Connect to the universe
For information on how to connect to the universe from the Kubernetes cluster, as well as remotely, see Connect YugabyteDB clusters.
Create common YB-TServer service for zones
By default, each zone has its own YB-TServer service, and you can use this service to connect to the universe. Optionally, you can create an additional highly available common service across all zones as follows.
Note that this requires all the zone deployments to be in the same namespace.
-
Set the following Kubernetes overrides to add the universe-name label on the YB-TServer pods. You can do this when you create the universe or by modifying the Kubernetes overrides of an existing universe.
tserver: podLabels: universe-name: yb-k8s -
Save the following to a file named
yb-tserver-common-service.yaml. You can customize the service type, annotations, and the label selector as required.# yb-tserver-common-service.yaml apiVersion: v1 kind: Service metadata: name: yb-k8s-common-tserver labels: app.kubernetes.io/name: yb-tserver # annotations: # networking.gke.io/load-balancer-type: "Internal" spec: type: ClusterIP selector: app.kubernetes.io/name: yb-tserver # This value should match with the value from step 1. universe-name: yb-k8s ports: # Modify the ports if using non-standard ports. - name: tcp-yql-port port: 9042 - name: tcp-ysql-port port: 5433 -
Run the following command to create the service in the universe's namespace (
yb-prod-yb-k8sin this example).$ kubectl apply -f yb-tserver-common-service.yaml -n yb-prod-yb-k8s
After the service YAML is applied, in this example you would access the universe at yb-k8s-common-tserver.yb-prod-yb-k8s.svc.cluster.local.
Create a common load balancer service for YB-Masters/YB-TServers
In v2.17 and later, newly created multi-zone universes are deployed in a single namespace by default. This can lead to duplication of load balancer services as a separate load balancer is created for each zone. To prevent creating extra load balancers, you can create a common load balancer service (currently EA ) for YB-Masters and YB-TServers that spans all the zones in a namespace.
For scenarios involving multi-namespaces or clusters, a distinct service is created for each namespace, maintaining the flexibility needed for complex deployments while avoiding unnecessary resource allocation.
Enable the common load balancer
By default, the load balancer service is created per zone. You can change this behavior by configuring Helm overrides during universe creation, or by enabling a global runtime configuration option.
You can explicitly define the service scope with the values as "AZ" or "Namespaced" when you configure Helm overrides as follows:
serviceEndpoints:
  - name: "yb-master-ui"
    type: LoadBalancer
    # Can be AZ/Namespaced
    scope: "AZ"
    annotations: {}
    clusterIP: ""
    ## Sets the Service's externalTrafficPolicy
    externalTrafficPolicy: ""
    app: "yb-master"
    loadBalancerIP: ""
    ports:
      http-ui: "7000"

  - name: "yb-tserver-service"
    type: LoadBalancer
    # Can be AZ/Namespaced
    scope: "AZ"
    annotations: {}
    clusterIP: ""
    ## Sets the Service's externalTrafficPolicy
    externalTrafficPolicy: ""
    app: "yb-tserver"
    loadBalancerIP: ""
    ports:
      tcp-yql-port: "9042"
      tcp-yedis-port: "6379"
      tcp-ysql-port: "5433"
For services without an explicitly defined scope in Helm overrides, the default service scope (Namespaced) is used, provided you set the Default service scope for K8s universe Global runtime configuration option (config key yb.universe.default_service_scope_for_k8s) to true. The configuration flag defines the default service scope for the universe if the scope is not explicitly defined in the service overrides.
Refer to Manage runtime configuration settings. Note that only a Super Admin user can modify Global runtime configuration settings, and you cannot modify this service scope during universe creation.
Keep in mind the following:
- Scope Utilization: Services with a defined scope will adhere to that scope, as long as it's supported.
- Namespaced scope: For Namespaced-scoped services, a service lifecycle is tied to the lifecycle of the universe.
- Namespace deletion: When a namespace is deleted, all services associated with that namespace that were created by Helm are removed as well.
- Service configuration changes: Existing services can have their serviceType, ports, and annotations updated.
Migrating service type from AZ to Namespaced scope
After creating a service scope, you can't change it directly. To migrate a service from an AZ scope to a Namespaced scope, do the following:
- Create a new service: Use Helm overrides to add a new service with the desired Namespaced scope.
- Migrate clients. Gradually switch clients over to the new Namespaced service to ensure they function correctly without disrupting operations.
- Remove the old Service. After confirming that all clients are using the new service, update the Helm overrides again to remove the old AZ scoped service.
Limitations
- Unsupported in YugabyteDB Helm chart versions before v2024.2.
- Unsupported for upgrading universes created prior to v2.18.6.0 and v2.20.2.0.
- Enable exposing service is disabled.
Examples
To create a universe with Namespaced scope services by default, do the following:
-
Set the Default service scope for K8s universe Global runtime configuration option (config key
yb.universe.default_service_scope_for_k8s) to true. -
When you configure Helm overrides, use serviceEndpoint overrides without explicitly defining scope, or define scope as "Namespaced":
serviceEndpoints:
  - name: "yb-master-ui"
    type: LoadBalancer
    annotations: {}
    clusterIP: ""
    ## Sets the Service's externalTrafficPolicy
    externalTrafficPolicy: ""
    app: "yb-master"
    loadBalancerIP: ""
    ports:
      http-ui: "7000"
Note that irrespective of the default scope, you can add any scope to the services using Helm overrides, provided that the database version supports the scope.
For example, if you create a universe that has "AZ" as the default scope, you can add a "Namespaced" scope as follows:
serviceEndpoints:
  - name: "yb-tserver-service"
    type: LoadBalancer
    annotations: {}
    clusterIP: ""
    ## Sets the Service's externalTrafficPolicy
    externalTrafficPolicy: ""
    app: "yb-tserver"
    loadBalancerIP: ""
    ports:
      tcp-yql-port: "9042"
      tcp-yedis-port: "6379"
      tcp-ysql-port: "5433"
  - name: "yb-tserver-service-ns"
    type: LoadBalancer
    # Can be AZ/Namespaced
    scope: "Namespaced"
    annotations: {}
    clusterIP: ""
    ## Sets the Service's externalTrafficPolicy
    externalTrafficPolicy: ""
    app: "yb-tserver"
    loadBalancerIP: ""
    ports:
      tcp-yql-port: "9042"
      tcp-yedis-port: "6379"
      tcp-ysql-port: "5433"