Cloud prerequisites
Create a new security group (optional)
In order to access YugabyteDB Anywhere from outside the AWS environment, you would need to enable access by assigning an appropriate security group to the server hosting YugabyteDB Anywhere. At a minimum, you need to be able to do the following:
- Access the YugabyteDB Anywhere instance over SSH (port
tcp:22). - Check, manage, and upgrade YugabyteDB Anywhere (port
tcp:8800) (Replicated installations only). - View the YugabyteDB Anywhere UI (port
tcp:80ortcp:443).
If you are using your own Virtual Private Cloud (VPC) as a self-managed configuration, the following additional TCP ports must be accessible: 7000, 7100, 9000, 9100, 18018, 11000, 12000, 13000, 9300, 9042, 5433, 6379, 54422. For more information on ports used by YugabyteDB, refer to Default ports.
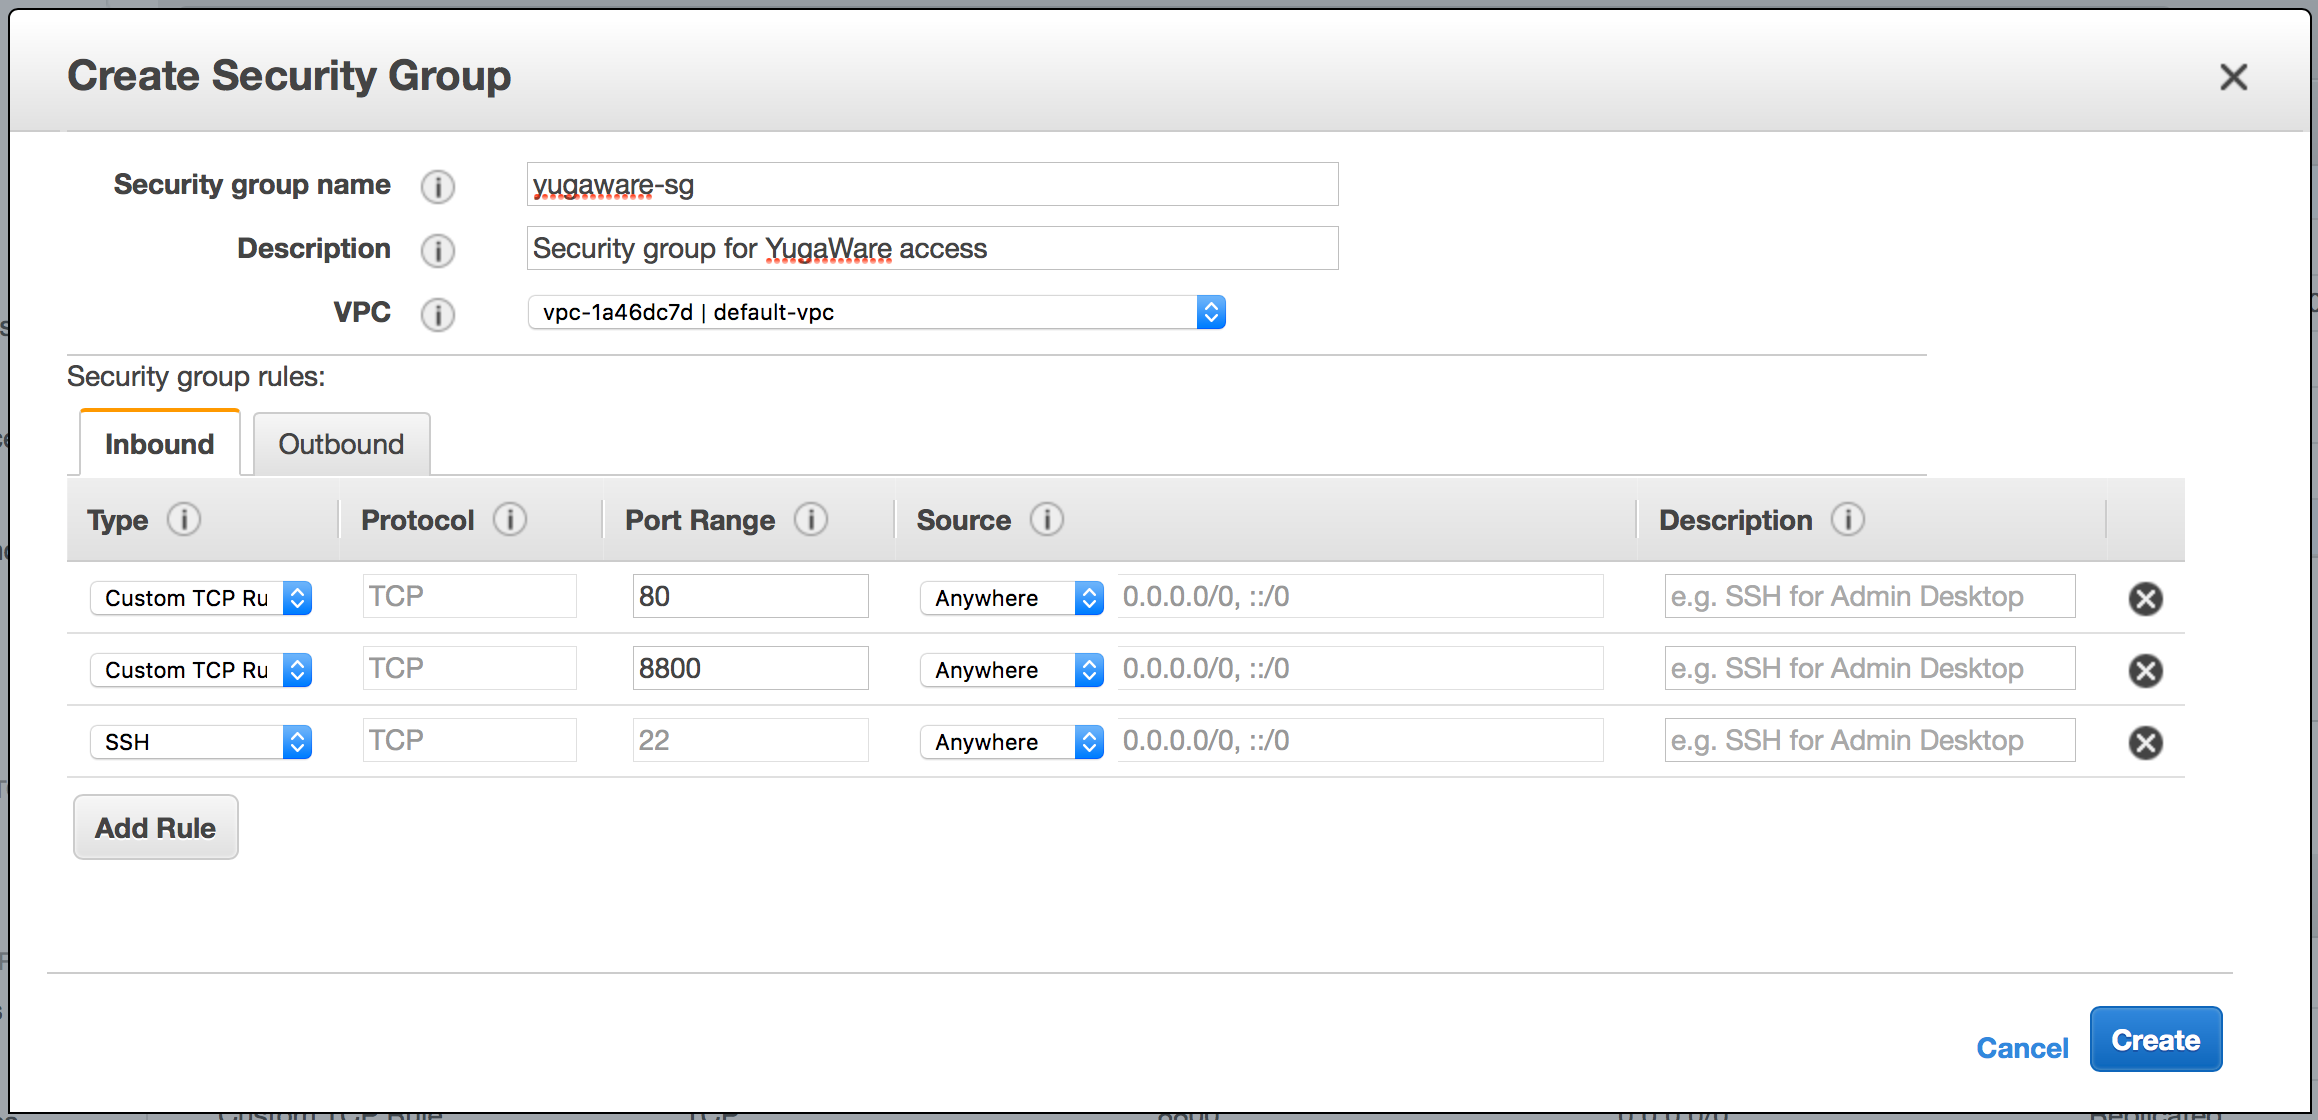
To create a security group that enables these, use the Amazon console to navigate to EC2 > Security Groups, click Create Security Group, and then add the following values:
-
Enter a meaningful name (for example,
yugaware-sg). -
Add a description (for example, Security group for YugabyteDB Anywhere access).
-
Add the appropriate IP addresses to the Source field. To allow access from any computer, add
0.0.0.0/0but note that this is not very secure. -
Add the ports 22, 8800 (Replicated installations only), and 80 or 443 to the Port Range field. The Protocol selected must be TCP.
For a self-managed configuration, also add the previously listed TCP ports.
You should see a configuration similar to the one shown in the following illustration:

Create an IAM role (optional)
To manage YugabyteDB nodes, YugabyteDB Anywhere requires limited access to your AWS infrastructure. To grant the required access, you can provide a set of credentials when configuring the AWS provider, as described in Configure the AWS cloud provider.
Alternatively, the EC2 instance where the YugabyteDB Anywhere will be running can be brought up with an IAM role with enough permissions to take all the actions required by YugabyteDB Anywhere. The following is a sample of such a role:
{
    "Version": "2012-10-17",
    "Statement": [
        {
            "Sid": "VisualEditor0",
            "Effect": "Allow",
            "Action": [
                "ec2:AttachVolume",
                "ec2:AuthorizeSecurityGroupIngress",
                "ec2:ImportVolume",
                "ec2:ModifyVolumeAttribute",
                "ec2:DescribeInstances",
                "ec2:DescribeInstanceAttribute",
                "ec2:CreateKeyPair",
                "ec2:DescribeVolumesModifications",
                "ec2:DeleteVolume",
                "ec2:DescribeVolumeStatus",
                "ec2:StartInstances",
                "ec2:DescribeAvailabilityZones",
                "ec2:DescribeVolumes",
                "ec2:ModifyInstanceAttribute",
                "ec2:DescribeKeyPairs",
                "ec2:DescribeInstanceStatus",
                "ec2:DetachVolume",
                "ec2:ModifyVolume",
                "ec2:TerminateInstances",
                "ec2:AssignIpv6Addresses",
                "ec2:ImportKeyPair",
                "ec2:DescribeTags",
                "ec2:CreateTags",
                "ec2:RunInstances",
                "ec2:AssignPrivateIpAddresses",
                "ec2:StopInstances",
                "ec2:AllocateAddress",
                "ec2:DescribeVolumeAttribute",
                "ec2:DescribeSecurityGroups",
                "ec2:CreateVolume",
                "ec2:EnableVolumeIO",
                "ec2:DescribeImages",
                "ec2:DescribeVpcs",
                "ec2:DeleteSecurityGroup",
                "ec2:DescribeSubnets",
                "ec2:DeleteKeyPair",
                "ec2:DescribeVpcPeeringConnections",
                "ec2:DescribeRouteTables",
                "ec2:DescribeInternetGateways",
                "ec2:GetConsoleOutput",
                "ec2:CreateSnapshot",
                "ec2:DeleteSnapshot",
                "ec2:DescribeInstanceTypes"
            ],
            "Resource": "*"
        }
    ]
}
Note that if you will be using YugabyteDB Anywhere to create a VPC on AWS (this feature is Beta, see Configure the AWS cloud provider) rather than use a VPC you have already configured, the role requires the following additional permissions:
                "ec2:CreateSecurityGroup",
                "ec2:AssociateRouteTable",
                "ec2:AttachInternetGateway",
                "ec2:CreateInternetGateway",
                "ec2:CreateRoute",
                "ec2:CreateSubnet",
                "ec2:CreateVpc",
                "ec2:CreateVpcPeeringConnection",
                "ec2:AcceptVpcPeeringConnection",
                "ec2:DisassociateRouteTable",
                "ec2:ModifyVpcAttribute",
Provision an instance for YugabyteDB Anywhere
You need to create an instance to run the YugabyteDB Anywhere server. To do this, navigate to EC2 > Instances, click Launch Instance, and enter the following values:
-
Change the boot disk image to Ubuntu Server 16.04, as shown in the following illustration:

-
Select c5.xlarge as the instance type (4 vCPUs are recommended for production).
-
Define the VPC, subnet, and other settings as required.
Ensure that Auto-assign Public IP is enabled (if it is disabled, the instance would not be accessible from outside AWS).
If you created an IAM role, as described in Create an IAM role, or already had the IAM role that you would like to use, include this information under IAM role. See Deploy the YugabyteDB universe using an IAM role for more information.
-
If you are operating YBA and deploying universes in airgapped mode, create endpoints (VPC > Endpoints) for EC2, S3 (for backup), and KMS (for encryption at rest) services so that they can connect through the internal network.
-
Increase the root storage volume size to at least 100GiB.
-
Add a tag to name the instance. You can set key to
Nameand value toyugaware-1. -
Select the
yugaware-sgsecurity group created in the previous step (or the custom name you chose when setting up the security groups), and then launch the instance. -
Pick an existing key pair or create a new one in order to access the instance.
Ensure that you have the SSH access key because it is required for enabling
sshaccess to the computer. In this example, assume that the key pair is~/.ssh/yugaware.pem. -
Click Launch to launch the YugabyteDB Anywhere server.
You should see an instance being created, as shown in the following illustration:

Deploy the YugabyteDB universe using an IAM role
If you are planning to use an IAM role while deploying the universe in your AWS account, you need to attach the IAM role to the YugabyteDB Anywhere VM before launching the instance, as follows:
-
Navigate to EC2 > New Instance > Confirm Instance Details > Attach the IAM role.
-
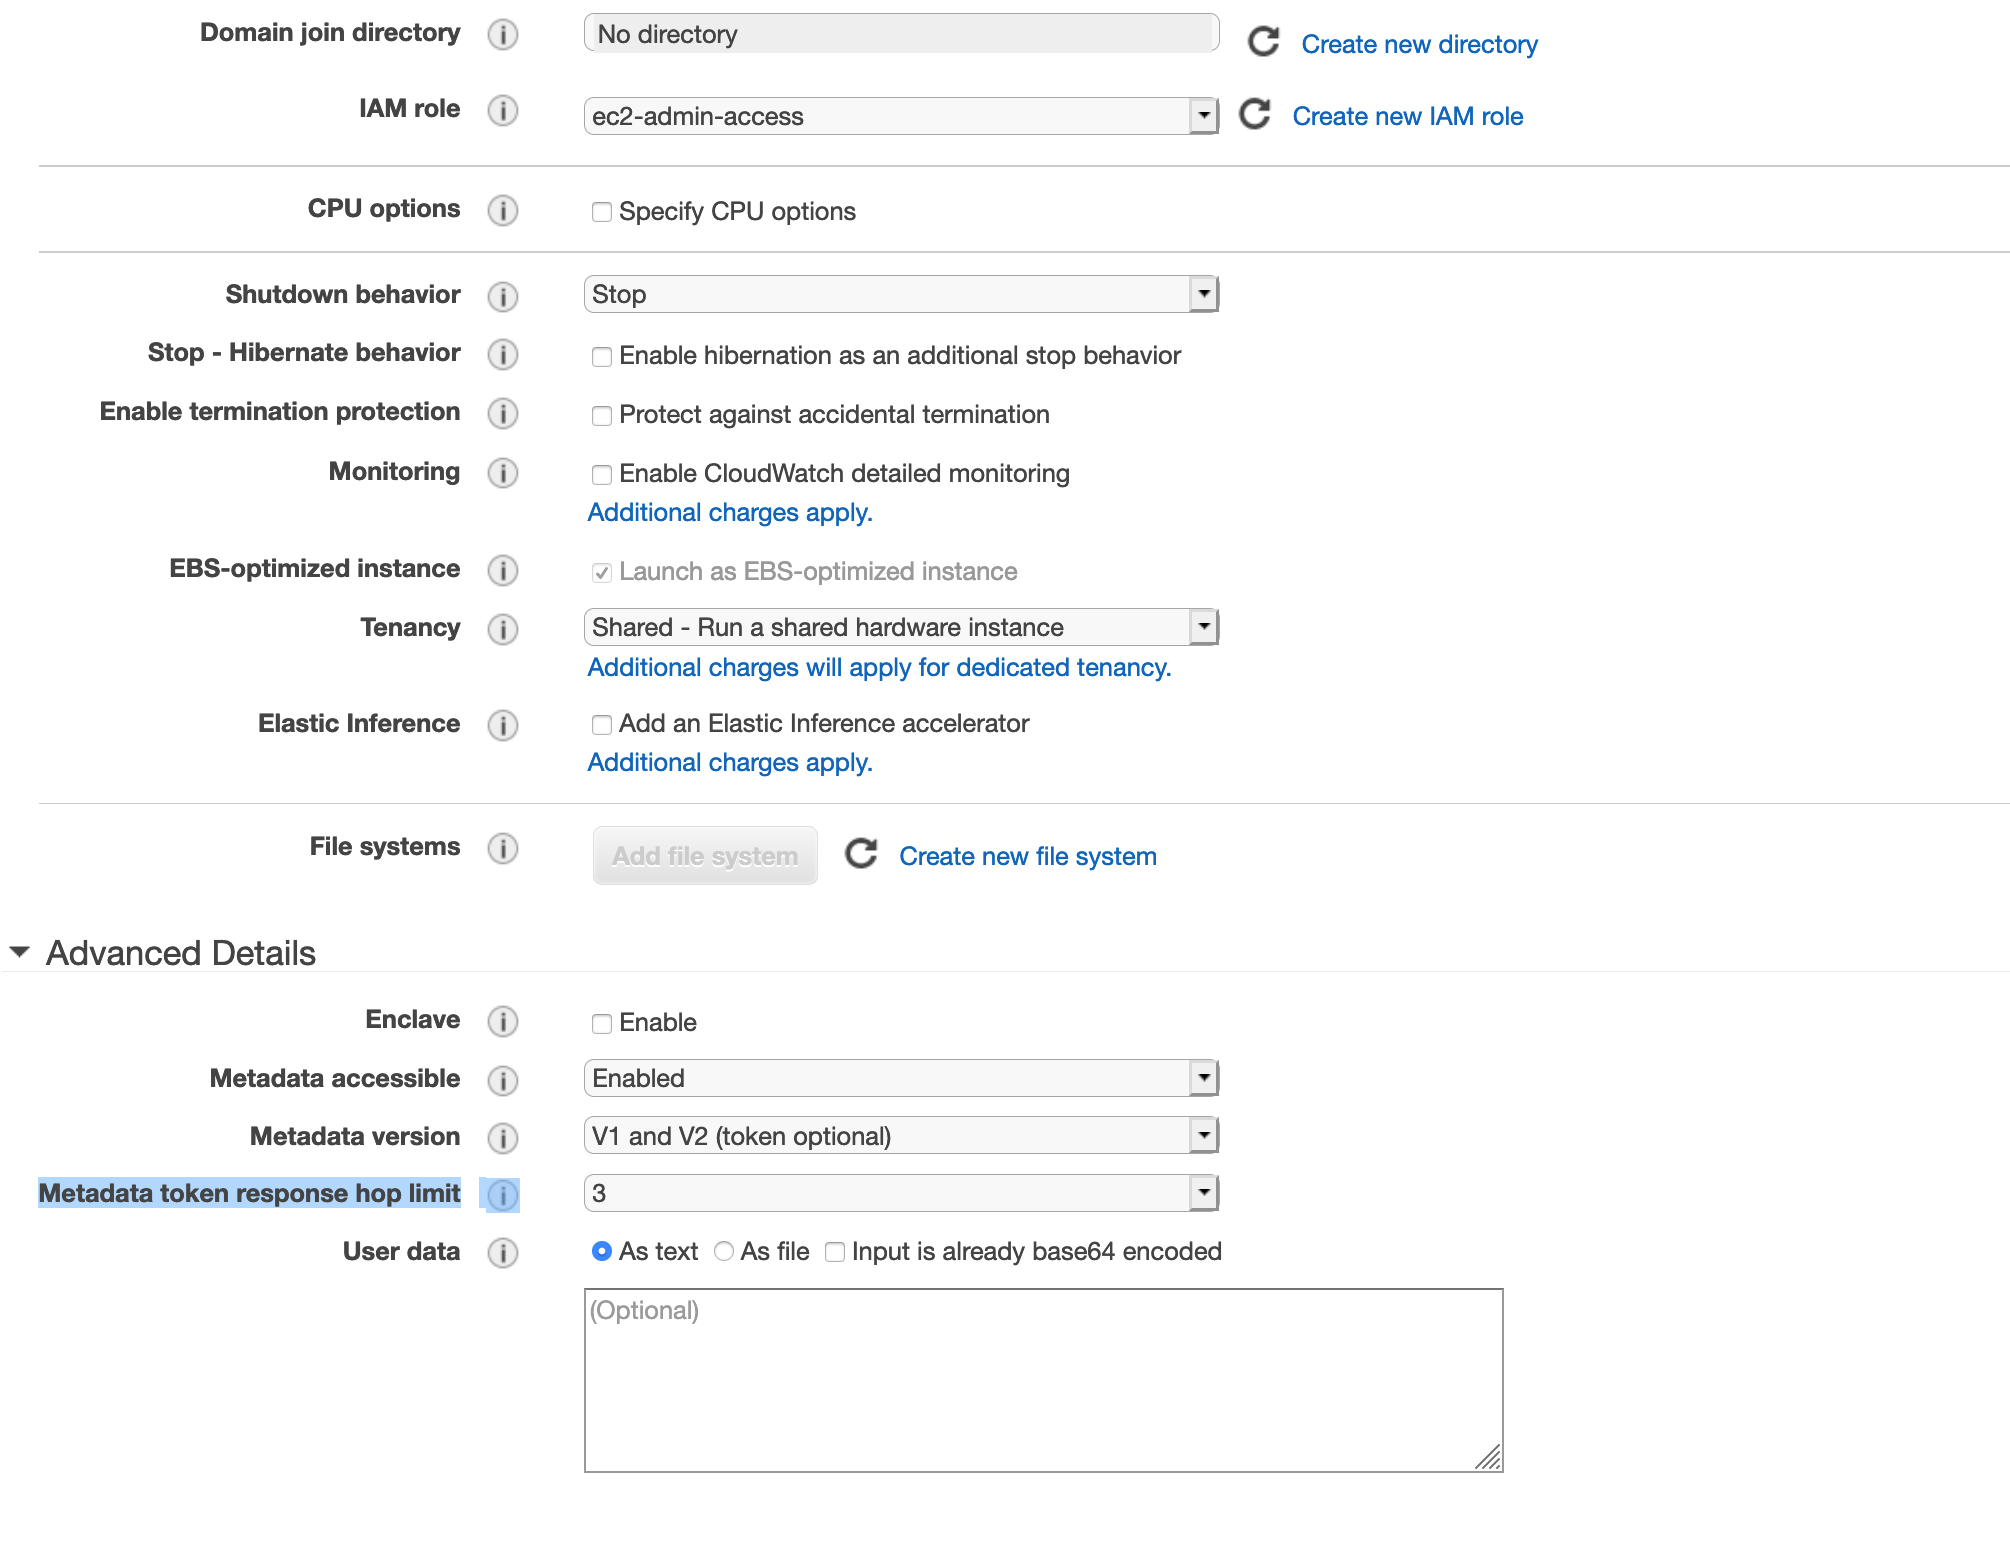
Set the IAM role field to your IAM role (for example, ec2-admin-access).
-
Set the Metadata accessible field to Enabled.
-
Set the Metadata version field to V1 and V2 (token optional).
-
Set the Metadata token response hop limit field to 3, as per the following illustration:

If you are configuring an existing instance of YugabyteDB Anywhere, start by attaching the IAM role as follows:
- Navigate to EC2 > Instances.
- Select the instance.
- Navigate to Actions > Security > Modify IAM role.
- Add the IAM role.
- Click Save.
Finally, execute the following command to change metadata options (replace NNNNNNN with the instance ID and us-west-2 with the region in which this EC2 VM is deployed):
aws ec2 modify-instance-metadata-options --instance-id i-NNNNNNN --http-put-response-hop-limit 3 --http-endpoint enabled --region us-west-2
For more information, see Configure the instance metadata service.